Android中常用的5大布局方式有以下几种: 线性布局(LinearLayout):按照垂直或者水平方向布局的组件。 帧布局(FrameLayout):组件从屏幕左上方布局
Android中常用的5大布局方式有以下几种:
线性布局(LinearLayout):按照垂直或者水平方向布局的组件。
帧布局(FrameLayout):组件从屏幕左上方布局组件。
表格布局(TableLayout):按照行列方式布局组件。
相对布局(RelativeLayout):相对其它组件的布局方式。
绝对布局(AbsoluteLayout):按照绝对坐标来布局组件。
1. 线性布局
线性布局是Android开发中最常见的一种布局方式,它是按照垂直或者水平方向来布局,通过“android:orientation”属性可以设置线性布局的方向。属性值有垂直(vertical)和水平(horizontal)两种。
常用的属性:
android:orientation:可以设置布局的方向
android:gravity:用来控制组件的对齐方式
layout_weight:控制各个组件在布局中的相对大小
第一个实例
①效果图:

②核心代码如下:
main.xml
<?xml version="1.0" encoding="utf-8"?>
<LinearLayout xmlns:android="Http://schemas.android.com/apk/res/android"
 android:orientation="vertical"
 android:layout_width="fill_parent"
 android:layout_height="fill_parent"
 >
 <LinearLayout
 android:layout_width="fill_parent"
 android:layout_height="wrap_content"
 android:orientation="vertical"
 >
 <EditText
  android:layout_width="fill_parent"
  android:layout_height="wrap_content"
  />
 </LinearLayout>
 <LinearLayout
 android:layout_width="fill_parent"
 android:layout_height="wrap_content"
 android:orientation="horizontal"
 android:gravity="right"
 >
 <!-- android:gravity="right"表示Button组件向右对齐 -->
 <Button
  android:layout_height="wrap_content"
  android:layout_width="wrap_content"
  android:text="确定"
  />
 <Button
  android:layout_height="wrap_content"
  android:layout_width="wrap_content"
  android:text="取消"
  />
 </LinearLayout>
</LinearLayout>
第二个实例
①效果图:

②核心代码:
mian.xml
<?xml version="1.0" encoding="utf-8"?>
<LinearLayout xmlns:android="http://schemas.android.com/apk/res/android"
 android:orientation="vertical" android:layout_width="fill_parent"
 android:layout_height="fill_parent">
 <LinearLayout
 android:orientation="horizontal"
 android:layout_width="fill_parent"
 android:layout_height="fill_parent"
 android:layout_weight="1">
 <TextView
 android:text="red"
 android:gravity="center_horizontal"
 android:background="#aa0000"
 android:layout_width="wrap_content"
 android:layout_height="fill_parent"
 android:layout_weight="1"
 />
 <!--android:gravity="center_horizontal"水平居中 -->
 <!--layout_weight属性以控制各个控件在布局中的相对大小。layout_weight属性是一个非负整数值。
  线性布局会根据该控件layout_weight值与其所处布局中所有控件layout_weight值之和的比值为该控件分配占用的区域。
 例如,在水平布局的LinearLayout中有两个Button,这两个Button的layout_weight属性值都为1,
 那么这两个按钮都会被拉伸到整个屏幕宽度的一半。如果layout_weight指为0,控件会按原大小显示,不会被拉伸;
 对于其余layout_weight属性值大于0的控件,系统将会减去layout_weight属性值为0的控件的宽度或者高度,
 再用剩余的宽度或高度按相应的比例来分配每一个控件显示的宽度或高度-->
 <TextView
 android:text="Teal"
 android:gravity="center_horizontal"
 android:background="#008080"
 android:layout_width="wrap_content"
 android:layout_height="fill_parent"
 android:layout_weight="1"/>
 <TextView
 android:text="blue"
 android:gravity="center_horizontal"
 android:background="#0000aa"
 android:layout_width="wrap_content"
 android:layout_height="fill_parent"
 android:layout_weight="1"
 />
 <TextView
 android:text="orange"
 android:gravity="center_horizontal"
 android:background="#FFA500"
 android:layout_width="wrap_content"
 android:layout_height="fill_parent"
 android:layout_weight="1"
 />
 </LinearLayout>
 <LinearLayout
 android:orientation="vertical"
 android:layout_width="fill_parent"
 android:layout_height="fill_parent"
 android:layout_weight="1">
 <TextView
 android:text="row one"
 android:textSize="15pt"
 android:background="#aa0000"
 android:layout_width="fill_parent"
 android:layout_height="wrap_content"
 android:layout_weight="1"
 />
 <!-- -->
 <TextView
 android:text="row two"
 android:textSize="15pt"
 android:background="#DDA0DD"
 android:layout_width="fill_parent"
 android:layout_height="wrap_content"
 android:layout_weight="1"
 />
 <TextView
 android:text="row three"
 android:textSize="15pt"
 android:background="#008080"
 android:layout_width="fill_parent"
 android:layout_height="wrap_content"
 android:layout_weight="1"
 />
 <TextView
 android:text="row four"
 android:textSize="15pt"
 android:background="#FFA500"
 android:layout_width="fill_parent"
 android:layout_height="wrap_content"
 android:layout_weight="1"
 />
 </LinearLayout>
</LinearLayout>
2. 帧布局
帧布局是从屏幕的左上角(0,0)坐标开始布局,多个组件层叠排列,第一个添加的组件放到最底层,最后添加到框架中的视图显示在最上面。上一层的会覆盖下一层的控件。
简单的例子
①效果图:

② 核心代码:
main.xml
<?xml version="1.0" encoding="utf-8"?>
<FrameLayout xmlns:android="http://schemas.android.com/apk/res/android"
 android:layout_width="fill_parent"
 android:layout_height="fill_parent"
 >
 <TextView
 android:layout_width="300dp"
 android:layout_height="300dp"
 android:background="#00BFFF"
 />
 <TextView
 android:layout_width="260dp"
 android:layout_height="260dp"
 android:background="#FFC0CB"
 />
 <TextView
 android:layout_width="220dp"
 android:layout_height="220dp"
 android:background="#0000FF"
 />
</FrameLayout>
3.表格布局
表格布局是一个ViewGroup以表格显示它的子视图(view)元素,即行和列标识一个视图的位置。
表格布局常用的属性如下:
android:collapseColumns:隐藏指定的列
android:shrinkColumns:收缩指定的列以适合屏幕,不会挤出屏幕
android:stretchColumns:尽量把指定的列填充空白部分
android:layout_column:控件放在指定的列
android:layout_span:该控件所跨越的列数
简单的列子:
①效果图:

② 核心代码:
main.xml
<?xml version="1.0" encoding="utf-8"?>
<TableLayout xmlns:android="http://schemas.android.com/apk/res/android"
 android:layout_width="fill_parent"
 android:layout_height="fill_parent"
 >
 <TableRow>
 <Button
  android:text="Button1"
  />
 <Button
  android:text="Button2"
  />
 <Button
  android:text="Button3"
  />
 </TableRow>
 <TableRow>
 <Button
  android:text="Button4"
  />
 <Button
  android:layout_span="2"
  android:text="Button5"
  />
 </TableRow>
</TableLayout>
4.相对布局
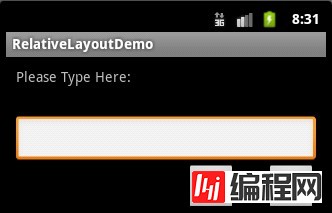
相对布局是按照组件之间的相对位置来布局,比如在某个组件的左边,右边,上面和下面等。
相对布局常用属性请参考我博客的://www.jb51.net/article/47434.htm
简单的例子
①效果图:

② 核心代码:
main.xml
<?xml version="1.0" encoding="utf-8"?>
<RelativeLayout xmlns:android="http://schemas.android.com/apk/res/android"
 android:layout_width="fill_parent"
 android:layout_height="wrap_content"
 android:padding="10px"
 >
 <TextView
 android:id="@+id/tev1"
 android:layout_width="wrap_content"
 android:layout_height="wrap_content"
 android:layout_marginBottom="30dp"
 android:text="Please Type Here:"
 />
 <EditText
 android:id="@+id/tx1"
 android:layout_width="match_parent"
 android:layout_height="wrap_content"
 android:layout_below="@id/tev1"
 />
 <Button
 android:id="@+id/btn1"
 android:layout_height="wrap_content"
 android:layout_width="wrap_content"
 android:layout_below="@id/tx1"
 android:layout_alignParentRight="true"
 android:text="确定"
 />
 <Button
 android:id="@+id/btn2"
 android:layout_height="wrap_content"
 android:layout_width="wrap_content"
 android:layout_below="@id/tx1"
 android:layout_toLeftOf="@id/btn1"
 android:layout_marginRight="30dp"
 android:text="取消"
 />
</RelativeLayout>
5. 绝对布局
绝对布局通过指定子组件的确切X,Y坐标来确定组件的位置,在Android2.0 api文档中标明该类已经过期,可以使用FrameLayout或者RelativeLayout来代替。所以这里不再详细介绍。
以上就是对 Android 五大布局的资料整理,后续继续补充相关资料,谢谢大家对本站的支持!
您可能感兴趣的文章:Android RefreshLayout实现下拉刷新布局探究Android中ListView复用导致布局错乱的解决方案Android ListView自动显示隐藏布局的实现方法Android RecyclerView加载不同布局简单实现Android实现气泡布局/弹窗效果 气泡尖角方向及偏移量可控Android动画效果之自定义ViewGroup添加布局动画(五)Android实现的ListView分组布局改进示例Android布局实现圆角边框效果Android 动态改变布局实例详解
--结束END--
本文标题: Android 五大布局方式详解
本文链接: https://lsjlt.com/news/23990.html(转载时请注明来源链接)
有问题或投稿请发送至: 邮箱/279061341@qq.com QQ/279061341
2024-01-21
2023-10-28
2023-10-28
2023-10-27
2023-10-27
2023-10-27
2023-10-27
回答
回答
回答
回答
回答
回答
回答
回答
回答
回答
0