目录 一:ORM 操作 MySQL 1. 创建 Spring Boot 项目 2. @MapperScan 3. mapper文件和java代码分开管理 4. 事务支持 一:ORM 操作 Mysql 使用mybatis框架操作数
目录
使用mybatis框架操作数据, 在SpringBoot框架集成MyBatis,使用步骤:
(1)mybatis起步依赖 : 完成mybatis对象自动配置, 对象放在容器中
(2)pom.xml 指定把src/main/java目录中的xml文件包含到classpath中
(3)创建实体类Student
(4)创建Dao接口 StudentDao , 创建一个查询学生的方法
(5)创建Dao接口对应的Mapper文件, xml文件, 写sql语句
(6)创建Service层对象, 创建StudentService接口和它的实现类。 去dao对象的方法,完成数据库的操作
(7)创建Controller对象,访问Service。
(1)准备数据库表
字段及其类型

插入数据

(2)创建一个springBoot项目
选择Spring WEB依赖

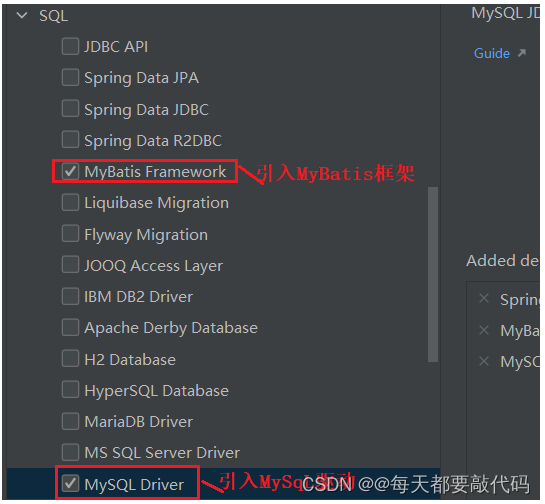
MybatisFramework依赖、mysql Driver依赖

(3)生成的pom.xml配置和手动添加的resource插件配置
注:resource插件配置是表示将src/java/main下的或者说子包下的*.xml配置文件最终加载到target/classes目录下。
4.0.0 org.springframework.boot spring-boot-starter-parent 2.7.9 com.zl study-springboot-mysql 0.0.1-SNAPSHOT 1.8 org.springframework.boot spring-boot-starter-web org.mybatis.spring.boot mybatis-spring-boot-starter 2.3.0 com.mysql mysql-connector-j runtime org.springframework.boot spring-boot-starter-test test src/main/java ***.properties ***.xml ***.xml **/*.properties generatorConfig.xml配置
双击插件,执行结果如下:

第三步:编写application.properties配置
注:如果StudentMapper.xml的目录与StudentMapper目录保持一致,就不需要以下这个配置mybatis.mapper-locations=classpath:mapper/*.xml;这里我们是自己定义的mapper目录,把mapper.xml文件放进去了,所以需要我们指定出来它的位置!
#设置端口server.port=8082#配置项目根路径context-pathserver.servlet.context-path=/myboot#配置数据库spring.datasource.driver-class-name=com.mysql.cj.jdbc.Driverspring.datasource.url=jdbc:mysql://localhost:3306/springboot?useUnicode=true&characterEncoding=UTF-8&serverTimezone=GMT%2B8spring.datasource.username=rootspring.datasource.passWord=123#配置mybatismybatis.mapper-locations=classpath:mapper/*.xml#配置日志mybatis.configuration.log-impl=org.apache.ibatis.logging.stdout.StdOutImpl第四步:编写service接口和实现类
StudentService接口
package com.zl.service;import com.zl.pojo.Student;public interface StudentService { int addStudent(Student student);}StudentService接口的实现类StudentServiceImpl
package com.zl.service.impl;import com.zl.mapper.StudentMapper;import com.zl.pojo.Student;import com.zl.service.StudentService;import org.springframework.stereotype.Service;import org.springframework.transaction.annotation.Transactional;import javax.annotation.Resource;@Service // 交给Spring容器管理public class StudentServiceImpl implements StudentService { @Resource // 属性赋值 private StudentMapper studentDao; @Transactional // 事务控制 @Override public int addStudent(Student student) { System.out.println("准备执行sql语句"); int count = studentDao.insert(student); System.out.println("已完成sql语句的执行"); // 模拟异常,回滚事务 int sum = 10 / 0; return count; }}第五步:编写controller类去调用service
package com.zl.controller;import com.zl.pojo.Student;import com.zl.service.StudentService;import org.springframework.stereotype.Controller;import org.springframework.web.bind.annotation.RequestMapping;import org.springframework.web.bind.annotation.ResponseBody;import javax.annotation.Resource;@Controllerpublic class StudentController { @Resource private StudentService studentService; @RequestMapping("/addStudent") @ResponseBody public String addStudent(String name,Integer age){ Student s = new Student(); s.setName(name); s.setAge(age); int count = studentService.addStudent(s); return "添加的Student个数是:"+count; }}第六步:在启动类上面加上包扫描注解和启动事务管理器注解
package com.zl;import org.mybatis.spring.annotation.MapperScan;import org.springframework.boot.SpringApplication;import org.springframework.boot.autoconfigure.SpringBootApplication;import org.springframework.transaction.annotation.EnableTransactionManagement;@SpringBootApplication@MapperScan(basePackages = "com.zl.mapper") // 添加包扫描@EnableTransactionManagement // 启动事务管理器public class Application { public static void main(String[] args) { SpringApplication.run(Application.class, args); }}第七步:进行测试
有异常发生,会回滚事务,无法插入数据

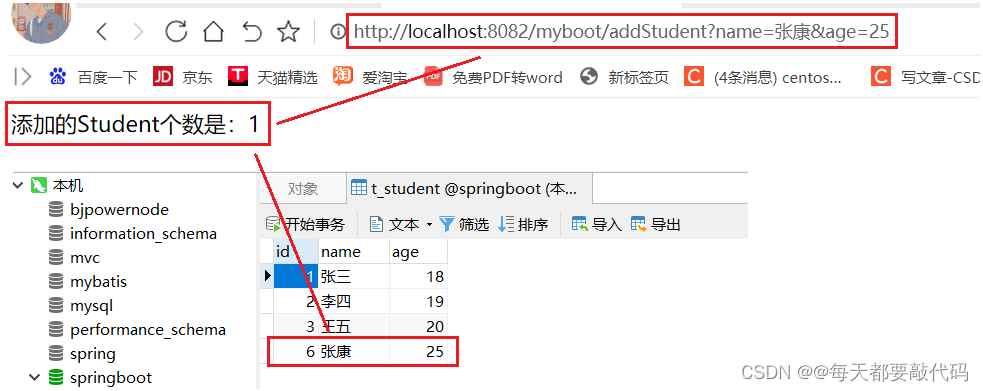
无异常发生,正常插入数据

来源地址:https://blog.csdn.net/m0_61933976/article/details/129344765
--结束END--
本文标题: 【SpringBoot】| ORM 操作 MySQL(集成MyBatis)
本文链接: https://lsjlt.com/news/404704.html(转载时请注明来源链接)
有问题或投稿请发送至: 邮箱/279061341@qq.com QQ/279061341
2024-10-23
2024-10-22
2024-10-22
2024-10-22
2024-10-22
2024-10-22
2024-10-22
2024-10-22
2024-10-22
2024-10-22
回答
回答
回答
回答
回答
回答
回答
回答
回答
回答
0