摘要:本节主要来讲解Android10.0 Binder中如何使用aiDL 阅读本文大约需要花费20分钟。 文章首发微信公众号:IngresGe 专注于Android系统级源码
摘要:本节主要来讲解Android10.0 Binder中如何使用aiDL
阅读本文大约需要花费20分钟。
文章首发微信公众号:IngresGe
专注于Android系统级源码分析,Android的平台设计,欢迎关注我,谢谢!
[Android取经之路] 的源码都基于Android-Q(10.0) 进行分析
[Android取经之路] 系列文章:
《系统启动篇》
Android系统架构 Android是怎么启动的 Android 10.0系统启动之init进程 Android10.0系统启动之ZyGote进程 Android 10.0 系统启动之SystemServer进程 Android 10.0 系统服务之ActivityMnagerService Android10.0系统启动之Launcher(桌面)启动流程 Android10.0应用进程创建过程以及Zygote的fork流程 Android 10.0 PackageManagerService(一)工作原理及启动流程 Android 10.0 PackageManagerService(二)权限扫描 Android 10.0 PackageManagerService(三)APK扫描 Android 10.0 PackageManagerService(四)APK安装流程《日志系统篇》
Android10.0 日志系统分析(一)-logd、loGCat 指令说明、分类和属性 Android10.0 日志系统分析(二)-logd、logcat架构分析及日志系统初始化 Android10.0 日志系统分析(三)-logd、logcat读写日志源码分析 Android10.0 日志系统分析(四)-selinux、kernel日志在logd中的实现《Binder通信原理》:
Android10.0 Binder通信原理(一)Binder、HwBinder、VndBinder概要 Android10.0 Binder通信原理(二)-Binder入门篇 Android10.0 Binder通信原理(三)-ServiceManager篇 Android10.0 Binder通信原理(四)-Native-C\c++实例分析 Android10.0 Binder通信原理(五)-Binder驱动分析 Android10.0 Binder通信原理(六)-Binder数据如何完成定向打击 Android10.0 Binder通信原理(七)-Framework binder示例 Android10.0 Binder通信原理(八)-Framework层分析 Android10.0 Binder通信原理(九)-AIDL Binder示例 Android10.0 Binder通信原理(十)-AIDL原理分析-Proxy-Stub设计模式 0.什么是AIDLAIDL:Android Interface Definition Language,即Android接口定义语言。
Android系统中的进程之间不能共享内存,因此,需要提供一些机制在不同进程之间进行数据通信。为了使其他的应用程序也可以访问本应用程序提供的服务,Android系统采用了远程过程调用(Remote Procedure Call,rpc)方式来实现。与很多其他的基于RPC的解决方案一样,Android使用一种接口定义语言(Interface Definition Language,IDL)来公开服务的接口。我们知道4个Android应用程序组件中的3个(Activity、BroadcastReceiver和ContentProvider)都可以进行跨进程访问,另外一个Android应用程序组件Service同样可以。因此,可以将这种可以跨进程访问的服务称为AIDL(Android Interface Definition Language)服务。
下面将通过一个示例来说明两个APP之间的AIDL通信。
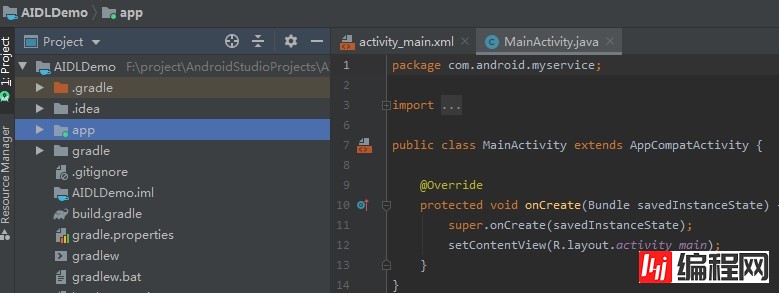
1.工程环境准备1)通过Android Studio 首先创建一个项目 New Project ->Empty Activity,Name:AIDLDemo, Pakcage:com.android.myservice ,用作Server
2)在项目中再创建一个Module,用来做Client, 在项目文件上 右键 ->New-> Module -> Phone & Tablet Module, 名称填client -> Empty Activity

3)这样Server和Client的两个环境就准备好了
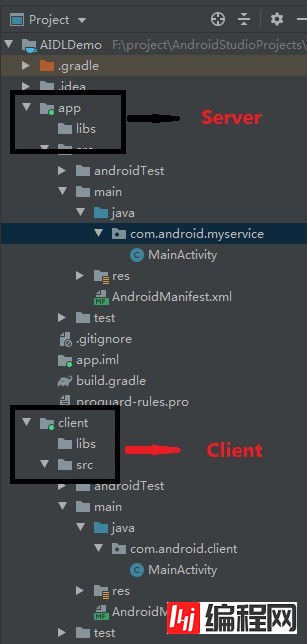
接下来开始填代码
2.服务端设计 2.1 创建一个AIDL 文件 IMyService在服务的文件夹app 中,执行下面的步骤:
右键 -> New -> AIDL->AIDL File, 名称为IMyService

AIDL创建完成
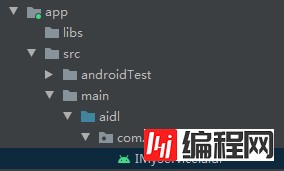
填入一个add的函数,我们用来做加法计算:
Code:
// IMyService.aidl
package com.android.myservice;
// Declare any non-default types here with import statements
interface IMyService {

    void basicTypes(int anInt, long aLong, boolean aBoolean, float aFloat,
            double aDouble, String aString);
    int add(int num1, int num2);
}
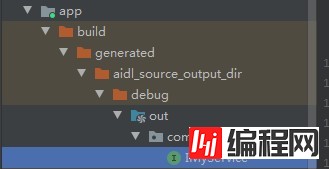
选择 Build -> Make Module "app",会把AIDL进行编译,会自动生成IMyService 这个服务接口,其中实现了stub、proxy的class,以及TRANSACTION的code,用来通信处理
在Framework层我们还可以使用addService进行服务注册,但是在应用层,我们不具备相应的权限,只能通过集成Service,开放Service,让Client进行bind。
在JAVA->com.android.myservice 上新建一个Java Class---MyService

package com.android.myservice;
import android.app.Service;
import android.content.Intent;
import android.os.IBinder;
import android.os.RemoteException;
import android.util.Log;
public class MyService extends Service {
static final String TAG = "MyTestService";
//服务实体
    IMyService.Stub mStub = new IMyService.Stub() {
        @Override
        public void basicTypes(int anInt, long aLong, boolean aBoolean, float aFloat, double aDouble, String aString) throws RemoteException {
        }
        @Override
        public int add(int num1, int num2) throws RemoteException {
            Log.d(TAG,"add");
            //服务的接口实现,这里做一个加法运算
            return num1 + num2;
        }
    };
    @Override
    public void onCreate() {
        super.onCreate();
        Log.d(TAG, "onCreate");
    }
    @Override
    public IBinder onBind(Intent intent) {
        Log.d(TAG,"onBind");
        return mStub;//通过ServiceConnection在activity中拿到MyService
    }
}在AndroidManifest.xml中配上Service的信息,其中enable:ture设置可用,exported:ture对外暴露, 这样其他的Activity才能访问。
执行编译,服务端准备完成,编译一个APK进入手机\模拟器
3.Client端设计 3.1 AIDL拷贝把服务端的AIDL以及包目录完整的拷贝到client的mian目录下,让Client和Server的服务对象对等。
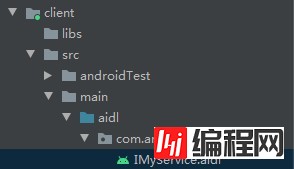
接着执行编译 Build-> Make Module "Client",对应的IMyService.java也在client中编译出来
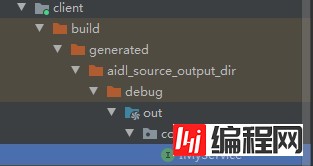
在layout->activity_main.xml 中添加相应的控件,效果如下:
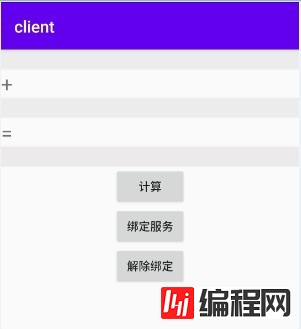
布局:
通过bindService进行服务的绑定,unbindService 进行服务的解绑
package com.android.client;
import androidx.appcompat.app.AlertDialog;
import androidx.appcompat.app.AppCompatActivity;
import android.content.ComponentName;
import android.content.DialogInterface;
import android.content.Intent;
import android.content.ServiceConnection;
import android.os.Bundle;
import android.os.IBinder;
import android.os.RemoteException;
import android.util.Log;
import android.view.View;
import android.widget.Button;
import android.widget.EditText;
import com.android.myservice.IMyService;
public class MainActivity extends AppCompatActivity implements View.OnClickListener {
       static final String TAG = "AIDLClient";
    IMyService myService;
    private EditText num1;
    private EditText num2;
    private EditText result;
    @Override
    protected void onCreate(Bundle savedInstanceState) {
        super.onCreate(savedInstanceState);
        Log.d(TAG, "onCreate ");
        setContentView(R.layout.activity_main);
        initView();
    }
    private void initView() {
        num1 = (EditText) findViewById(R.id.num1);
        num2 = (EditText) findViewById(R.id.num2);
        result = (EditText) findViewById(R.id.result);
        Button toAdd = (Button) findViewById(R.id.toAdd);
        Button bindbtn = (Button) findViewById(R.id.bindbtn);
        Button unbindbtn = (Button) findViewById(R.id.unbindbtn);
        toAdd.setOnClickListener(this);
        bindbtn.setOnClickListener(this);
        unbindbtn.setOnClickListener(this);
    }
    private ServiceConnection connection = new ServiceConnection() {
        //绑定上服务的时候
        @Override
        public void onServiceConnected(ComponentName componentName, IBinder service) {
            //接受到了远程的服务
            Log.d(TAG, "onServiceConnected: ");
            myService = IMyService.Stub.asInterface(service);
        }
        // 当服务断开的时候调用
        @Override
        public void onServiceDisconnected(ComponentName componentName) {
            Log.d(TAG, "onServiceDisconnected: ");
            //回收资源
            myService = null;
        }
    };
    @Override
    public void onClick(View v) {
        switch (v.getId()) {
            case R.id.bindbtn://绑定服务
                Log.d(TAG, "start to bindMyServce");
                bindMyService();
                break;
            case R.id.unbindbtn://解除绑定
                Log.d(TAG, "start to unbindMyServce");
                unbindMyService();
                break;
            case R.id.toAdd://计算数据
                int number1 = Integer.valueOf(num1.getText().toString());
                int number2 = Integer.valueOf(num2.getText().toString());
                try {
                    Log.d(TAG, "start to add");
                    int valueRes = myService.add(number1, number2);
                    result.setText(valueRes + "");
                } catch (RemoteException e) {
                    e.printStackTrace();
                }
                break;
        }
    }
    private void bindMyService() {
        Intent intent = new Intent();
        intent.setAction("com.android.myservice.myservice");
        intent.setPackage("com.android.myservice"); // server's package name
        bindService(intent, connection, BIND_AUTO_CREATE);
        new AlertDialog.Builder(this)
                .setTitle("Tips")
                .setMessage("绑定成功!")
                .setPositiveButton("确定",
                        new DialogInterface.OnClickListener() {
                            public void onClick(DialogInterface dialog,
                                                int whichButton) {
                            }
                        }).show();
        Log.d("AIDLClient", "bindMyService: bind on end");
    }
    private void unbindMyService() {
        unbindService(connection);
        new AlertDialog.Builder(this)
                .setTitle("Tips")
                .setMessage("解除绑定成功!")
                .setPositiveButton("确定",
                        new DialogInterface.OnClickListener() {
                            public void onClick(DialogInterface dialog,
                                                int whichButton) {
                            }
                        }).show();
        Log.d("AIDLClient", "unbindMyService: unbind on end");
    }
}
执行编译,生成client.apk,在手机\模拟器中展示
4.测试:
点击“绑定服务”,成功后弹出“绑定成功”:
log:
Client:
03-21 19:32:49.986 30794 30794 D AIDLClient: start to bindMyServce
03-21 19:32:50.023 30794 30794 D AIDLClient: bindMyService: bind on end
03-21 19:32:50.044 30794 30794 D AIDLClient: onServiceConnected:
03-21 19:32:57.062 30794 30794 D AIDLClient: start to add
Server:
03-21 19:32:49.996 31091 31091 D MyTestService: onCreate
03-21 19:32:49.997 31091 31091 D MyTestService: onBind
在输入框分别输入1,2, 点击计算,执行“1+2”,结果为3,从服务端返回成功
log:
Client:
03-21 19:32:57.062 30794 30794 D AIDLClient: start to addServer:
03-21 19:32:57.063 31091 31160 D MyTestService: add
点击“解除绑定”,成功后弹出“解除绑定成功”:
log:
Client:
03-21 19:35:57.109 30794 30794 I AIDLClient: start to unbindMyServce
03-21 19:35:57.147 30794 30794 D AIDLClient: unbindMyService: unbind on end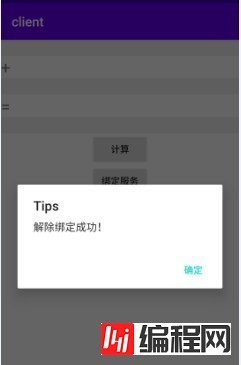
下一节专门来讲一讲AIDL的原理
我的微信公众号:IngresGe

--结束END--
本文标题: Android10.0 Binder通信原理(九)-AIDL Binder示例
本文链接: https://lsjlt.com/news/29396.html(转载时请注明来源链接)
有问题或投稿请发送至: 邮箱/279061341@qq.com QQ/279061341
2024-01-21
2023-10-28
2023-10-28
2023-10-27
2023-10-27
2023-10-27
2023-10-27
回答
回答
回答
回答
回答
回答
回答
回答
回答
回答
0