目录正文基础 Flutter 应用脚手架创建 TodoItem展示 Dialog 去添加列表项列表项添加状态正文 今天,我们将使用 Flutter 构建一个动态的 todo list
今天,我们将使用 Flutter 构建一个动态的 todo list 的应用。
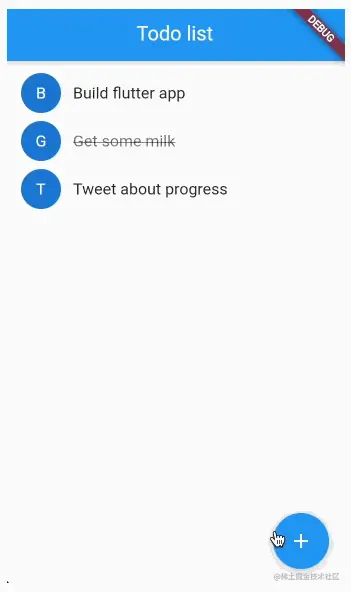
开发完成的效果如下:

我们直接进入正题。
# create new project
flutter create flutter_todo_app
# navigate to project
cd flutter_todo_app
# run flutter
flutter run
main.dart 这个文件是 Flutter 应用的入口文件。在这篇文章中,我将仅仅使用这个文件来开发。
首先,我们先导入 material 包。
import 'package:flutter/material.dart';
下一步,我们得有一个主要的方法。在这个例子中,它将返回 TodoApp 实例。
void main() => runApp(
  new TodoApp(),
);
这个 TodoApp 应该是一个 statelessWidget。这将会是我们列表的骨架
class TodoApp extends StatelessWidget {
  @override
  Widget build(BuildContext context) {
    return new MaterialApp(
      title: 'Todo list',
      home: new TodoList(),
    );
  }
}
正如你所见,我返回了一个 MaterialApp 实例,它具有一个 title 属性和一个 home 功能。这个 home 函数返回一个 TodoList 实例。这个 TodoList 类才是我们控制的列表项。
class TodoList extends StatefulWidget {
  @override
  _TodoListState createState() => new _TodoListState();
}
等等,这是什么?所有的挂件都会调用一个状态去知道将要发生什么和渲染什么。在这个例子中,我们调用了 _TodoListState。这将包含应用中的列表及其运行逻辑。
class _TodoListState extends State<TodoList> {
  final TextEditinGController _textFieldController = TextEditingController();
  final List<Todo> _todos = <Todo>[];
  @override
  Widget build(BuildContext context) {
	  // Widget template comes here
  }
  // Other functions
}
接下来,创建列表变量。
final List<Todo> _todos = <Todo>[];
也许你已经注意到了,我们定义了这个列表的类型是 Todo,但 Flutter 怎么知道 Todo 长是什么样呢?
Flutter 并不会知道,所以我们得创建一个类来定义。如下:
class Todo {
  Todo({required this.name, required this.checked});
  final String name;
  bool checked;
}
这跟 typescript 中的类型定义很像。我们告诉 flutter 一个 todo 项应该包含什么,什么字段是必须的。在我们的案例中,我们有名字和 checked 两个状态属性。
回到 _TodoListState 中,我们开始让我们的挂件展示点东西。
@override
Widget build(BuildContext context) {
	return new Scaffold(
	  appBar: new AppBar(
	    title: new Text('Todo list'),
	  ),
	  body: ListView(
	    padding: EdgeInsets.symmetric(vertical: 8.0),
	    children: _todos.map((Todo todo) {
	      return TodoItem(
	        todo: todo,
	        onTodoChanged: _handleTodoChange,
	      );
	    }).toList(),
	  ),
	  floatingActionButton: FloatingActionButton(
	      onPressed: () => _displayDialog(),
	      tooltip: 'Add Item',
	      child: Icon(Icons.add)),
	);
}
让我们看看上面发生了什么。我们返回了应用的一个脚手架,在脚手架上,我们添加了一个包含标题的 appBar 的属性。我们定义了 body 属性,这将存放 ListView 组件。
在上面代码片段中,通过 map 方法返回每个元素的 TodoItem。
然后,在应用的底部,我们定义了一个按钮。当按钮被点击时候,将调用 _displayDialog 方法。
到目前为止,我们还需要完成下面的代码片段:
TodoItem_displayDialog 函数_handleTodoChange 函数让我们一个一个来解决。
TodoItem 是我们列表项的单独体现。
class TodoItem extends StatelessWidget {
  TodoItem({
    required this.todo,
    required this.onTodoChanged,
  }) : super(key: ObjecTKEy(todo));
  final Todo todo;
  final onTodoChanged;
  TextStyle? _getTextStyle(bool checked) {
    if (!checked) return null;
    return TextStyle(
      color: Colors.black54,
      decoration: TextDecoration.lineThrough,
    );
  }
  @override
  Widget build(BuildContext context) {
    return ListTile(
      onTap: () {
        onTodoChanged(todo);
      },
      leading: CircleAvatar(
        child: Text(todo.name[0]),
      ),
      title: Text(todo.name, style: _getTextStyle(todo.checked)),
    );
  }
}
正如你所见,我们传递一个 todo 和 onTodoChanged 进来。
然后我们定义了一个 TextStyle 去处理列表项是否被勾选。
然后我们使用 ListTile 挂件来展示内容和添加点击事件。
点击应用的右下角的按钮,将会调起 _displayDialog 方法。
这将调起一个带有文本框的对话框。当点击确认的时候,将以文本框的内容基础添加一个新的列表项。
在 _TodoListState 中创建 _displayDialog。
Future<void> _displayDialog() async {
	return showDialog<void>(
	  context: context,
	  barrierDismissible: false, // user must tap button!
	  builder: (BuildContext context) {
	    return AlertDialog(
	      title: const Text('Add a new todo item'),
	      content: TextField(
	        controller: _textFieldController,
	        decoration: const InputDecoration(hintText: 'Type your new todo'),
	      ),
	      actions: <Widget>[
	        TextButton(
	          child: const Text('Add'),
	          onPressed: () {
	            Navigator.of(context).pop();
	            _addTodoItem(_textFieldController.text);
	          },
	        ),
	      ],
	    );
	  },
	);
}
Flutter 中的 Future 表明在将来的某个时候将返回潜在的值或者错误信息。在我们的案例中,将会返回用户输入的值。
对话框中有一个动作,就是当我们点击按钮的时候,将会关闭对话框并且调用 _addTodoItem 函数。
我们看看 _addTodoItem 函数长什么样:
void _addTodoItem(String name) {
	setState(() {
	  _todos.add(Todo(name: name, checked: false));
	});
	_textFieldController.clear();
}
这函数比你想象中的简单,是吧。
最后一部分是,我们应该为列表项进行标记。我们需要一个处理函数 _handleTodoChange:
void _handleTodoChange(Todo todo) {
	setState(() {
	  todo.checked = !todo.checked;
	});
}
这里我们只是改变了其列表项的状态。
完整的代码如下:
// lib/main.dart
import 'package:flutter/material.dart';
class Todo {
  Todo({required this.name, required this.checked});
  final String name;
  bool checked;
}
class TodoItem extends StatelessWidget {
  TodoItem({
    required this.todo,
    required this.onTodoChanged,
  }) : super(key: ObjectKey(todo));
  final Todo todo;
  final onTodoChanged;
  TextStyle? _getTextStyle(bool checked) {
    if (!checked) return null;
    return TextStyle(
      color: Colors.black54,
      decoration: TextDecoration.lineThrough,
    );
  }
  @override
  Widget build(BuildContext context) {
    return ListTile(
      onTap: () {
        onTodoChanged(todo);
      },
      leading: CircleAvatar(
        child: Text(todo.name[0]),
      ),
      title: Text(todo.name, style: _getTextStyle(todo.checked)),
    );
  }
}
class TodoList extends StatefulWidget {
  @override
  _TodoListState createState() => new _TodoListState();
}
class _TodoListState extends State<TodoList> {
  final TextEditingController _textFieldController = TextEditingController();
  final List<Todo> _todos = <Todo>[];
  @override
  Widget build(BuildContext context) {
    return new Scaffold(
      appBar: new AppBar(
        title: new Text('Todo list'),
      ),
      body: ListView(
        padding: EdgeInsets.symmetric(vertical: 8.0),
        children: _todos.map((Todo todo) {
          return TodoItem(
            todo: todo,
            onTodoChanged: _handleTodoChange,
          );
        }).toList(),
      ),
      floatingActionButton: FloatingActionButton(
          onPressed: () => _displayDialog(),
          tooltip: 'Add Item',
          child: Icon(Icons.add)),
    );
  }
  void _handleTodoChange(Todo todo) {
    setState(() {
      todo.checked = !todo.checked;
    });
  }
  void _addTodoItem(String name) {
    setState(() {
      _todos.add(Todo(name: name, checked: false));
    });
    _textFieldController.clear();
  }
  Future<void> _displayDialog() async {
    return showDialog<void>(
      context: context,
      barrierDismissible: false, // user must tap button!
      builder: (BuildContext context) {
        return AlertDialog(
          title: const Text('Add a new todo item'),
          content: TextField(
            controller: _textFieldController,
            decoration: const InputDecoration(hintText: 'Type your new todo'),
          ),
          actions: <Widget>[
            TextButton(
              child: const Text('Add'),
              onPressed: () {
                Navigator.of(context).pop();
                _addTodoItem(_textFieldController.text);
              },
            ),
          ],
        );
      },
    );
  }
}
class TodoApp extends StatelessWidget {
  @override
  Widget build(BuildContext context) {
    return new MaterialApp(
      title: 'Todo list',
      home: new TodoList(),
    );
  }
}
void main() => runApp(new TodoApp());
本文采用的是意译的方式。原文链接 - Build a todo list app with Flutter
以上就是iOS开发Flutter构建todo list应用的详细内容,更多关于ios开发Flutter构建todo list的资料请关注编程网其它相关文章!
--结束END--
本文标题: ios开发Flutter构建todo list应用
本文链接: https://lsjlt.com/news/168552.html(转载时请注明来源链接)
有问题或投稿请发送至: 邮箱/279061341@qq.com QQ/279061341
2024-01-21
2023-10-28
2023-10-28
2023-10-27
2023-10-27
2023-10-27
2023-10-27
回答
回答
回答
回答
回答
回答
回答
回答
回答
回答
0