Python 官方文档:入门教程 => 点击学习
目录RFC6749OAuth 2.0授权4大模式合同到期后的续约机制OAuth2.0第三方授权实战oauth-clientoauth-serverRFC6749 OAuth2的官方文
OAuth2的官方文档在RFC6749:https://datatracker.ietf.org/doc/html/rfc6749
以王者荣耀请求微信登录的过程为例
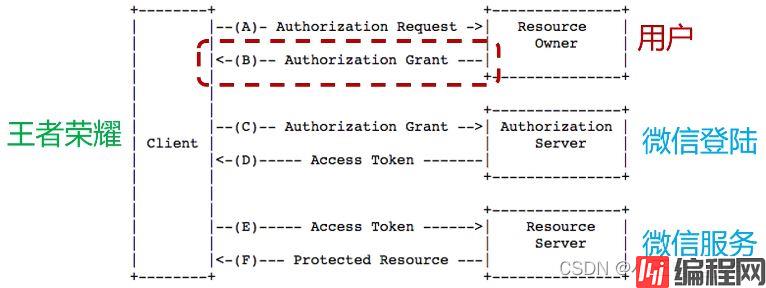
授权码模式:完整、严密,第三方认证和授权的最主流实现
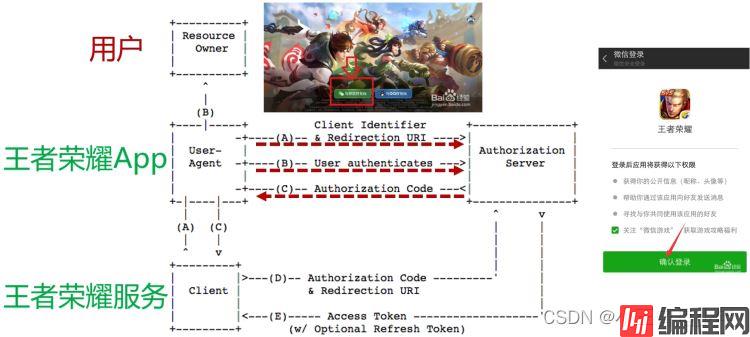
token只有APP的后台服务和微信的后台才有,二者之间使用token通信,保证数据不易泄露到后台黑客
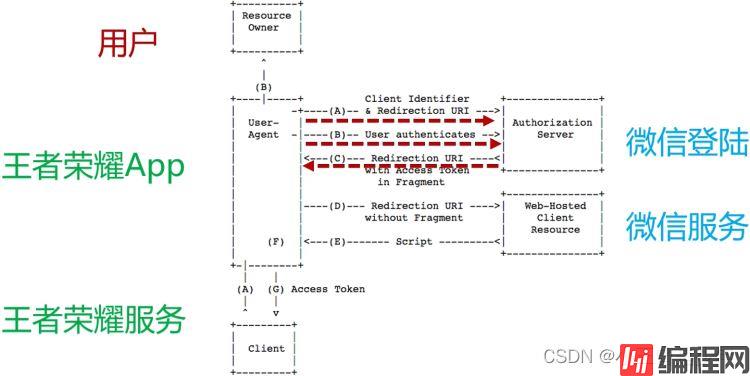
简化模式:令牌用户可见,移动端的常用实现手段
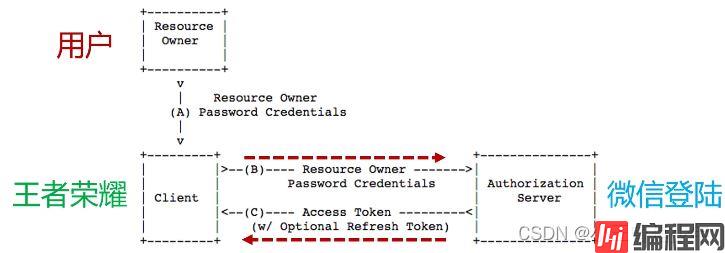
密码模式:用户名密码都返回
客户端模式:后台内容应用之间进行访问

微信登录会为APP分配一个内部的特定用户名和密码,APP用这个账号 + 密码和微信沟通,微信返回一个token,APP可以用这个token做很多部门自身的事情
通常拿到Access token时还会拿到一个Refresh token,可以用来延长token的有效期
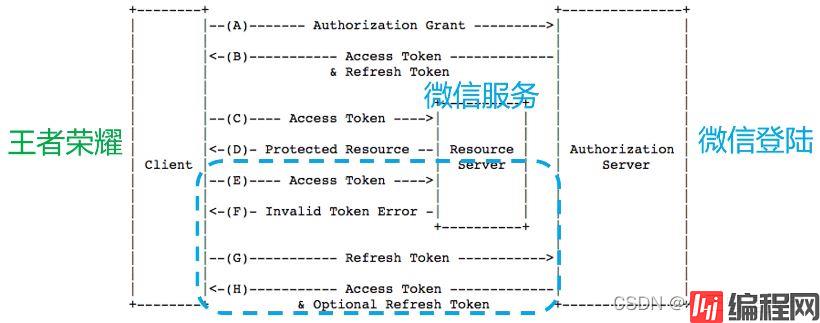
表示王者荣耀端
pom文件:
<?xml version="1.0" encoding="UTF-8"?>
<project xmlns="Http://Maven.apache.org/POM/4.0.0"
         xmlns:xsi="http://www.w3.org/2001/XMLSchema-instance"
         xsi:schemaLocation="http://maven.apache.org/POM/4.0.0 http://maven.apache.org/xsd/maven-4.0.0.xsd">
  <modelVersion>4.0.0</modelVersion>

  <parent>
    <groupId>org.springframework.boot</groupId>
    <artifactId>spring-boot-starter-parent</artifactId>
    <version>2.4.0</version>
    <relativePath/> <!-- lookup parent from repository -->
  </parent>

  <groupId>org.example</groupId>
  <artifactId>oauth-client</artifactId>
  <version>1.0-SNAPSHOT</version>
  <description>Demo project for Spring Boot</description>

  <properties>
    <maven.compiler.source>8</maven.compiler.source>
    <maven.compiler.target>8</maven.compiler.target>
    <spring-cloud.version>2020.0.0-M5</spring-cloud.version>
  </properties>

  <dependencies>
    <dependency>
      <groupId>org.springframework.boot</groupId>
      <artifactId>spring-boot-starter-WEB</artifactId>
    </dependency>
    <dependency>
      <groupId>org.springframework.cloud</groupId>
      <artifactId>spring-cloud-starter-oauth2</artifactId>
    </dependency>
    <dependency>
      <groupId>org.springframework.cloud</groupId>
      <artifactId>spring-cloud-starter-security</artifactId>
    </dependency>

    <dependency>
      <groupId>org.springframework.boot</groupId>
      <artifactId>spring-boot-starter-test</artifactId>
      <scope>test</scope>
    </dependency>
  </dependencies>

  <dependencyManagement>
    <dependencies>
      <dependency>
        <groupId>org.springframework.cloud</groupId>
        <artifactId>spring-cloud-dependencies</artifactId>
        <version>${spring-cloud.version}</version>
        <type>pom</type>
        <scope>import</scope>
      </dependency>
    </dependencies>
  </dependencyManagement>

  <build>
    <plugins>
      <plugin>
        <groupId>org.springframework.boot</groupId>
        <artifactId>spring-boot-maven-plugin</artifactId>
      </plugin>
    </plugins>
  </build>

  <repositories>
    <repository>
      <id>spring-milestones</id>
      <name>Spring Milestones</name>
      <url>https://repo.spring.io/milestone</url>
    </repository>
  </repositories>

</project>
SpringBoot的经典启动类:
package com.wjw.oauthclient;

import org.springframework.boot.SpringApplication;
import org.springframework.boot.autoconfigure.SpringBootApplication;

@SpringBootApplication
public class OauthClientApplication {
    public static void main(String[] args) {
        SpringApplication.run(OauthClientApplication.class, args);
    }
}
创建OAuth2的配置类:
package com.wjw.oauthclient.config;

import org.springframework.boot.autoconfigure.security.oauth2.client.EnableOAuth2Sso;
import org.springframework.context.annotation.Configuration;
import org.springframework.security.config.annotation.web.builders.HttpSecurity;
import org.springframework.security.config.annotation.web.configuration.WebSecurityConfigurerAdapter;

//激活OAuth2 SSO客户端
@Configuration
@EnableOAuth2Sso
public class SecurityConfig extends WebSecurityConfigurerAdapter {
    @Override
    protected void configure(HttpSecurity http) throws Exception {
        http.authorizeRequests()
            .anyRequest()
            .authenticated()
            .and()
            .csrf()
            .disable();
    }
}

配置文件application.yaml:
security.oauth2.client.client-secret=my_client_secret
security.oauth2.client.client-id=my_client_id
security.oauth2.client.user-authorization-uri=http://localhost:9090/oauth/authorize
security.oauth2.client.access-token-uri=http://localhost:9090/oauth/token
security.oauth2.resource.user-info-uri=http://localhost:9090/user

server.port=8080

server.servlet.session.cookie.name=ut
表示微信客户端
pom文件:
<?xml version="1.0" encoding="UTF-8"?>
<project xmlns="http://maven.apache.org/POM/4.0.0" xmlns:xsi="http://www.w3.org/2001/XMLSchema-instance"
         xsi:schemaLocation="http://maven.apache.org/POM/4.0.0 https://maven.apache.org/xsd/maven-4.0.0.xsd">
  <modelVersion>4.0.0</modelVersion>
  <parent>
    <groupId>org.springframework.boot</groupId>
    <artifactId>spring-boot-starter-parent</artifactId>
    <version>2.4.0</version>
    <relativePath/> <!-- lookup parent from repository -->
  </parent>
  <groupId>com.example</groupId>
  <artifactId>oauth-server</artifactId>
  <version>0.0.1-SNAPSHOT</version>
  <name>oauth-server</name>
  <description>Demo project for Spring Boot</description>

  <properties>
    <java.version>1.8</java.version>
    <spring-cloud.version>2020.0.0-M5</spring-cloud.version>
  </properties>

  <dependencies>
    <dependency>
      <groupId>org.springframework.boot</groupId>
      <artifactId>spring-boot-starter-web</artifactId>
    </dependency>
    <dependency>
      <groupId>org.springframework.cloud</groupId>
      <artifactId>spring-cloud-starter-oauth2</artifactId>
    </dependency>
    <dependency>
      <groupId>org.springframework.cloud</groupId>
      <artifactId>spring-cloud-starter-security</artifactId>
    </dependency>

    <dependency>
      <groupId>org.springframework.boot</groupId>
      <artifactId>spring-boot-starter-test</artifactId>
      <scope>test</scope>
    </dependency>

  </dependencies>

  <dependencyManagement>
    <dependencies>
      <dependency>
        <groupId>org.springframework.cloud</groupId>
        <artifactId>spring-cloud-dependencies</artifactId>
        <version>${spring-cloud.version}</version>
        <type>pom</type>
        <scope>import</scope>
      </dependency>
    </dependencies>
  </dependencyManagement>

  <build>
    <plugins>
      <plugin>
        <groupId>org.springframework.boot</groupId>
        <artifactId>spring-boot-maven-plugin</artifactId>
      </plugin>
    </plugins>
  </build>

  <repositories>
    <repository>
      <id>spring-milestones</id>
      <name>Spring Milestones</name>
      <url>https://repo.spring.io/milestone</url>
    </repository>
  </repositories>

</project>
创建SpringBoot启动类:
package com.wjw.oauthserver;

import org.springframework.boot.SpringApplication;
import org.springframework.boot.autoconfigure.SpringBootApplication;
import org.springframework.security.oauth2.config.annotation.web.configuration.EnableResourceServer;

@SpringBootApplication
@EnableResourceServer
public class OauthServerApplication {

    public static void main(String[] args) {
        SpringApplication.run(OauthServerApplication.class, args);
    }

}

创建controller:
package com.wjw.oauthserver.controller;

import org.springframework.web.bind.annotation.GetMapping;
import org.springframework.web.bind.annotation.RestController;

import java.security.Principal;

@RestController
public class UserController {
    @GetMapping("/user")
    public Principal getCurrentUser(Principal principal) {
        return principal;
    }
}
创建oauth2的关键配置类:
package com.wjw.oauthserver.config;

import org.springframework.beans.factory.annotation.Autowired;
import org.springframework.context.annotation.Configuration;
import org.springframework.security.crypto.passWord.PasswordEncoder;
import org.springframework.security.oauth2.config.annotation.configurers.ClientDetailsServiceConfigurer;
import org.springframework.security.oauth2.config.annotation.web.configuration.AuthorizationServerConfigurerAdapter;
import org.springframework.security.oauth2.config.annotation.web.configuration.EnableAuthorizationServer;

@Configuration
@EnableAuthorizationServer
public class AuthorizationServerConfig extends AuthorizationServerConfigurerAdapter {
    @Autowired
    PasswordEncoder passwordEncoder;

    @Override
    public void configure(ClientDetailsServiceConfigurer clients) throws Exception {
        clients.inMemory() // 在内存里
                .withClient("my_client_id")
                .secret(passwordEncoder.encode("my_client_secret")) // 加密密码
                .autoApprove(true)  // 允许所有子类用户登录
                .redirectUris("http://localhost:8080/login")    // 反跳会登录页面
                .scopes("all")
                .accessTokenValiditySeconds(3600)
                .authorizedGrantTypes("authorization_code");    // 4大模式里的授权码模式
    }
}
现在需要提供一个登录页面让用户输入用户名和密码,并设置一个管理员账户:
package com.wjw.oauthserver.config;

import org.springframework.context.annotation.Bean;
import org.springframework.context.annotation.Configuration;
import org.springframework.core.annotation.Order;
import org.springframework.security.config.annotation.authentication.builders.AuthenticationManagerBuilder;
import org.springframework.security.config.annotation.web.builders.HttpSecurity;
import org.springframework.security.config.annotation.web.configuration.EnableWebSecurity;
import org.springframework.security.config.annotation.web.configuration.WebSecurityConfigurerAdapter;
import org.springframework.security.crypto.bcrypt.BCryptPasswordEncoder;
import org.springframework.security.crypto.password.PasswordEncoder;

@Configuration
@EnableWebSecurity
@Order(1)
public class SecurityConfig extends WebSecurityConfigurerAdapter {
    @Bean
    PasswordEncoder passwordEncoder() {
        return new BCryptPasswordEncoder();
    }

    @Override
    protected void configure(HttpSecurity http) throws Exception {
        http.requestMatchers()
                .antMatchers("/login")
                .antMatchers("/oauth/authorize")
                .and()
                .authorizeRequests().anyRequest().authenticated()
                .and()
                .fORMLogin()
                .permitAll()
                .and()
                .csrf().disable();
    }

    @Override
    protected void configure(AuthenticationManagerBuilder auth) throws Exception {
        auth.inMemoryAuthentication()
                .withUser("wjw")
                .password(passwordEncoder().encode("123456"))
                .roles("admin");
    }
}
配置文件application.yaml:
server.port=9090分别启动oauth-server和oauth-client进行测试:
访问localhost:8080/hello
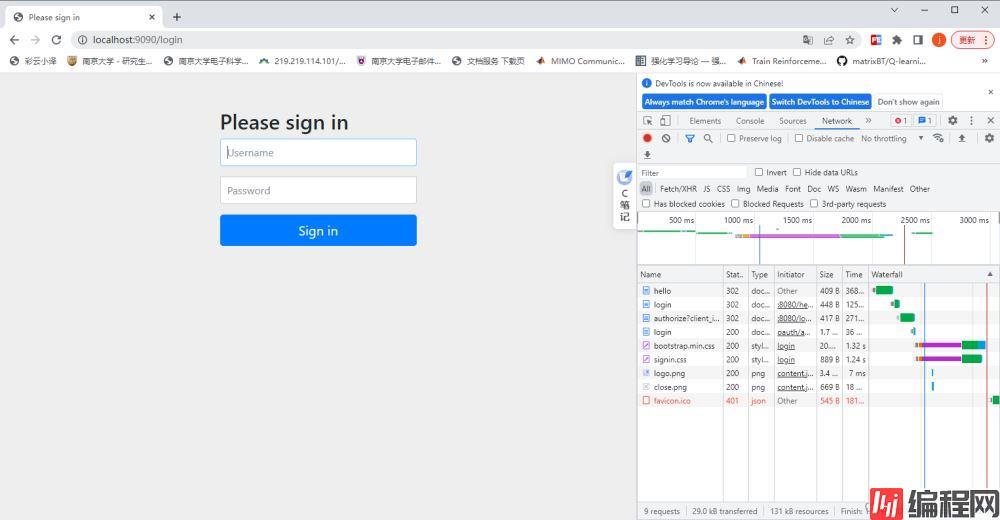
访问hello时会重定向到login

访问登录时又会重定向到微信登录:

之后又会重定向到:

输入账户名+密码:

继续看控制台:
登录成功后还是会被重定向
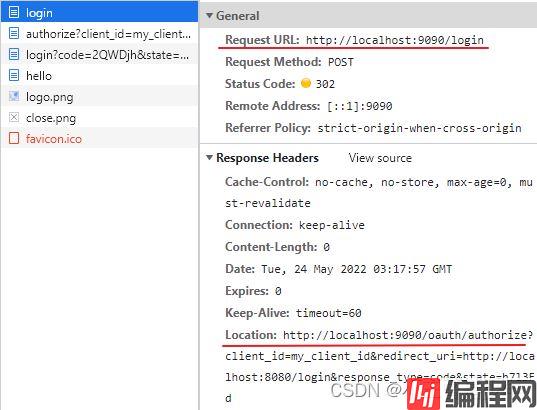
此时再访问就会有授权码了(只能用一次):

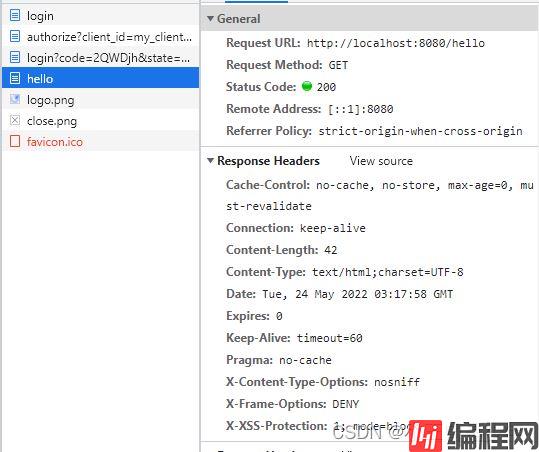
此时浏览器拿着授权码才去真正请求王者荣耀的hello接口(浏览器自动使用授权码交换token,对用户透明):
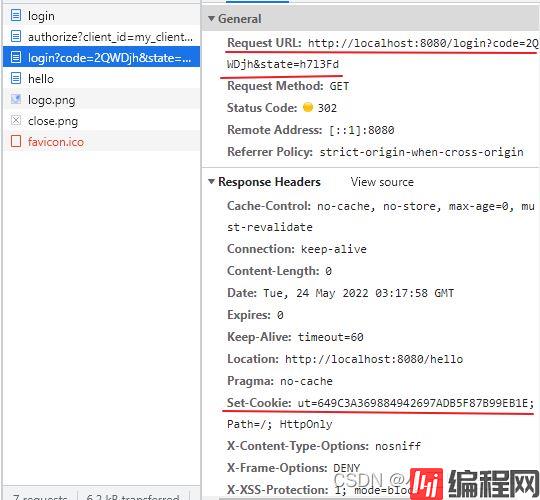
王者荣耀使用授权码请求微信得到一个token和用户信息并返回给浏览器,浏览器再使用这个token调王者荣耀的hello接口拿用户信息:
到此这篇关于Java中OAuth2.0第三方授权原理与实战的文章就介绍到这了,更多相关Java OAuth2.0第三方授权内容请搜索编程网以前的文章或继续浏览下面的相关文章希望大家以后多多支持编程网!
--结束END--
本文标题: Java中OAuth2.0第三方授权原理与实战
本文链接: https://lsjlt.com/news/150134.html(转载时请注明来源链接)
有问题或投稿请发送至: 邮箱/279061341@qq.com QQ/279061341
2024-03-01
2024-03-01
2024-03-01
2024-02-29
2024-02-29
2024-02-29
2024-02-29
2024-02-29
2024-02-29
2024-02-29
回答
回答
回答
回答
回答
回答
回答
回答
回答
回答
0