Python 官方文档:入门教程 => 点击学习
目录什么是Vision TransfORMer(VIT)Vision Transforme的实现思路一、整体结构解析二、网络结构解析1、特征提取部分介绍2、分类部分Vision Tr
视觉Transformer最近非常的火热,从VIT开始,我先学学看。
Vision Transformer是Transformer的视觉版本,Transformer基本上已经成为了自然语言处理的标配,但是在视觉中的运用还受到限制。
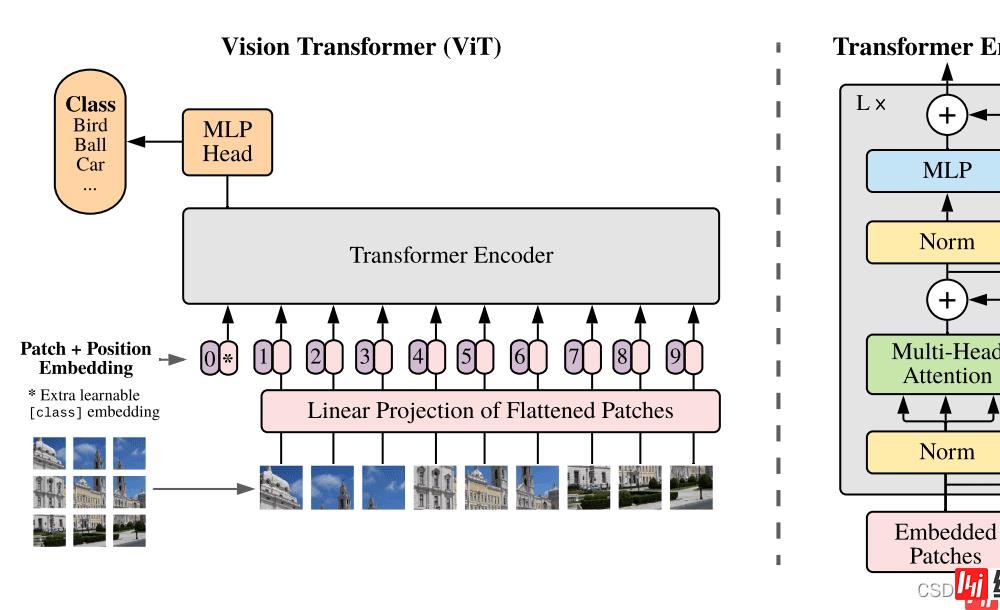
Vision Transformer打破了这种NLP与CV的隔离,将Transformer应用于图像图块(patch)序列上,进一步完成图像分类任务。简单来理解,Vision Transformer就是将输入进来的图片,每隔一定的区域大小划分图片块。然后将划分后的图片块组合成序列,将组合后的结果传入Transformer特有的Multi-head Self-attention进行特征提取。最后利用Cls Token进行分类。
代码下载

与寻常的分类网络类似,整个Vision Transformer可以氛围两部分,一部分是特征提取部分,另一部分是分类部分。
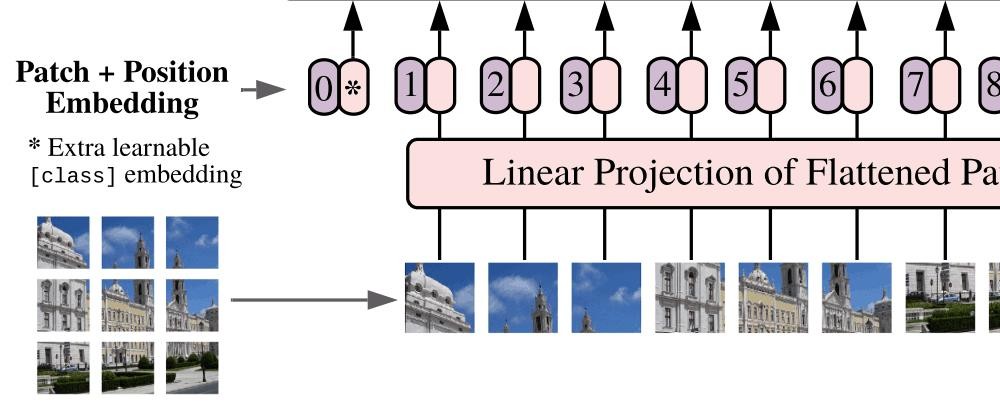
Patch+Position Embedding的作用主要是对输入进来的图片进行分块处理,每隔一定的区域大小划分图片块。然后将划分后的图片块组合成序列。
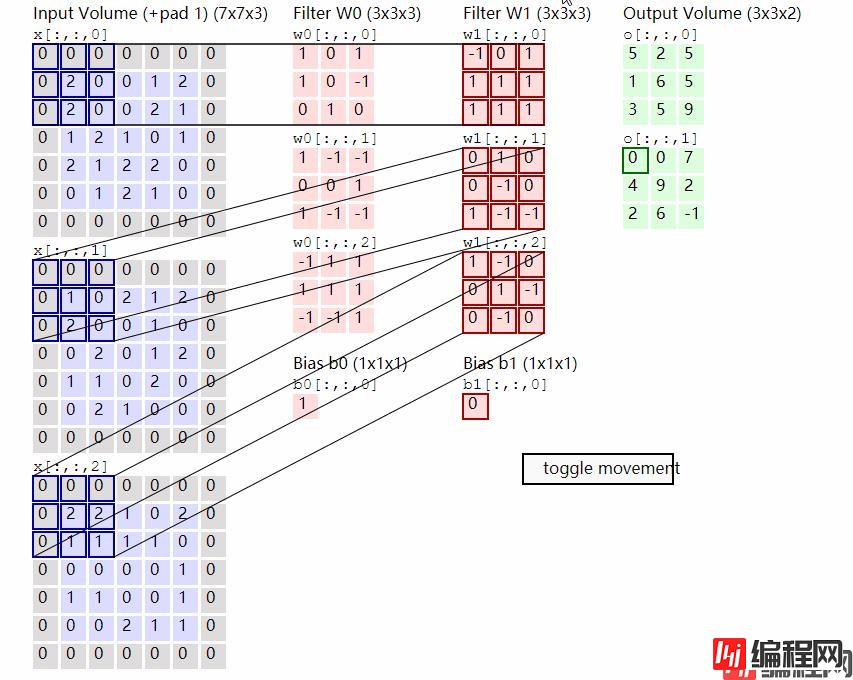
该部分首先对输入进来的图片进行分块处理,处理方式其实很简单,使用的是现成的卷积。由于卷积使用的是滑动窗口的思想,我们只需要设定特定的步长,就可以输入进来的图片进行分块处理了。
在VIT中,我们常设置这个卷积的卷积核大小为16x16,步长也为16x16,此时卷积就会每隔16个像素点进行一次特征提取,由于卷积核大小为16x16,两个图片区域的特征提取过程就不会有重叠。当我们输入的图片是224, 224, 3的时候,我们可以获得一个14, 14, 768的特征层。
下一步就是将这个特征层组合成序列,组合的方式非常简单,就是将高宽维度进行平铺,14, 14, 768在高宽维度平铺后,获得一个196, 768的特征层。
平铺完成后,我们会在图片序列中添加上Cls Token,该Token会作为一个单位的序列信息一起进行特征提取,图中的这个0*就是Cls Token,我们此时获得一个197, 768的特征层。
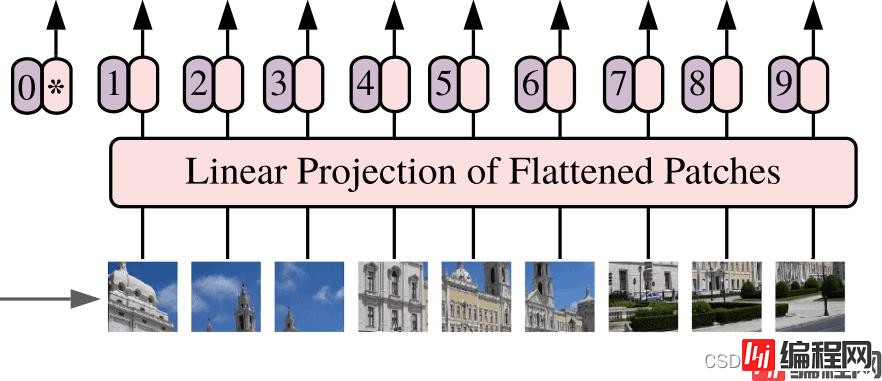
添加完成Cls Token后,再为所有特征添加上位置信息,这样网络才有区分不同区域的能力。添加方式其实也非常简单,我们生成一个197, 768的参数矩阵,这个参数矩阵是可训练的,把这个矩阵加上197, 768的特征层即可。
到这里,Patch+Position Embedding就构建完成了,构建代码如下:
#--------------------------------------------------------------------------------------------------------------------#
#   classtoken部分是transformer的分类特征。用于堆叠到序列化后的图片特征中,作为一个单位的序列特征进行特征提取。
#
#   在利用步长为16x16的卷积将输入图片划分成14x14的部分后,将14x14部分的特征平铺,一幅图片会存在序列长度为196的特征。
#   此时生成一个classtoken,将classtoken堆叠到序列长度为196的特征上,获得一个序列长度为197的特征。
#   在特征提取的过程中,classtoken会与图片特征进行特征的交互。最终分类时,我们取出classtoken的特征,利用全连接分类。
#--------------------------------------------------------------------------------------------------------------------#
class ClassToken(Layer):
    def __init__(self, cls_initializer='zeros', cls_regularizer=None, cls_constraint=None, **kwargs):
        super(ClassToken, self).__init__(**kwargs)
        self.cls_initializer    = keras.initializers.get(cls_initializer)
        self.cls_regularizer    = keras.regularizers.get(cls_regularizer)
        self.cls_constraint     = keras.constraints.get(cls_constraint)
    def get_config(self):
        config = {
            'cls_initializer': keras.initializers.serialize(self.cls_initializer),
            'cls_regularizer': keras.regularizers.serialize(self.cls_regularizer),
            'cls_constraint': keras.constraints.serialize(self.cls_constraint),
        }
        base_config = super(ClassToken, self).get_config()
        return dict(list(base_config.items()) + list(config.items()))
    def compute_output_shape(self, input_shape):
        return (input_shape[0], input_shape[1] + 1, input_shape[2])
    def build(self, input_shape):
        self.num_features = input_shape[-1]
        self.cls = self.add_weight(
            shape       = (1, 1, self.num_features),
            initializer = self.cls_initializer,
            regularizer = self.cls_regularizer,
            constraint  = self.cls_constraint,
            name        = 'cls',
        )
        super(ClassToken, self).build(input_shape)
    def call(self, inputs):
        batch_size      = tf.shape(inputs)[0]
        cls_broadcasted = tf.cast(tf.broadcast_to(self.cls, [batch_size, 1, self.num_features]), dtype = inputs.dtype)
        return tf.concat([cls_broadcasted, inputs], 1)
#--------------------------------------------------------------------------------------------------------------------#
#   为网络提取到的特征添加上位置信息。
#   以输入图片为224, 224, 3为例,我们获得的序列化后的图片特征为196, 768。加上classtoken后就是197, 768
#   此时生成的pos_Embedding的shape也为197, 768,代表每一个特征的位置信息。
#--------------------------------------------------------------------------------------------------------------------#
class AddPositionEmbs(Layer):
    def __init__(self, image_shape, patch_size, pe_initializer='zeros', pe_regularizer=None, pe_constraint=None, **kwargs):
        super(AddPositionEmbs, self).__init__(**kwargs)
        self.image_shape        = image_shape
        self.patch_size         = patch_size
        self.pe_initializer     = keras.initializers.get(pe_initializer)
        self.pe_regularizer     = keras.regularizers.get(pe_regularizer)
        self.pe_constraint      = keras.constraints.get(pe_constraint)
    def get_config(self):
        config = {
            'pe_initializer': keras.initializers.serialize(self.pe_initializer),
            'pe_regularizer': keras.regularizers.serialize(self.pe_regularizer),
            'pe_constraint': keras.constraints.serialize(self.pe_constraint),
        }
        base_config = super(AddPositionEmbs, self).get_config()
        return dict(list(base_config.items()) + list(config.items()))
    def compute_output_shape(self, input_shape):
        return input_shape
    def build(self, input_shape):
        assert (len(input_shape) == 3), f"Number of dimensions should be 3, Got {len(input_shape)}"
        length  = (224 // self.patch_size) * (224 // self.patch_size) + 1
        self.pe = self.add_weight(
            # shape       = [1, input_shape[1], input_shape[2]],
            shape       = [1, length, input_shape[2]],
            initializer = self.pe_initializer,
            regularizer = self.pe_regularizer,
            constraint  = self.pe_constraint,
            name        = 'pos_embedding',
        )
        super(AddPositionEmbs, self).build(input_shape)
    def call(self, inputs):
        num_features = tf.shape(inputs)[2]
        cls_token_pe = self.pe[:, 0:1, :]
        img_token_pe = self.pe[:, 1: , :]
        img_token_pe = tf.reshape(img_token_pe, [1, (224 // self.patch_size), (224 // self.patch_size), num_features])
        img_token_pe = tf.image.resize_bicubic(img_token_pe, (self.image_shape[0] // self.patch_size, self.image_shape[1] // self.patch_size), align_corners=False)
        img_token_pe = tf.reshape(img_token_pe, [1, -1, num_features])
        pe = tf.concat([cls_token_pe, img_token_pe], axis = 1)
        return inputs + tf.cast(pe, dtype=inputs.dtype)
def VisionTransformer(input_shape = [224, 224], patch_size = 16, num_layers = 12, num_features = 768, num_heads = 12, mlp_dim = 3072,
            classes = 1000, dropout = 0.1):
    #-----------------------------------------------#
    #   224, 224, 3
    #-----------------------------------------------#
    inputs      = Input(shape = (input_shape[0], input_shape[1], 3))
    #-----------------------------------------------#
    #   224, 224, 3 -> 14, 14, 768
    #-----------------------------------------------#
    x           = Conv2D(num_features, patch_size, strides = patch_size, padding = "valid", name = "patch_embed.proj")(inputs)
    #-----------------------------------------------#
    #   14, 14, 768 -> 196, 768
    #-----------------------------------------------#
    x           = Reshape(((input_shape[0] // patch_size) * (input_shape[1] // patch_size), num_features))(x)
    #-----------------------------------------------#
    #   196, 768 -> 197, 768
    #-----------------------------------------------#
    x           = ClassToken(name="cls_token")(x)
    #-----------------------------------------------#
    #   197, 768 -> 197, 768
    #-----------------------------------------------#
    x           = AddPositionEmbs(input_shape, patch_size, name="pos_embed")(x)

在上一步获得shape为197, 768的序列信息后,将序列信息传入Transformer Encoder进行特征提取,这是Transformer特有的Multi-head Self-attention结构,通过自注意力机制,关注每个图片块的重要程度。
I、Self-attention结构解析
看懂Self-attention结构,其实看懂下面这个动图就可以了,动图中存在一个序列的三个单位输入,每一个序列单位的输入都可以通过三个处理(比如全连接)获得Query、Key、Value,Query是查询向量、Key是键向量、Value值向量。
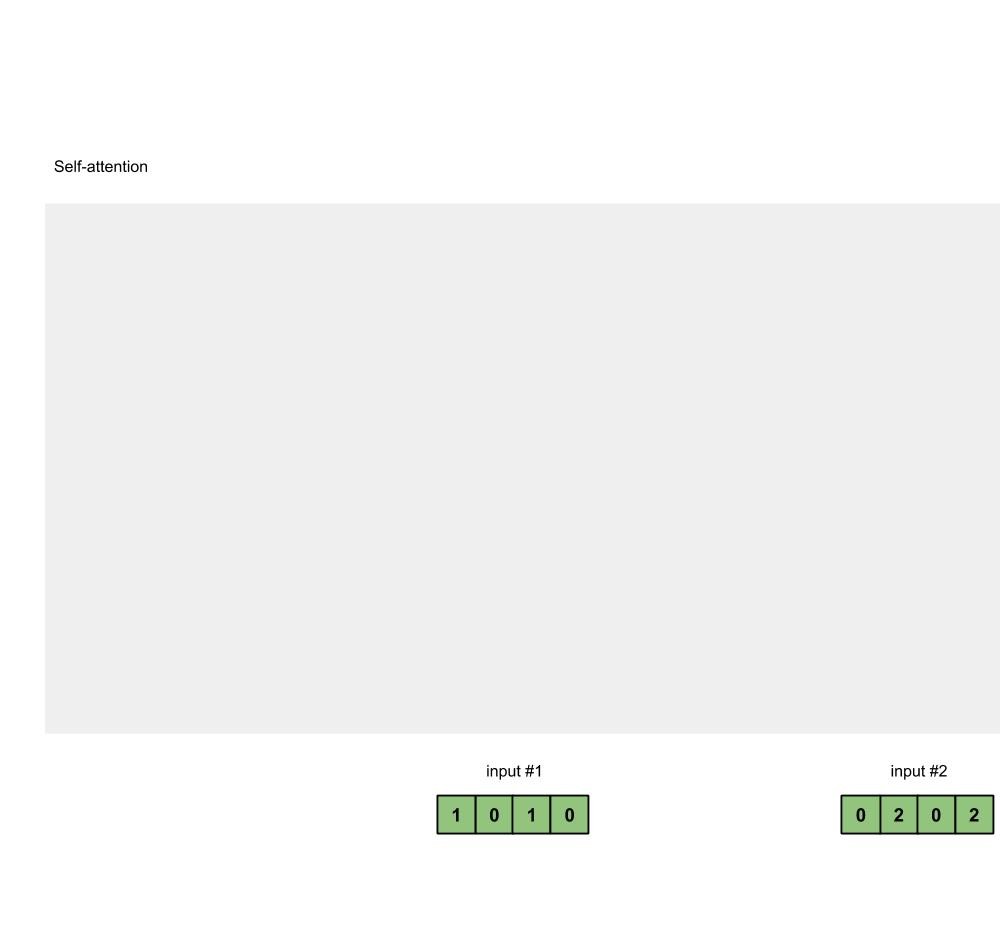
如果我们想要获得input-1的输出,那么我们进行如下几步:
1、利用input-1的查询向量,分别乘上input-1、input-2、input-3的键向量,此时我们获得了三个score。
2、然后对这三个score取softmax,获得了input-1、input-2、input-3各自的重要程度。
3、然后将这个重要程度乘上input-1、input-2、input-3的值向量,求和。
4、此时我们获得了input-1的输出。
如图所示,我们进行如下几步:
1、input-1的查询向量为[1, 0, 2],分别乘上input-1、input-2、input-3的键向量,获得三个score为2,4,4。
2、然后对这三个score取softmax,获得了input-1、input-2、input-3各自的重要程度,获得三个重要程度为0.0,0.5,0.5。
3、然后将这个重要程度乘上input-1、input-2、input-3的值向量,求和,即0.0 ∗ [ 1 , 2 , 3 ] + 0.5 ∗ [ 2 , 8 , 0 ] + 0.5 ∗ [ 2 , 6 , 3 ] = [ 2.0 , 7.0 , 1.5 ] 0.0 * [1, 2, 3] + 0.5 * [2, 8, 0] + 0.5 * [2, 6, 3] = [2.0, 7.0, 1.5] 0.0∗[1,2,3]+0.5∗[2,8,0]+0.5∗[2,6,3]=[2.0,7.0,1.5]。
4、此时我们获得了input-1的输出 [2.0, 7.0, 1.5]。
上述的例子中,序列长度仅为3,每个单位序列的特征长度仅为3,在VIT的Transformer Encoder中,序列长度为197,每个单位序列的特征长度为768 // num_heads。但计算过程是一样的。在实际运算时,我们采用矩阵进行运算。
II、Self-attention的矩阵运算
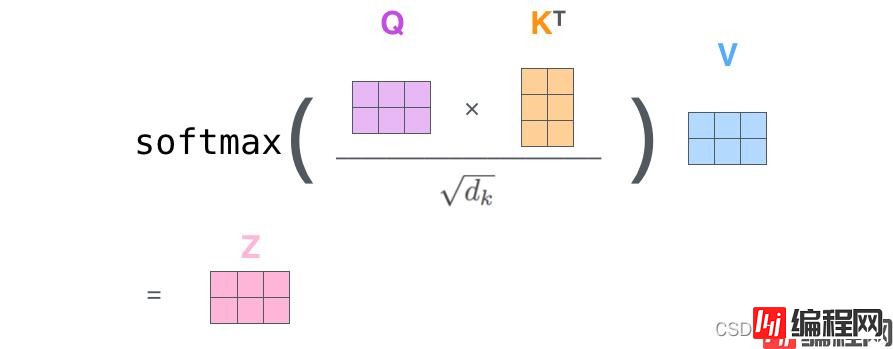
实际的矩阵运算过程如下图所示。我以实际矩阵为例子给大家解析:
输入的Query、Key、Value如下图所示:
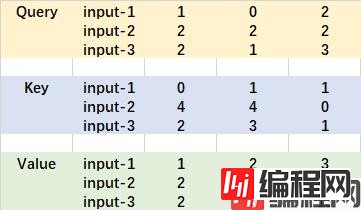
首先利用 查询向量query 叉乘 转置后的键向量key,这一步可以通俗的理解为,利用查询向量去查询序列的特征,获得序列每个部分的重要程度score。
输出的每一行,都代表input-1、input-2、input-3,对当前input的贡献,我们对这个贡献值取一个softmax。


然后利用 score 叉乘 value,这一步可以通俗的理解为,将序列每个部分的重要程度重新施加到序列的值上去。

这个矩阵运算的代码如下所示,各位同学可以自己试试。
import numpy as np
def soft_max(z):
    t = np.exp(z)
    a = np.exp(z) / np.expand_dims(np.sum(t, axis=1), 1)
    return a
Query = np.array([
    [1,0,2],
    [2,2,2],
    [2,1,3]
])
Key = np.array([
    [0,1,1],
    [4,4,0],
    [2,3,1]
])
Value = np.array([
    [1,2,3],
    [2,8,0],
    [2,6,3]
])
scores = Query @ Key.T
print(scores)
scores = soft_max(scores)
print(scores)
out = scores @ Value
print(out)
III、MultiHead多头注意力机制
多头注意力机制的示意图如图所示:
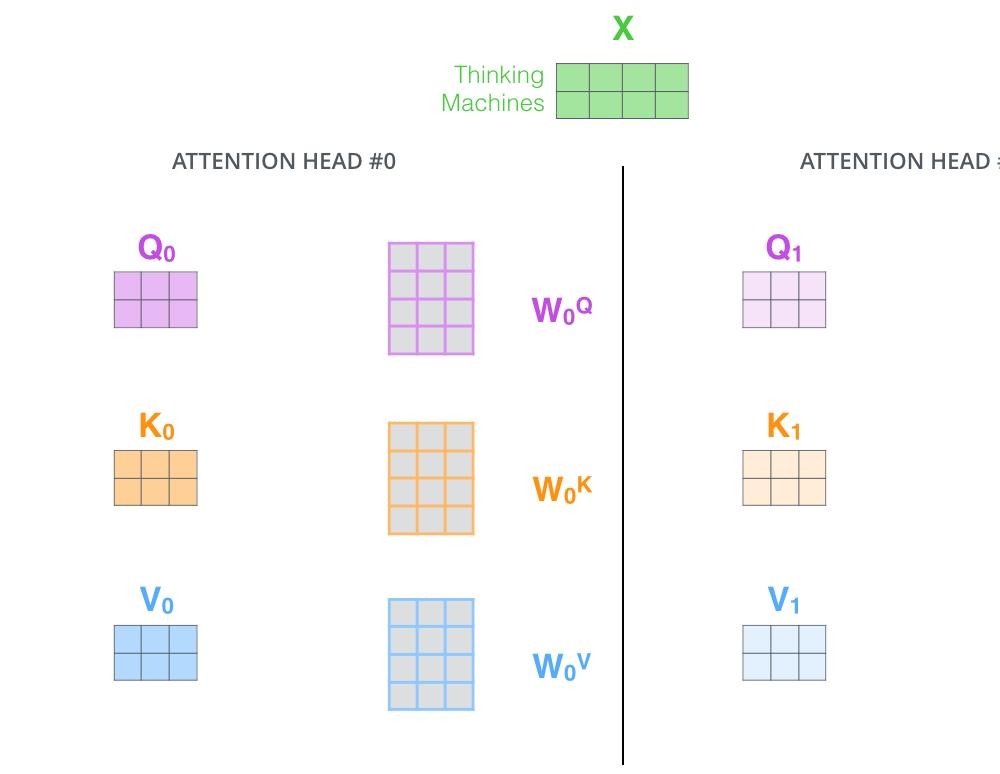
这幅图给人的感觉略显迷茫,我们跳脱出这个图,直接从矩阵的shape入手会清晰很多。
在第一步进行图像的分割后,我们获得的特征层为197, 768。
在施加多头的时候,我们直接对196, 768的最后一维度进行分割,比如我们想分割成12个头,那么矩阵的shepe就变成了196, 12, 64。
然后我们将196, 12, 64进行转置,将12放到前面去,获得的特征层为12, 196, 64。之后我们忽略这个12,把它和batch维度同等对待,只对196, 64进行处理,其实也就是上面的注意力机制的过程了。
#--------------------------------------------------------------------------------------------------------------------#
#   Attention机制
#   将输入的特征qkv特征进行划分,首先生成query, key, value。query是查询向量、key是键向量、v是值向量。
#   然后利用 查询向量query 叉乘 转置后的键向量key,这一步可以通俗的理解为,利用查询向量去查询序列的特征,获得序列每个部分的重要程度score。
#   然后利用 score 叉乘 value,这一步可以通俗的理解为,将序列每个部分的重要程度重新施加到序列的值上去。
#--------------------------------------------------------------------------------------------------------------------#
class Attention(Layer):
    def __init__(self, num_features, num_heads, **kwargs):
        super(Attention, self).__init__(**kwargs)
        self.num_features   = num_features
        self.num_heads      = num_heads
        self.projection_dim = num_features // num_heads
    def compute_output_shape(self, input_shape):
        return (input_shape[0], input_shape[1], input_shape[2] // 3)
    def call(self, inputs):
        #-----------------------------------------------#
        #   获得batch_size
        #-----------------------------------------------#
        bs      = tf.shape(inputs)[0]
        #-----------------------------------------------#
        #   b, 197, 3 * 768 -> b, 197, 3, 12, 64
        #-----------------------------------------------#
        inputs  = tf.reshape(inputs, [bs, -1, 3, self.num_heads, self.projection_dim])
        #-----------------------------------------------#
        #   b, 197, 3, 12, 64 -> 3, b, 12, 197, 64
        #-----------------------------------------------#
        inputs  = tf.transpose(inputs, [2, 0, 3, 1, 4])
        #-----------------------------------------------#
        #   将query, key, value划分开
        #   query     b, 12, 197, 64
        #   key       b, 12, 197, 64
        #   value     b, 12, 197, 64
        #-----------------------------------------------#
        query, key, value = inputs[0], inputs[1], inputs[2]
        #-----------------------------------------------#
        #   b, 12, 197, 64 @ b, 12, 197, 64 = b, 12, 197, 197
        #-----------------------------------------------#
        score           = tf.matmul(query, key, transpose_b=True)
        #-----------------------------------------------#
        #   进行数量级的缩放
        #-----------------------------------------------#
        scaled_score    = score / tf.math.sqrt(tf.cast(self.projection_dim, score.dtype))
        #-----------------------------------------------#
        #   b, 12, 197, 197 -> b, 12, 197, 197
        #-----------------------------------------------#
        weights         = tf.nn.softmax(scaled_score, axis=-1)
        #-----------------------------------------------#
        #   b, 12, 197, 197 @ b, 12, 197, 64 = b, 12, 197, 64
        #-----------------------------------------------#
        value          = tf.matmul(weights, value)
        #-----------------------------------------------#
        #   b, 12, 197, 64 -> b, 197, 12, 64
        #-----------------------------------------------#
        value = tf.transpose(value, perm=[0, 2, 1, 3])
        #-----------------------------------------------#
        #   b, 197, 12, 64 -> b, 197, 768
        #-----------------------------------------------#
        output = tf.reshape(value, (tf.shape(value)[0], tf.shape(value)[1], -1))
        return output
def MultiHeadSelfAttention(inputs, num_features, num_heads, dropout, name):
    #-----------------------------------------------#
    #   qkv   b, 197, 768 -> b, 197, 3 * 768
    #-----------------------------------------------#
    qkv = Dense(int(num_features * 3), name = name + "qkv")(inputs)
    #-----------------------------------------------#
    #   b, 197, 3 * 768 -> b, 197, 768
    #-----------------------------------------------#
    x   = Attention(num_features, num_heads)(qkv)
    #-----------------------------------------------#
    #   197, 768 -> 197, 768
    #-----------------------------------------------#
    x   = Dense(num_features, name = name + "proj")(x)
    x   = Dropout(dropout)(x)
    return x
IV、TransformerBlock的构建。
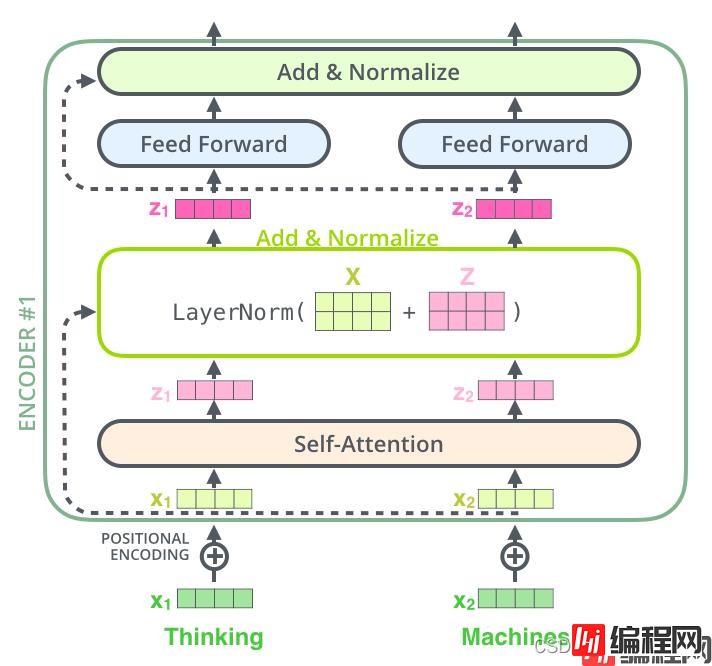
在完成MultiHeadSelfAttention的构建后,我们需要在其后加上两个全连接。就构建了整个TransformerBlock。
def MLP(y, num_features, mlp_dim, dropout, name):
    y = Dense(mlp_dim, name = name + "fc1")(y)
    y = Gelu()(y)
    y = Dropout(dropout)(y)
    y = Dense(num_features, name = name + "fc2")(y)
    return y
def TransformerBlock(inputs, num_features, num_heads, mlp_dim, dropout, name):
    #-----------------------------------------------#
    #   施加层标准化
    #-----------------------------------------------#
    x = LayerNormalization(epsilon=1e-6, name = name + "norm1")(inputs)
    #-----------------------------------------------#
    #   施加多头注意力机制
    #-----------------------------------------------#
    x = MultiHeadSelfAttention(x, num_features, num_heads, dropout, name = name + "attn.")
    x = Dropout(dropout)(x)
    #-----------------------------------------------#
    #   施加残差结构
    #-----------------------------------------------#
    x = Add()([x, inputs])
    #-----------------------------------------------#
    #   施加层标准化
    #-----------------------------------------------#
    y = LayerNormalization(epsilon=1e-6, name = name + "norm2")(x)
    #-----------------------------------------------#
    #   施加两次全连接
    #-----------------------------------------------#
    y = MLP(y, num_features, mlp_dim, dropout, name = name + "mlp.")
    y = Dropout(dropout)(y)
    #-----------------------------------------------#
    #   施加残差结构
    #-----------------------------------------------#
    y = Add()([x, y])
    return y

整个VIT模型由一个Patch+Position Embedding加上多个TransformerBlock组成。典型的TransforerBlock的数量为12个。
def VisionTransformer(input_shape = [224, 224], patch_size = 16, num_layers = 12, num_features = 768, num_heads = 12, mlp_dim = 3072,
            classes = 1000, dropout = 0.1):
    #-----------------------------------------------#
    #   224, 224, 3
    #-----------------------------------------------#
    inputs      = Input(shape = (input_shape[0], input_shape[1], 3))
    #-----------------------------------------------#
    #   224, 224, 3 -> 14, 14, 768
    #-----------------------------------------------#
    x           = Conv2D(num_features, patch_size, strides = patch_size, padding = "valid", name = "patch_embed.proj")(inputs)
    #-----------------------------------------------#
    #   14, 14, 768 -> 196, 768
    #-----------------------------------------------#
    x           = Reshape(((input_shape[0] // patch_size) * (input_shape[1] // patch_size), num_features))(x)
    #-----------------------------------------------#
    #   196, 768 -> 197, 768
    #-----------------------------------------------#
    x           = ClassToken(name="cls_token")(x)
    #-----------------------------------------------#
    #   197, 768 -> 197, 768
    #-----------------------------------------------#
    x           = AddPositionEmbs(input_shape, patch_size, name="pos_embed")(x)
    #-----------------------------------------------#
    #   197, 768 -> 197, 768  12次
    #-----------------------------------------------#
    for n in range(num_layers):
        x = TransformerBlock(
            x,
            num_features= num_features,
            num_heads   = num_heads,
            mlp_dim     = mlp_dim,
            dropout     = dropout,
            name        = "blocks." + str(n) + ".",
        )
    x = LayerNormalization(
        epsilon=1e-6, name="norm"
    )(x)

在分类部分,VIT所做的工作是利用提取到的特征进行分类。
在进行特征提取的时候,我们会在图片序列中添加上Cls Token,该Token会作为一个单位的序列信息一起进行特征提取,提取的过程中,该Cls Token会与其它的特征进行特征交互,融合其它图片序列的特征。
最终,我们利用Multi-head Self-attention结构提取特征后的Cls Token进行全连接分类。
def VisionTransformer(input_shape = [224, 224], patch_size = 16, num_layers = 12, num_features = 768, num_heads = 12, mlp_dim = 3072,
            classes = 1000, dropout = 0.1):
    #-----------------------------------------------#
    #   224, 224, 3
    #-----------------------------------------------#
    inputs      = Input(shape = (input_shape[0], input_shape[1], 3))
    #-----------------------------------------------#
    #   224, 224, 3 -> 14, 14, 768
    #-----------------------------------------------#
    x           = Conv2D(num_features, patch_size, strides = patch_size, padding = "valid", name = "patch_embed.proj")(inputs)
    #-----------------------------------------------#
    #   14, 14, 768 -> 196, 768
    #-----------------------------------------------#
    x           = Reshape(((input_shape[0] // patch_size) * (input_shape[1] // patch_size), num_features))(x)
    #-----------------------------------------------#
    #   196, 768 -> 197, 768
    #-----------------------------------------------#
    x           = ClassToken(name="cls_token")(x)
    #-----------------------------------------------#
    #   197, 768 -> 197, 768
    #-----------------------------------------------#
    x           = AddPositionEmbs(input_shape, patch_size, name="pos_embed")(x)
    #-----------------------------------------------#
    #   197, 768 -> 197, 768  12次
    #-----------------------------------------------#
    for n in range(num_layers):
        x = TransformerBlock(
            x,
            num_features= num_features,
            num_heads   = num_heads,
            mlp_dim     = mlp_dim,
            dropout     = dropout,
            name        = "blocks." + str(n) + ".",
        )
    x = LayerNormalization(
        epsilon=1e-6, name="norm"
    )(x)
    x = Lambda(lambda v: v[:, 0], name="ExtractToken")(x)
    x = Dense(classes, name="head")(x)
    x = Softmax()(x)
    return keras.models.Model(inputs, x)
import math
import keras
import Tensorflow as tf
from keras import backend as K
from keras.layers import (Add, Conv2D, Dense, Dropout, Input, Lambda, Layer,
                          Reshape, Softmax)
#--------------------------------------#
#   LayerNormalization
#   层标准化的实现
#--------------------------------------#
class LayerNormalization(keras.layers.Layer):
    def __init__(self,
                 center=True,
                 scale=True,
                 epsilon=None,
                 gamma_initializer='ones',
                 beta_initializer='zeros',
                 gamma_regularizer=None,
                 beta_regularizer=None,
                 gamma_constraint=None,
                 beta_constraint=None,
                 **kwargs):
        """Layer normalization layer
        See: [Layer Normalization](https://arxiv.org/pdf/1607.06450.pdf)
        :param center: Add an offset parameter if it is True.
        :param scale: Add a scale parameter if it is True.
        :param epsilon: Epsilon for calculating variance.
        :param gamma_initializer: Initializer for the gamma weight.
        :param beta_initializer: Initializer for the beta weight.
        :param gamma_regularizer: Optional regularizer for the gamma weight.
        :param beta_regularizer: Optional regularizer for the beta weight.
        :param gamma_constraint: Optional constraint for the gamma weight.
        :param beta_constraint: Optional constraint for the beta weight.
        :param kwargs:
        """
        super(LayerNormalization, self).__init__(**kwargs)
        self.supports_masking = True
        self.center = center
        self.scale = scale
        if epsilon is None:
            epsilon = K.epsilon() * K.epsilon()
        self.epsilon = epsilon
        self.gamma_initializer = keras.initializers.get(gamma_initializer)
        self.beta_initializer = keras.initializers.get(beta_initializer)
        self.gamma_regularizer = keras.regularizers.get(gamma_regularizer)
        self.beta_regularizer = keras.regularizers.get(beta_regularizer)
        self.gamma_constraint = keras.constraints.get(gamma_constraint)
        self.beta_constraint = keras.constraints.get(beta_constraint)
        self.gamma, self.beta = None, None
    def get_config(self):
        config = {
            'center': self.center,
            'scale': self.scale,
            'epsilon': self.epsilon,
            'gamma_initializer': keras.initializers.serialize(self.gamma_initializer),
            'beta_initializer': keras.initializers.serialize(self.beta_initializer),
            'gamma_regularizer': keras.regularizers.serialize(self.gamma_regularizer),
            'beta_regularizer': keras.regularizers.serialize(self.beta_regularizer),
            'gamma_constraint': keras.constraints.serialize(self.gamma_constraint),
            'beta_constraint': keras.constraints.serialize(self.beta_constraint),
        }
        base_config = super(LayerNormalization, self).get_config()
        return dict(list(base_config.items()) + list(config.items()))
    def compute_output_shape(self, input_shape):
        return input_shape
    def compute_mask(self, inputs, input_mask=None):
        return input_mask
    def build(self, input_shape):
        shape = input_shape[-1:]
        if self.scale:
            self.gamma = self.add_weight(
                shape=shape,
                initializer=self.gamma_initializer,
                regularizer=self.gamma_regularizer,
                constraint=self.gamma_constraint,
                name='gamma',
            )
        if self.center:
            self.beta = self.add_weight(
                shape=shape,
                initializer=self.beta_initializer,
                regularizer=self.beta_regularizer,
                constraint=self.beta_constraint,
                name='beta',
            )
        super(LayerNormalization, self).build(input_shape)
    def call(self, inputs, training=None):
        mean = K.mean(inputs, axis=-1, keepdims=True)
        variance = K.mean(K.square(inputs - mean), axis=-1, keepdims=True)
        std = K.sqrt(variance + self.epsilon)
        outputs = (inputs - mean) / std
        if self.scale:
            outputs *= self.gamma
        if self.center:
            outputs += self.beta
        return outputs
#--------------------------------------#
#   Gelu激活函数的实现
#   利用近似的数学公式
#--------------------------------------#
class Gelu(Layer):
    def __init__(self, **kwargs):
        super(Gelu, self).__init__(**kwargs)
        self.supports_masking = True
    def call(self, inputs):
        return 0.5 * inputs * (1 + tf.tanh(tf.sqrt(2 / math.pi) * (inputs + 0.044715 * tf.pow(inputs, 3))))
    def get_config(self):
        config = super(Gelu, self).get_config()
        return config
    def compute_output_shape(self, input_shape):
        return input_shape
#--------------------------------------------------------------------------------------------------------------------#
#   classtoken部分是transformer的分类特征。用于堆叠到序列化后的图片特征中,作为一个单位的序列特征进行特征提取。
#
#   在利用步长为16x16的卷积将输入图片划分成14x14的部分后,将14x14部分的特征平铺,一幅图片会存在序列长度为196的特征。
#   此时生成一个classtoken,将classtoken堆叠到序列长度为196的特征上,获得一个序列长度为197的特征。
#   在特征提取的过程中,classtoken会与图片特征进行特征的交互。最终分类时,我们取出classtoken的特征,利用全连接分类。
#--------------------------------------------------------------------------------------------------------------------#
class ClassToken(Layer):
    def __init__(self, cls_initializer='zeros', cls_regularizer=None, cls_constraint=None, **kwargs):
        super(ClassToken, self).__init__(**kwargs)
        self.cls_initializer    = keras.initializers.get(cls_initializer)
        self.cls_regularizer    = keras.regularizers.get(cls_regularizer)
        self.cls_constraint     = keras.constraints.get(cls_constraint)
    def get_config(self):
        config = {
            'cls_initializer': keras.initializers.serialize(self.cls_initializer),
            'cls_regularizer': keras.regularizers.serialize(self.cls_regularizer),
            'cls_constraint': keras.constraints.serialize(self.cls_constraint),
        }
        base_config = super(ClassToken, self).get_config()
        return dict(list(base_config.items()) + list(config.items()))
    def compute_output_shape(self, input_shape):
        return (input_shape[0], input_shape[1] + 1, input_shape[2])
    def build(self, input_shape):
        self.num_features = input_shape[-1]
        self.cls = self.add_weight(
            shape       = (1, 1, self.num_features),
            initializer = self.cls_initializer,
            regularizer = self.cls_regularizer,
            constraint  = self.cls_constraint,
            name        = 'cls',
        )
        super(ClassToken, self).build(input_shape)
    def call(self, inputs):
        batch_size      = tf.shape(inputs)[0]
        cls_broadcasted = tf.cast(tf.broadcast_to(self.cls, [batch_size, 1, self.num_features]), dtype = inputs.dtype)
        return tf.concat([cls_broadcasted, inputs], 1)
#--------------------------------------------------------------------------------------------------------------------#
#   为网络提取到的特征添加上位置信息。
#   以输入图片为224, 224, 3为例,我们获得的序列化后的图片特征为196, 768。加上classtoken后就是197, 768
#   此时生成的pos_Embedding的shape也为197, 768,代表每一个特征的位置信息。
#--------------------------------------------------------------------------------------------------------------------#
class AddPositionEmbs(Layer):
    def __init__(self, image_shape, patch_size, pe_initializer='zeros', pe_regularizer=None, pe_constraint=None, **kwargs):
        super(AddPositionEmbs, self).__init__(**kwargs)
        self.image_shape        = image_shape
        self.patch_size         = patch_size
        self.pe_initializer     = keras.initializers.get(pe_initializer)
        self.pe_regularizer     = keras.regularizers.get(pe_regularizer)
        self.pe_constraint      = keras.constraints.get(pe_constraint)
    def get_config(self):
        config = {
            'pe_initializer': keras.initializers.serialize(self.pe_initializer),
            'pe_regularizer': keras.regularizers.serialize(self.pe_regularizer),
            'pe_constraint': keras.constraints.serialize(self.pe_constraint),
        }
        base_config = super(AddPositionEmbs, self).get_config()
        return dict(list(base_config.items()) + list(config.items()))
    def compute_output_shape(self, input_shape):
        return input_shape
    def build(self, input_shape):
        assert (len(input_shape) == 3), f"Number of dimensions should be 3, got {len(input_shape)}"
        length  = (224 // self.patch_size) * (224 // self.patch_size) + 1
        self.pe = self.add_weight(
            # shape       = [1, input_shape[1], input_shape[2]],
            shape       = [1, length, input_shape[2]],
            initializer = self.pe_initializer,
            regularizer = self.pe_regularizer,
            constraint  = self.pe_constraint,
            name        = 'pos_embedding',
        )
        super(AddPositionEmbs, self).build(input_shape)
    def call(self, inputs):
        num_features = tf.shape(inputs)[2]
        cls_token_pe = self.pe[:, 0:1, :]
        img_token_pe = self.pe[:, 1: , :]
        img_token_pe = tf.reshape(img_token_pe, [1, (224 // self.patch_size), (224 // self.patch_size), num_features])
        img_token_pe = tf.image.resize_bicubic(img_token_pe, (self.image_shape[0] // self.patch_size, self.image_shape[1] // self.patch_size), align_corners=False)
        img_token_pe = tf.reshape(img_token_pe, [1, -1, num_features])
        pe = tf.concat([cls_token_pe, img_token_pe], axis = 1)
        return inputs + tf.cast(pe, dtype=inputs.dtype)
#--------------------------------------------------------------------------------------------------------------------#
#   Attention机制
#   将输入的特征qkv特征进行划分,首先生成query, key, value。query是查询向量、key是键向量、v是值向量。
#   然后利用 查询向量query 叉乘 转置后的键向量key,这一步可以通俗的理解为,利用查询向量去查询序列的特征,获得序列每个部分的重要程度score。
#   然后利用 score 叉乘 value,这一步可以通俗的理解为,将序列每个部分的重要程度重新施加到序列的值上去。
#--------------------------------------------------------------------------------------------------------------------#
class Attention(Layer):
    def __init__(self, num_features, num_heads, **kwargs):
        super(Attention, self).__init__(**kwargs)
        self.num_features   = num_features
        self.num_heads      = num_heads
        self.projection_dim = num_features // num_heads
    def compute_output_shape(self, input_shape):
        return (input_shape[0], input_shape[1], input_shape[2] // 3)
    def call(self, inputs):
        #-----------------------------------------------#
        #   获得batch_size
        #-----------------------------------------------#
        bs      = tf.shape(inputs)[0]
        #-----------------------------------------------#
        #   b, 197, 3 * 768 -> b, 197, 3, 12, 64
        #-----------------------------------------------#
        inputs  = tf.reshape(inputs, [bs, -1, 3, self.num_heads, self.projection_dim])
        #-----------------------------------------------#
        #   b, 197, 3, 12, 64 -> 3, b, 12, 197, 64
        #-----------------------------------------------#
        inputs  = tf.transpose(inputs, [2, 0, 3, 1, 4])
        #-----------------------------------------------#
        #   将query, key, value划分开
        #   query     b, 12, 197, 64
        #   key       b, 12, 197, 64
        #   value     b, 12, 197, 64
        #-----------------------------------------------#
        query, key, value = inputs[0], inputs[1], inputs[2]
        #-----------------------------------------------#
        #   b, 12, 197, 64 @ b, 12, 197, 64 = b, 12, 197, 197
        #-----------------------------------------------#
        score           = tf.matmul(query, key, transpose_b=True)
        #-----------------------------------------------#
        #   进行数量级的缩放
        #-----------------------------------------------#
        scaled_score    = score / tf.math.sqrt(tf.cast(self.projection_dim, score.dtype))
        #-----------------------------------------------#
        #   b, 12, 197, 197 -> b, 12, 197, 197
        #-----------------------------------------------#
        weights         = tf.nn.softmax(scaled_score, axis=-1)
        #-----------------------------------------------#
        #   b, 12, 197, 197 @ b, 12, 197, 64 = b, 12, 197, 64
        #-----------------------------------------------#
        value          = tf.matmul(weights, value)
        #-----------------------------------------------#
        #   b, 12, 197, 64 -> b, 197, 12, 64
        #-----------------------------------------------#
        value = tf.transpose(value, perm=[0, 2, 1, 3])
        #-----------------------------------------------#
        #   b, 197, 12, 64 -> b, 197, 768
        #-----------------------------------------------#
        output = tf.reshape(value, (tf.shape(value)[0], tf.shape(value)[1], -1))
        return output
def MultiHeadSelfAttention(inputs, num_features, num_heads, dropout, name):
    #-----------------------------------------------#
    #   qkv   b, 197, 768 -> b, 197, 3 * 768
    #-----------------------------------------------#
    qkv = Dense(int(num_features * 3), name = name + "qkv")(inputs)
    #-----------------------------------------------#
    #   b, 197, 3 * 768 -> b, 197, 768
    #-----------------------------------------------#
    x   = Attention(num_features, num_heads)(qkv)
    #-----------------------------------------------#
    #   197, 768 -> 197, 768
    #-----------------------------------------------#
    x   = Dense(num_features, name = name + "proj")(x)
    x   = Dropout(dropout)(x)
    return x
def MLP(y, num_features, mlp_dim, dropout, name):
    y = Dense(mlp_dim, name = name + "fc1")(y)
    y = Gelu()(y)
    y = Dropout(dropout)(y)
    y = Dense(num_features, name = name + "fc2")(y)
    return y
def TransformerBlock(inputs, num_features, num_heads, mlp_dim, dropout, name):
    #-----------------------------------------------#
    #   施加层标准化
    #-----------------------------------------------#
    x = LayerNormalization(epsilon=1e-6, name = name + "norm1")(inputs)
    #-----------------------------------------------#
    #   施加多头注意力机制
    #-----------------------------------------------#
    x = MultiHeadSelfAttention(x, num_features, num_heads, dropout, name = name + "attn.")
    x = Dropout(dropout)(x)
    #-----------------------------------------------#
    #   施加残差结构
    #-----------------------------------------------#
    x = Add()([x, inputs])
    #-----------------------------------------------#
    #   施加层标准化
    #-----------------------------------------------#
    y = LayerNormalization(epsilon=1e-6, name = name + "norm2")(x)
    #-----------------------------------------------#
    #   施加两次全连接
    #-----------------------------------------------#
    y = MLP(y, num_features, mlp_dim, dropout, name = name + "mlp.")
    y = Dropout(dropout)(y)
    #-----------------------------------------------#
    #   施加残差结构
    #-----------------------------------------------#
    y = Add()([x, y])
    return y
def VisionTransformer(input_shape = [224, 224], patch_size = 16, num_layers = 12, num_features = 768, num_heads = 12, mlp_dim = 3072,
            classes = 1000, dropout = 0.1):
    #-----------------------------------------------#
    #   224, 224, 3
    #-----------------------------------------------#
    inputs      = Input(shape = (input_shape[0], input_shape[1], 3))
    #-----------------------------------------------#
    #   224, 224, 3 -> 14, 14, 768
    #-----------------------------------------------#
    x           = Conv2D(num_features, patch_size, strides = patch_size, padding = "valid", name = "patch_embed.proj")(inputs)
    #-----------------------------------------------#
    #   14, 14, 768 -> 196, 768
    #-----------------------------------------------#
    x           = Reshape(((input_shape[0] // patch_size) * (input_shape[1] // patch_size), num_features))(x)
    #-----------------------------------------------#
    #   196, 768 -> 197, 768
    #-----------------------------------------------#
    x           = ClassToken(name="cls_token")(x)
    #-----------------------------------------------#
    #   197, 768 -> 197, 768
    #-----------------------------------------------#
    x           = AddPositionEmbs(input_shape, patch_size, name="pos_embed")(x)
    #-----------------------------------------------#
    #   197, 768 -> 197, 768  12次
    #-----------------------------------------------#
    for n in range(num_layers):
        x = TransformerBlock(
            x,
            num_features= num_features,
            num_heads   = num_heads,
            mlp_dim     = mlp_dim,
            dropout     = dropout,
            name        = "blocks." + str(n) + ".",
        )
    x = LayerNormalization(
        epsilon=1e-6, name="norm"
    )(x)
    x = Lambda(lambda v: v[:, 0], name="ExtractToken")(x)
    x = Dense(classes, name="head")(x)
    x = Softmax()(x)
    return keras.models.Model(inputs, x)
以上就是Keras实现Vision Transformer VIT模型示例详解的详细内容,更多关于Keras实现VIT模型的资料请关注编程网其它相关文章!
--结束END--
本文标题: Keras实现Vision Transformer VIT模型示例详解
本文链接: https://lsjlt.com/news/117743.html(转载时请注明来源链接)
有问题或投稿请发送至: 邮箱/279061341@qq.com QQ/279061341
2024-03-01
2024-03-01
2024-03-01
2024-02-29
2024-02-29
2024-02-29
2024-02-29
2024-02-29
2024-02-29
2024-02-29
回答
回答
回答
回答
回答
回答
回答
回答
回答
回答
0