Centos 7 命令行安装oracle 前言: 本篇文章是使用VM中的centos7 安装oracle11g,网上找了很多教程,花了一天时间终于把oracle安装好了。大家可以看一看,全篇把文章中提到的所有步骤都进行截图了,方便大家

本篇文章是使用VM中的centos7 安装oracle11g,网上找了很多教程,花了一天时间终于把oracle安装好了。大家可以看一看,全篇把文章中提到的所有步骤都进行截图了,方便大家找错误。
检查硬盘分区:#df -h
#fdisk -l //fdisk -l可以查看swap分区大小
增加SWAP分区的方法:
使用dd命令创建一个swap交换文件
dd if=/dev/zero of=/home/swap bs=1024 count=4165632
这样就建立一个/home/swap的分区文件,大小为4G。
制作为swap格式文件:
mkswap /home/swap
再用swapon命令把这个文件分区挂载swap分区
/sbin/swapon /home/swap
我们用free -m命令看一下,发现已经有交换分区了。
为防止重启后swap分区变成0,要修改/etc/fstab文件
vi /etc/fstab
在文件末尾(最后一行)加上
/home/swap swap swap default 0 0
[root@host1 ~]# ifconfig

[root@host1 ~]# vi /etc/hosts


本次安装需要使用的oracle安装包需要大家提前下载完成,在本篇博客中的3.8中有相关安装包下载地址 ,如有需要可以自行使用百度网盘下载
yum install -y binutils* compat-libcap1* compat-libstdc++* GCc* glibc* ksh* libgcc* libstdc++* libaio* make* sysstat* elfutils-libelf-devel* unixODBC*
安装包*表示下载安装包所有的依赖包
yum命令不可使用请跳转到命令不可用问题2
[root@host1 ~]# vim /etc/sysctl.conf
io-max-nr = 1048576
fs.file-max = 6815744
kernel.shmall = 2097152
kernel.shmmax = 1073741824
kernel.shmmni = 4096
kernel.sem = 250 32000 100 128
net.ipv4.ip_local_port_range = 9000 65500
net.core.rmem_default = 262144
net.core.rmem_max = 4194304
net.core.wmem_default = 262144
net.core.wmem_max = 1048576

[root@host1 ~]# /sbin/sysctl -p
[root@host1 ~]# vim /etc/security/limits.conf
添加以下配置:
oracle           soft    nproc           2047
oracle           hard    nproc           16384
oracle           soft    nofile          1024
oracle           hard    nofile          65536
oracle           soft    stack           10240

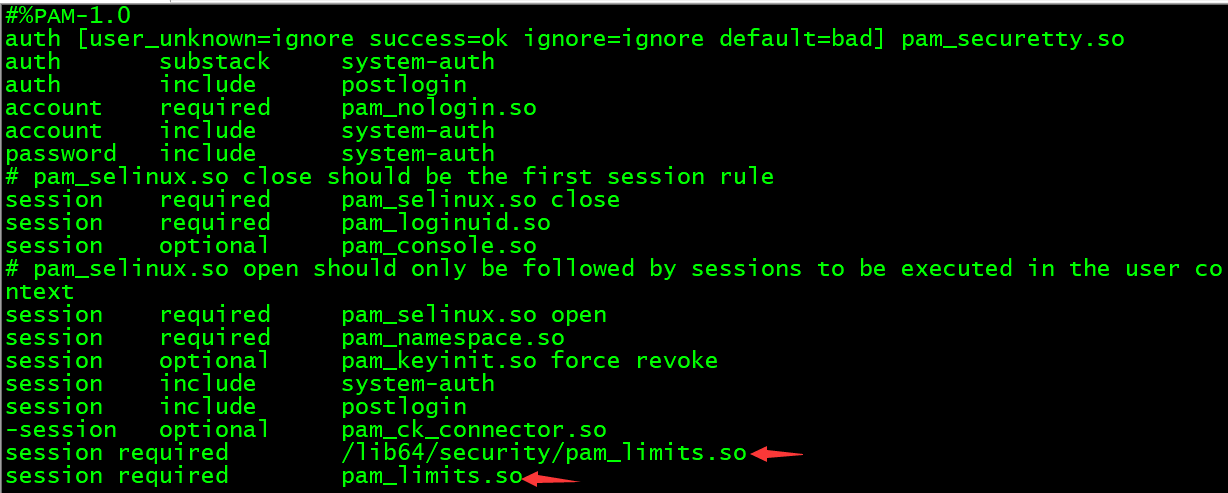
[root@host1 ~]# vim /etc/pam.d/login
添加:
session  required   /lib64/security/pam_limits.so
session  required   pam_limits.so

[root@host1 ~]# vim /etc/profile
添加如下函数
if [ $USER = "oracle" ]; then
  if [ $shell = "/bin/ksh" ]; then
   ulimit -p 16384
   ulimit -n 65536
  else
   ulimit -u 16384 -n 65536
  fi
fi

[root@host1 ~]# groupadd dba
[root@host1 ~]# groupadd oinstall
[root@host1 ~]# useradd -d /home/oracle -m -g oinstall -G dba -p 123 oracle
[root@host1 ~]# mkdir -p /u01/app/oracle/product/11.2.0
[root@host1 ~]# mkdir /u01/app/oracle/oradata
[root@host1 ~]# mkdir /u01/app/oracle/inventory
[root@host1 ~]# mkdir /u01/app/oracle/fast_recovery_area
[root@host1 ~]# chown -R oracle:oinstall /u01/app/oracle
[root@host1 ~]# chmod -R 775 /u01/app/oracle
[root@host1 ~]# mkdir -p /oracleData/software
[root@host1 ~]# chown -R oracle:oinstall /oracleData/software
链接:https://pan.baidu.com/s/17tp1cAIAMQU42UAhcrRRVA?pwd=1314
提取码:1314
链接:Https://pan.baidu.com/s/1PZ5h9LD5aHBfT34yjhP-Qg?pwd=1314
提取码:1314
[root@host1 ~]# cd /oracleData/software
[root@host1 software]# unzip linux.x64_11gR2_database_1of2.zip
[root@host1 software]# unzip linux.x64_11gR2_database_2of2.zip
[root@host1 ~]# su oracle
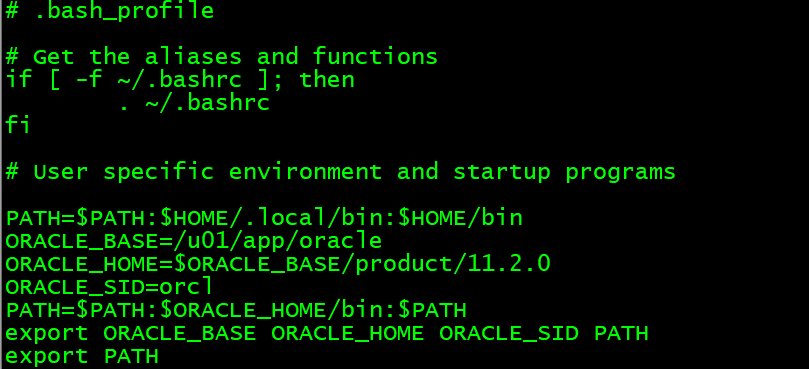
[oracle@host1 ~]$ vim .bash_profile
添加如下环境变量
ORACLE_BASE=/u01/app/oracle
ORACLE_HOME=$ORACLE_BASE/product/11.2.0
ORACLE_SID=orcl
PATH=$PATH:$ORACLE_HOME/bin:$PATH
export ORACLE_BASE ORACLE_HOME ORACLE_SID PATH

[oracle@host1 ~]$ source .bash_profile
[oracle@host1 ~]$ su - root
PassWord:
Last login: Thu Jan 27 15:33:11 EST 2022 from 192.168.255.1 on pts/1
[root@host1 ~]# cd /oracleData/software/database/response/
[root@host1 response]# cp db_install.rsp db_install.rsp.bak
[root@host1 response]# vim db_install.rsp
修改下列参数
oracle.install.option=INSTALL_DB_SWONLY

ORACLE_HOSTNAME=host1	//这里填写你自己修改的主机名,我这里修改的是host1

UNIX_GROUP_NAME=oinstall

INVENTORY_LOCATION=/u01/app/oracle/inventory

SELECTED_LANGUAGES=en,zh_CN

ORACLE_HOME=/u01/app/oracle/product/11.2.0

ORACLE_BASE=/u01/app/oracle

oracle.install.db.InstallEdition=EE

oracle.install.db.DBA_GROUP=dba

oracle.install.db.OPER_GROUP=dba

DECLINE_SECURITY_UPDATES=true
[root@host1 response]# su - oracle
Last login: Thu Jan 27 16:53:50 EST 2022 on pts/1
[oracle@host1 ~]$ cd /oracleData/software/database/
[oracle@host1 database]$ ./runInstaller -silent -ignorePrereq -ignoreSysPrereqs -responseFile /oracleData/software/database/response/db_install.rsp

[oracle@host1 ~]$ su - root
Password:
Last login: Thu Jan 27 15:33:11 EST 2022 from 192.168.255.1 on pts/1
[root@host1 ~]# cd /oracleData/software/database/
[root@host1 database]# sh /u01/app/oracle/inventory/orainstRoot.sh
[root@host1 database]# sh /u01/app/oracle/product/11.2.0/root.sh
[oracle@host1 ~]$ export DISPLAY=localhost:0.0
[oracle@host1 ~]$ netca -silent -responseFile /tmp/database/response/netca.rsp
[root@host1 ~]# netstat -tnulp | grep 1521
[root@host1 ~]# vim /oracleData/software/database/response/dbca.rsp
修改以下参数:
GDBNAME = "orcl"
SID = "orcl"
SYSPASSWORD = "oracle"
SYSTEMPASSWORD = "oracle"
SYSMANPASSWORD = "oracle"
DBSNMPPASSWORD = "oracle"
DATAFILEDESTINATION =/u01/app/oracle/oradata        /357
RECOVERYAREADESTINATION=/u01/app/oracle/fast_recovery_area        /367
CHARACTERSET = "ZHS16GBK"        /415
TOTALMEMORY = "1638"        /540
[oracle@host1 database]$ dbca -silent -responseFile /oracleData/software/database/response/dbca.rsp
[oracle@host1 ~]$ ps -ef | grep ora_ | grep -v grep
[oracle@host1 ~]$ lsnrctl status
[oracle@host1 dbs]$ sqlplus / as sysdba
使用yum -y install vim*安装 vim
使用yum install net-tools安装
使用yum install -y unzip zip安装
--结束END--
本文标题: VM中CentOS 7 命令行安装oracle
本文链接: https://lsjlt.com/news/9103.html(转载时请注明来源链接)
有问题或投稿请发送至: 邮箱/279061341@qq.com QQ/279061341
2024-10-23
2024-10-22
2024-10-22
2024-10-22
2024-10-22
2024-10-22
2024-10-22
2024-10-22
2024-10-22
2024-10-22
回答
回答
回答
回答
回答
回答
回答
回答
回答
回答
0