这篇文章主要介绍如何安装oracle12c单实例数据库软件,文中介绍的非常详细,具有一定的参考价值,感兴趣的小伙伴们一定要看完!一、环境准备[oracle@localhost ~]$ df -hl 查看内存
这篇文章主要介绍如何安装oracle12c单实例数据库软件,文中介绍的非常详细,具有一定的参考价值,感兴趣的小伙伴们一定要看完!
一、环境准备
[oracle@localhost ~]$ df -hl 查看内存情况
磁盘空间需要6.4GB,/tmp分区需要1GB
[oracle@localhost ~]$ df -hl /tmp
内存配置4G,swap配置2G
[oracle@localhost ~]$ grep MemTotal /proc/meminfo
[oracle@localhost ~]$ cat /proc/swaps
操作系统:Red Hat Enterprise linux Server release 7
[oracle@localhost ~]$ cat /etc/redhat-release
安装包 yum -y install package*
把所有包安装
binutils-2.23.52.0.1-12.el7.x86_64
compat-libcap1-1.10-3.el7.x86_64
compat-libstdc++-33-3.2.3-71.el7.i686
compat-libstdc++-33-3.2.3-71.el7.x86_64
GCc-4.8.2-3.el7.x86_64
gcc-c++-4.8.2-3.el7.x86_64
glibc-2.17-36.el7.i686
glibc-2.17-36.el7.x86_64
glibc-devel-2.17-36.el7.i686
glibc-devel-2.17-36.el7.x86_64
ksh
libaio-0.3.109-9.el7.i686
libaio-0.3.109-9.el7.x86_64
libaio-devel-0.3.109-9.el7.i686
libaio-devel-0.3.109-9.el7.x86_64
libgcc-4.8.2-3.el7.i686
libgcc-4.8.2-3.el7.x86_64
libstdc++-4.8.2-3.el7.i686
libstdc++-4.8.2-3.el7.x86_64
libstdc++-devel-4.8.2-3.el7.i686
libstdc++-devel-4.8.2-3.el7.x86_64
libXi-1.7.2-1.el7.i686
libXi-1.7.2-1.el7.x86_64
libXtst-1.2.2-1.el7.i686
libXtst-1.2.2-1.el7.x86_64
make-3.82-19.el7.x86_64
sysstat-10.1.5-1.el7.x86_64
查看组是否存在
[root@localhost ~]# grep oinstall /etc/group
[root@localhost ~]# grep dba /etc/group
创建组oninstall 与 dba
[root@localhost ~]# /usr/sbin/groupadd oinstall
[root@localhost ~]# /usr/sbin/groupadd dba
[root@localhost ~]# /usr/sbin/groupadd oper
查看oracle用户 是否存在
[root@localhost ~]# id oracle
创建oracle用户
[root@localhost ~]# /usr/sbin/useradd -g oinstall -G dba,oper oracle
若已有oracle则报错存在
[root@localhost ~]# passwd oracle
为oracle创建密码
设置资源限制:
[root@localhost ~]# vi /etc/sysctl.conf
在文末添加:
fs.aio-max-nr = 1048576
fs.file-max = 6815744
#kernel.shmall = 2097152
#kernel.shmmax = 536870912
kernel.shmmni = 4096
kernel.sem = 250 32000 100 128
net.ipv4.ip_local_port_range = 9000 65500
net.core.rmem_default = 262144
net.core.rmem_max = 4194304
net.core.wmem_default = 262144
net.core.wmem_max = 1048586
使更改生效
[root@localhost ~]# /sbin/sysctl -p
设置安装用户的资源限制:
[root@localhost ~]# vi /etc/security/limits.conf
在root下,添加
oracle soft nofile 1024
oracle hard nofile 65536
oracle soft nproc 2047
oracle hard nproc 16384
oracle soft stack 10240
oracle hard stack 10240
创建oracle安装目录并分配权限
[root@localhost ~]# mkdir /u01
[root@localhost ~]# chown -R oracle:oinstall /u01
[root@localhost ~]# chmod -R 775 /u01
为oracle用户设置环境变量
[li@localhost ~]$ su - oracle
PassWord:
[oracle@localhost ~]$
[oracle@localhost ~]$ vi ~/.bash_profile
# .bash_profile
# Get the aliases and functions
if [ -f ~/.bashrc ]; then
. ~/.bashrc
fi
# User specific environment and startup programs
PATH=$PATH:$HOME/bin
export PATH
export ORACLE_BASE=/u01/app/oracle
export ORACLE_HOME=$ORACLE_BASE/product/12.2.0/dbhome_1
export PATH=$ORACLE_HOME/bin:$PATH
export ORACLE_SID=db12c
export NLS_LANG=AMERICAN_AMERICA.AL32UTF8
如何切换到oracle用户
Su – oracle
在temp下创建oracle 然后把12c压缩包解压在里面
在oracle用户下
[li@localhost ~]$ su oracle
Password:
[oracle@localhost ]$ cd /u01/software/database
[oracle@localhost database]$ ls
install response rpm runInstaller sshsetup stage welcome.html
执行安装
[oracle@localhost database]$ ./runInstaller
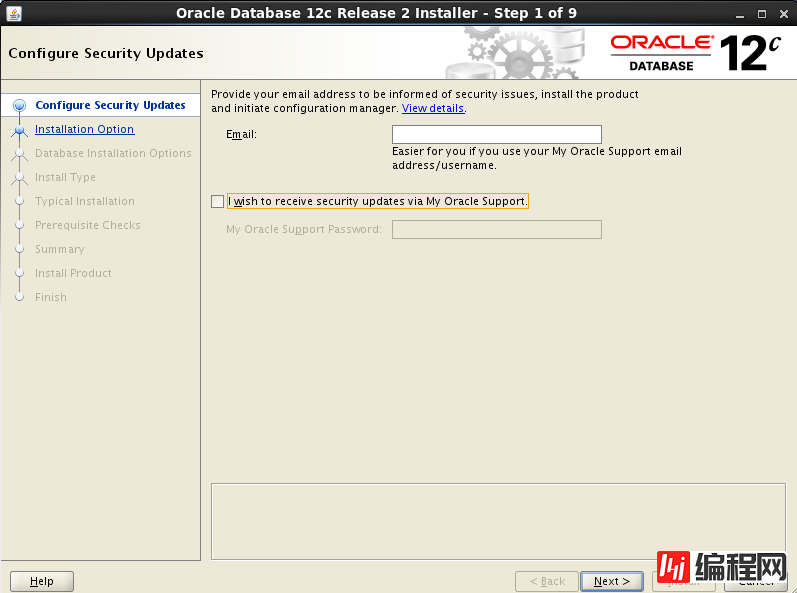
1、弹出此界面,不勾选选项(如果有也可以填写)然后next
2、此处选择仅安装数据库软件,然后next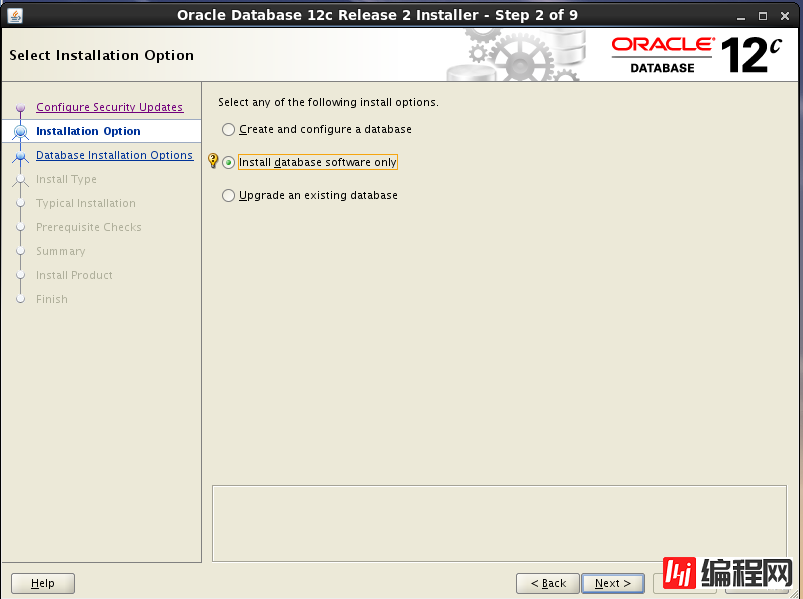
3、选择安装单实例数据库,然后next
4、选择安装企业版,然后next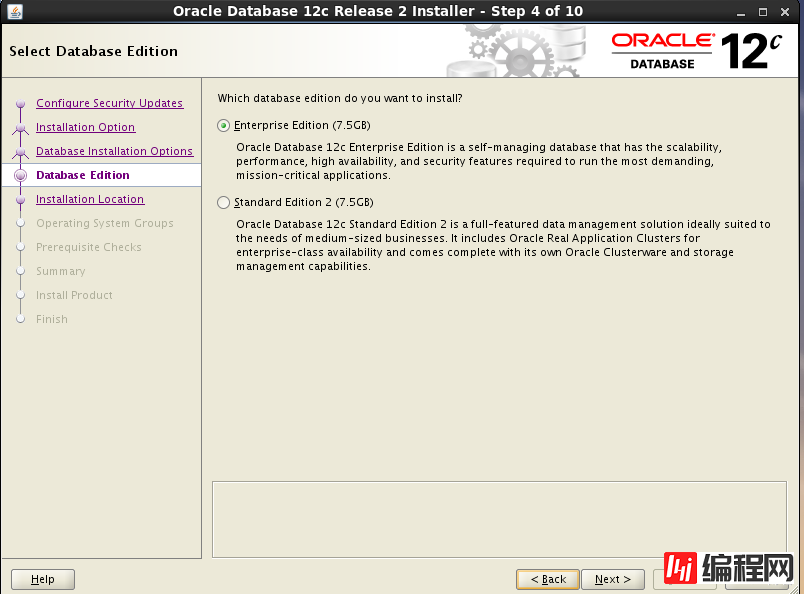
5、安装路径默认安装
6、默认安装 next
7、组默认 next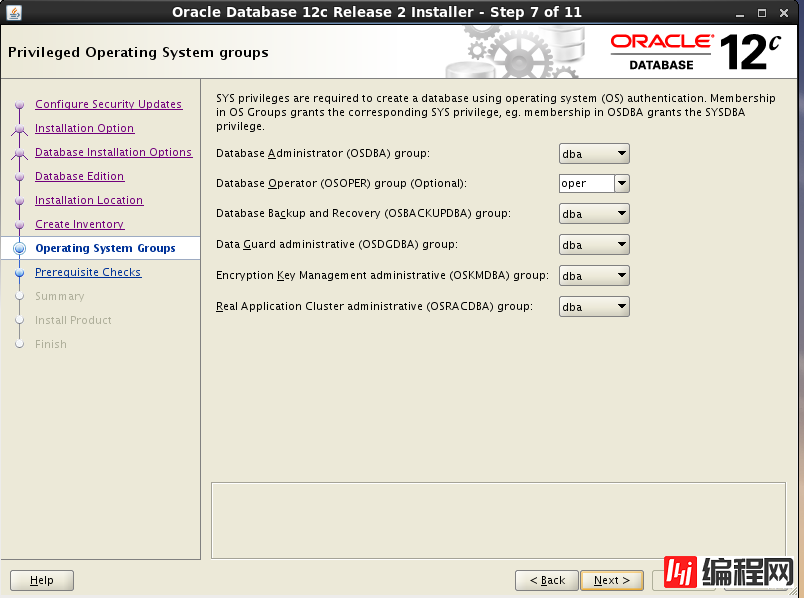
8、这里会检查是否有安装相关的包,可以新打开一个窗口yum安装包,然后检查
(这里检查的错误最好都想办法使得没有错误,不然在启动时会报错)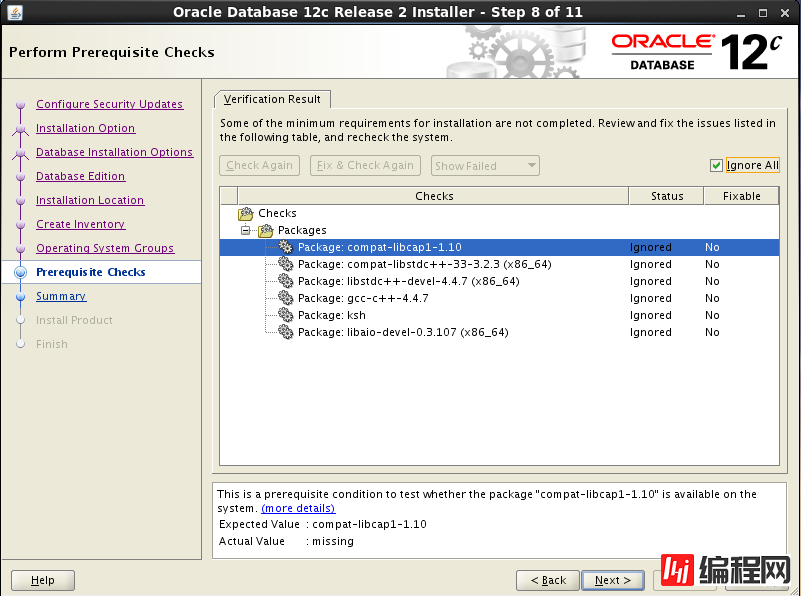
9、点击install开始安装
10、在root下执行两条脚本
[root@localhost ~]# /u01/app/oraInventory/orainstRoot.sh
Changing permissions of /u01/app/oraInventory.
Adding read,write permissions for group.
Removing read,write,execute permissions for world.
Changing groupname of /u01/app/oraInventory to oinstall.
The execution of the script is complete.
[root@localhost ~]# /u01/app/oracle/product/12.2.0/dbhome_1/root.sh
PerfORMing root user operation.
The following environment variables are set as:
ORACLE_OWNER= oracle
ORACLE_HOME= /u01/app/oracle/product/12.2.0/dbhome_1
Enter the full pathname of the local bin directory: [/usr/local/bin]:
Copying dbhome to /usr/local/bin ...
Copying oraenv to /usr/local/bin ...
Copying coraenv to /usr/local/bin ...
Creating /etc/oratab file...
Entries will be added to the /etc/oratab file as needed by
Database Configuration Assistant when a database is created
Finished running generic part of root script.
Now product-specific root actions will be performed.
Do you want to setup Oracle Trace File Analyzer (TFA) now ? yes|[no] :
yes
Installing Oracle Trace File Analyzer (TFA).
Log File: /u01/app/oracle/product/12.2.0/dbhome_1/install/root_localhost.localdomain_2018-04-30_07-56-19-938348191.log
Finished installing Oracle Trace File Analyzer (TFA)
执行完脚本,数据库软件安装完成
以上是“如何安装oracle12c单实例数据库软件”这篇文章的所有内容,感谢各位的阅读!希望分享的内容对大家有帮助,更多相关知识,欢迎关注编程网数据库频道!
--结束END--
本文标题: 如何安装oracle12c单实例数据库软件
本文链接: https://lsjlt.com/news/64417.html(转载时请注明来源链接)
有问题或投稿请发送至: 邮箱/279061341@qq.com QQ/279061341
2024-10-23
2024-10-22
2024-10-22
2024-10-22
2024-10-22
2024-10-22
2024-10-22
2024-10-22
2024-10-22
2024-10-22
回答
回答
回答
回答
回答
回答
回答
回答
回答
回答
0