小编给大家分享一下Centos7.3 安装Mysql5.7.18的示例,希望大家阅读完这篇文章之后都有所收获,下面让我们一起去探讨吧!1查看linux发行版本[root@typecodes ~]# cat
小编给大家分享一下Centos7.3 安装Mysql5.7.18的示例,希望大家阅读完这篇文章之后都有所收获,下面让我们一起去探讨吧!
1查看linux发行版本
[root@typecodes ~]# cat /etc/redhat-release
CentOS Linux release 7.2.1511 (Core)
2 下载mysql官方的Yum Repository
根据Linux发行版本(CentOS、Fedora都属于红帽系),从mysql官方(Http://dev.mysql.com/downloads/repo/yum/)获取Yum Repository。
[root@typecodes ~]# wget -i http://dev.mysql.com/get/mysql57-commUnity-release-el7-7.noarch.rpm
--2016-02-03 18:36:02-- http://dev.mysql.com/get/mysql57-community-release-el7-7.noarch.rpm
Resolving dev.mysql.com (dev.mysql.com)... 137.254.60.11
Connecting to dev.mysql.com (dev.mysql.com)|137.254.60.11|:80... connected.
HTTP request sent, awaiting response... 302 Found
Location: http://repo.mysql.com//mysql57-community-release-el7-7.noarch.rpm [following]
--2016-02-03 18:36:04-- http://repo.mysql.com//mysql57-community-release-el7-7.noarch.rpm
Resolving repo.mysql.com (repo.mysql.com)... 104.102.164.25
Connecting to repo.mysql.com (repo.mysql.com)|104.102.164.25|:80... connected.
HTTP request sent, awaiting response... 200 OK
Length: 8984 (8.8K) [application/x-redhat-package-manager]
Saving to: ‘mysql57-community-release-el7-7.noarch.rpm'
100%[=============================================================================================================================>] 8,984  --.-K/s in 0s
2016-02-03 18:36:07 (68.4 MB/s) - ‘mysql57-community-release-el7-7.noarch.rpm' saved [8984/8984]
3 安装MySQL的Yum Repository
安装完MySQL的Yum Repository,每次执行yum update都会检查MySQL是否更新。
[root@typecodes ~]# yum -y install mysql57-community-release-el7-7.noarch.rpm
Loaded plugins: axelget, fastestmirror, langpacks
Examining mysql57-community-release-el7-7.noarch.rpm: mysql57-community-release-el7-7.noarch
Marking mysql57-community-release-el7-7.noarch.rpm to be installed
Resolving Dependencies
--> Running transaction check
---> Package mysql57-community-release.noarch 0:el7-7 will be installed
--> Finished Dependency Resolution
Dependencies Resolved
=======================================================================================================================================================================
 Package          Arch      Version     Repository             Size
=======================================================================================================================================================================
Installing:
 mysql57-community-release      noarch      el7-7      /mysql57-community-release-el7-7.noarch      7.8 k
Transaction Summary
=======================================================================================================================================================================
Install 1 Package
Total size: 7.8 k
Installed size: 7.8 k
Downloading packages:
Running transaction check
Running transaction test
Transaction test succeeded
Running transaction
 Installing : mysql57-community-release-el7-7.noarch                            1/1
 Verifying : mysql57-community-release-el7-7.noarch                           1/1
Installed:
 mysql57-community-release.noarch 0:el7-7
Complete![root@typecodes ~]# yum -y install mysql-community-server
Loaded plugins: axelget, fastestmirror, langpacks
No metadata available for base
No metadata available for epel
No metadata available for extras
repomd.xml | 2.5 kB 00:00:00
update mysql-connectors-community metadata successfully
repomd.xml | 2.5 kB 00:00:00
update mysql-tools-community metadata successfully
repomd.xml | 2.5 kB 00:00:00
update mysql57-community metadata successfully
No metadata available for updates
mysql-connectors-community | 2.5 kB 00:00:00
mysql-tools-community | 2.5 kB 00:00:00
mysql57-community | 2.5 kB 00:00:00
(1/3): mysql-tools-community/x86_64/primary_db | 24 kB 00:00:01
(2/3): mysql57-community/x86_64/primary_db | 28 kB 00:00:01
(3/3): mysql-connectors-community/x86_64/primary_db | 8.6 kB 00:00:02
Loading mirror speeds from cached hostfile
* base: mirrors.aliyun.com
* epel: mirrors.neusoft.edu.cn
* extras: mirrors.163.com
* updates: mirrors.163.com
Resolving Dependencies
--> Running transaction check
---> Package mysql-community-server.x86_64 0:5.7.10-1.el7 will be installed
--> Processing Dependency: mysql-community-common(x86-64) = 5.7.10-1.el7 for package: mysql-community-server-5.7.10-1.el7.x86_64
--> Processing Dependency: mysql-community-client(x86-64) = 5.7.10-1.el7 for package: mysql-community-server-5.7.10-1.el7.x86_64
--> Running transaction check
---> Package mysql-community-client.x86_64 0:5.7.10-1.el7 will be installed
--> Processing Dependency: mysql-community-libs(x86-64) = 5.7.10-1.el7 for package: mysql-community-client-5.7.10-1.el7.x86_64
---> Package mysql-community-common.x86_64 0:5.7.10-1.el7 will be installed
--> Running transaction check
---> Package mariadb-libs.x86_64 1:5.5.44-2.el7.centos will be obsoleted
--> Processing Dependency: libmysqlclient.so.18()(64bit) for package: 2:postfix-2.10.1-6.el7.x86_64
--> Processing Dependency: libmysqlclient.so.18(libmysqlclient_18)(64bit) for package: 2:postfix-2.10.1-6.el7.x86_64
---> Package mysql-community-libs.x86_64 0:5.7.10-1.el7 will be obsoleting
--> Running transaction check
---> Package mysql-community-libs-compat.x86_64 0:5.7.10-1.el7 will be obsoleting
--> Finished Dependency Resolution
Dependencies Resolved
=======================================================================================================================================================================
Package Arch Version Repository Size
=======================================================================================================================================================================
Installing:
mysql-community-libs x86_64 5.7.10-1.el7 mysql57-community 2.2 M
replacing mariadb-libs.x86_64 1:5.5.44-2.el7.centos
mysql-community-libs-compat x86_64 5.7.10-1.el7 mysql57-community 2.0 M
replacing mariadb-libs.x86_64 1:5.5.44-2.el7.centos
mysql-community-server x86_64 5.7.10-1.el7 mysql57-community 142 M
Installing for dependencies:
mysql-community-client x86_64 5.7.10-1.el7 mysql57-community 24 M
mysql-community-common x86_64 5.7.10-1.el7 mysql57-community 269 k
Transaction Summary
=======================================================================================================================================================================
Install 3 Packages (+2 Dependent packages)
Total download size: 171 M
Downloading packages:
mysql-community-server-5.7.10-1.el7.x86_64.rpm | 142 MB 00:03:42
mysql-community-libs-compat-5.7.10-1.el7.x86_64.rpm | 2.0 MB 00:00:03
mysql-community-libs-5.7.10-1.el7.x86_64.rpm | 2.2 MB 00:00:05
mysql-community-client-5.7.10-1.el7.x86_64.rpm | 24 MB 00:00:41
warning: /var/cache/yum/x86_64/7/mysql57-community/packages/mysql-community-common-5.7.10-1.el7.x86_64.rpm: Header V3 DSA/SHA1 Signature, key ID 5072e1f5: NOKEY00 ETA
Public key for mysql-community-common-5.7.10-1.el7.x86_64.rpm is not installed
mysql-community-common-5.7.10-1.el7.x86_64.rpm | 269 kB 00:00:01
Retrieving key from file:///etc/pki/rpm-gpg/RPM-GPG-KEY-mysql
Importing GPG key 0x5072E1F5:
Userid : "MySQL Release Engineering <mysql-build@oss.oracle.com>"
Fingerprint: a4a9 4068 76fc bd3c 4567 70c8 8c71 8d3b 5072 e1f5
Package : mysql57-community-release-el7-7.noarch (@/mysql57-community-release-el7-7.noarch)
From : /etc/pki/rpm-gpg/RPM-GPG-KEY-mysql
Running transaction check
Running transaction test
Transaction test succeeded
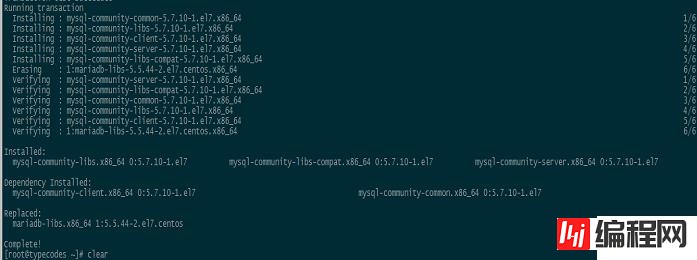
Running transaction
Installing : mysql-community-common-5.7.10-1.el7.x86_64 1/6
Installing : mysql-community-libs-5.7.10-1.el7.x86_64 2/6
Installing : mysql-community-client-5.7.10-1.el7.x86_64 3/6
Installing : mysql-community-server-5.7.10-1.el7.x86_64 4/6
Installing : mysql-community-libs-compat-5.7.10-1.el7.x86_64 5/6
Erasing : 1:mariadb-libs-5.5.44-2.el7.centos.x86_64 6/6
Verifying : mysql-community-server-5.7.10-1.el7.x86_64 1/6
Verifying : mysql-community-libs-compat-5.7.10-1.el7.x86_64 2/6
Verifying : mysql-community-common-5.7.10-1.el7.x86_64 3/6
Verifying : mysql-community-libs-5.7.10-1.el7.x86_64 4/6
Verifying : mysql-community-client-5.7.10-1.el7.x86_64 5/6
Verifying : 1:mariadb-libs-5.5.44-2.el7.centos.x86_64 6/6
Installed:
mysql-community-libs.x86_64 0:5.7.10-1.el7 mysql-community-libs-compat.x86_64 0:5.7.10-1.el7 mysql-community-server.x86_64 0:5.7.10-1.el7
Dependency Installed:
mysql-community-client.x86_64 0:5.7.10-1.el7 mysql-community-common.x86_64 0:5.7.10-1.el7
Replaced:
mariadb-libs.x86_64 1:5.5.44-2.el7.centos
Complete!
[root@typecodes ~]# clear最后的截图:

4 启动数据库:
[root@typecodes ~]# systemctl start mysqld.service然后使用命令systemctl status mysqld.service查看MySQL数据库启动后的服务状态:

5 获取初始密码
使用YUM安装并启动MySQL服务后,MySQL进程会自动在进程日志中打印root用户的初始密码:
#######从mysql进程日志中获取root用户的初始密码:ra%yk7urCBIh
[root@typecodes ~]# grep "passWord" /var/log/mysqld.log
2016-02-03T10:42:17.272166Z 1 [Note] A temporary password is generated for root@localhost: ra%yk7urCBIh
2016-02-03T10:42:36.776875Z 2 [Note] Access denied for user 'root'@'localhost' (using password: NO)
2016-02-03T10:42:52.063138Z 3 [Note] Access denied for user 'root'@'localhost' (using password: NO)
2016-02-03T10:42:57.564373Z 4 [Note] Access denied for user 'root'@'localhost' (using password: NO)
2016-02-03T10:43:01.477007Z 5 [Note] Access denied for user 'root'@'localhost' (using password: NO)
2016-02-03T10:46:03.642008Z 6 [Note] Access denied for user 'root'@'localhost' (using password: NO)
2016-02-03T10:46:11.217889Z 7 [Note] Access denied for user 'root'@'localhost' (using password: NO)
2016-02-03T10:47:44.755199Z 0 [Note] Shutting down plugin 'validate_password'
2016-02-03T10:47:46.505844Z 0 [Note] Shutting down plugin 'sha256_password'
2016-02-03T10:47:46.505851Z 0 [Note] Shutting down plugin 'mysql_native_password'
6 修改root用户密码
使用小节5中获取的root用户的初始密码,然后进行修改:
set global validate_password_policy =0;//默认是1,即MEDIUM,所以刚开始设置的密码必须符合长度,且必须含有数字,小写或大写字母,特殊字符。
set global validate_password_length=4;//指定了密码中数据的长度
alter user root@localhost identified by 'crow';//修改密码
增加远程访问权限
GRANT ALL PRIVILEGES ON *.* TO 'root'@'%' IDENTIFIED BY 'crow' WITH GRANT OPTION;
FLUSH PRIVILEGES;
退出mysql,然后重启服务
systemctl restart mysqld防火墙打开3306端口
firewall-cmd --zone=public --add-port=3306/tcp --permanent重启防火墙
firewall-cmd --reload
[root@typecodes ~]# mysql -uroot -p
Enter password:    #######输入默认的root密码后回车
Welcome to the MySQL monitor. Commands end with ; or \g.
Your MySQL connection id is 2
Server version: 5.7.10
Copyright (c) 2000, 2015, Oracle and/or its affiliates. All rights reserved.
Oracle is a reGIStered trademark of Oracle Corporation and/or its
affiliates. Other names may be trademarks of their respective
owners.
Type 'help;' or '\h' for help. Type '\c' to clear the current input statement.
mysql> ALTER USER 'root'@'localhost' IDENTIFIED BY 'new password';
Query OK, 0 rows affected (0.00 sec)
mysql> exit
Bye
7 安装完毕
至此,使用在CentOS7中使用YUM方法安装MySQL5.7.10数据库完毕。如下所示,可以使用新的root密码登陆MySQL了。
[root@typecodes ~]# mysql -uroot -ppassword
mysql: [Warning] Using a password on the command line interface can be insecure.
Welcome to the MySQL monitor. Commands end with ; or \g.
Your MySQL connection id is 3
Server version: 5.7.10 MySQL Community Server (GPL)
Copyright (c) 2000, 2015, Oracle and/or its affiliates. All rights reserved.
Oracle is a registered trademark of Oracle Corporation and/or its
affiliates. Other names may be trademarks of their respective
owners.
Type 'help;' or '\h' for help. Type '\c' to clear the current input statement.
mysql> use mysql;
Reading table infORMation for completion of table and column names
You can turn off this feature to get a quicker startup with -A
Database changed
mysql> show databases;
+--------------------+
| Database   |
+--------------------+
| information_schema |
| mysql    |
| performance_schema |
| sys    |
+--------------------+
4 rows in set (0.00 sec)
mysql> clear
mysql> exit
Bye
[root@typecodes ~]# clear
附录1:查看MySQL数据库的配置信息
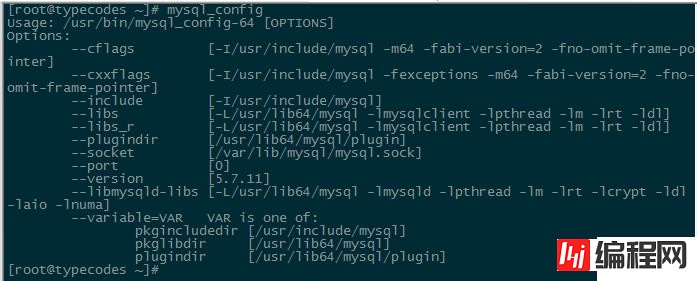
MySQL的配置文件依然是/etc/my.cnf,其它安装信息可以通过mysql_config命令查看。其中,动态库文件存放在/usr/lib64/mysql目录下。

由于需要用到类似mysql.h等头文件,需要执行下面的命令安装mysql开发版本即可。
[root@typecodes ~]# yum -y install mysql-community-devel附录3:删除MySQL的Repository
因为小节3中安装了MySQL的Yum Repository,所以以后每次执行yum操作时,都会去检查更新。如果想要去掉这种自动检查操作的话,可以使用如下命令卸载MySQL的Repository即可。
[root@typecodes ~]# yum -y remove mysql57-community-release-el7-7.noarch
update 2017.04.10 11:10
使用上面的yum方法也可以安装目前mysql官网上最新的版本mysql5.7.18。只要替换小节2中rmp包的版本即可,后续操作步骤不变。
wget -i -c http://dev.mysql.com/get/mysql57-community-release-el7-10.noarch.rpm看完了这篇文章,相信你对“centos7.3 安装mysql5.7.18的示例”有了一定的了解,如果想了解更多相关知识,欢迎关注编程网数据库频道,感谢各位的阅读!
--结束END--
本文标题: centos7.3 安装mysql5.7.18的示例
本文链接: https://lsjlt.com/news/54586.html(转载时请注明来源链接)
有问题或投稿请发送至: 邮箱/279061341@qq.com QQ/279061341
2024-10-23
2024-10-22
2024-10-22
2024-10-22
2024-10-22
2024-10-22
2024-10-22
2024-10-22
2024-10-22
2024-10-22
回答
回答
回答
回答
回答
回答
回答
回答
回答
回答
0