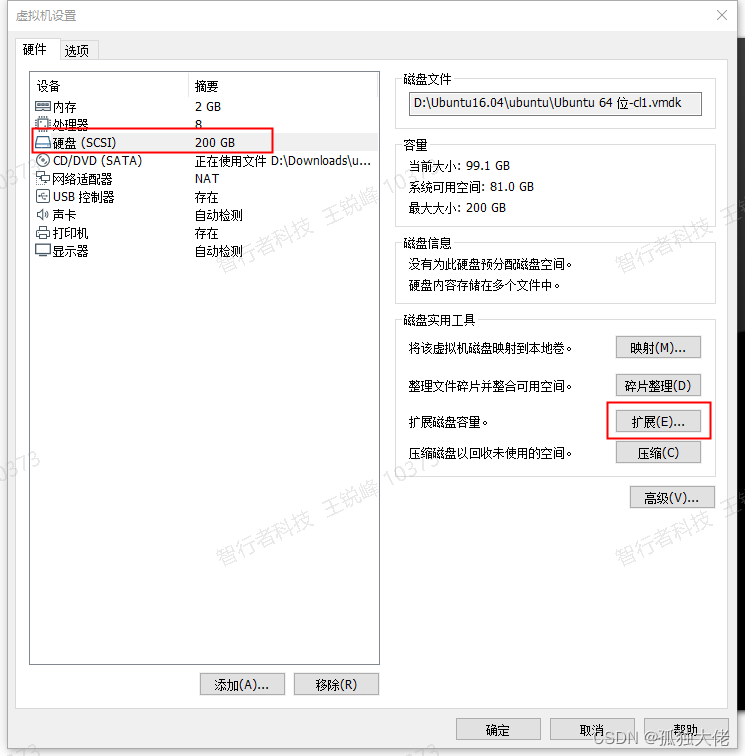
一、准备 扩展虚拟机的磁盘空间 在虚拟机关闭状态下,点击虚拟机>设置>硬盘>扩展:扩展自己需要的容量。 二、开始扩展 idriver@ubuntu:~$ su // 1.
一、准备
在虚拟机关闭状态下,点击虚拟机>设置>硬盘>扩展:扩展自己需要的容量。

二、开始扩展
idriver@ubuntu:~$ su // 1.切换至root用户root@ubuntu:/home/idriver# fdisk -l // 2.查看系统的磁盘分区情况root@ubuntu:/home/idriver# df -TH // 3.查看哪个分区挂载在根目录下Filesystem Type Size Used Avail Use% Mounted onudev devtmpfs 1.1G 0 1.1G 0% /devtmpfs tmpfs 207M 6.5M 201M 4% /run/dev/sda1 ext4 212G 43G 160G 22% /tmpfs tmpfs 1.1G 218k 1.1G 1% /dev/shmtmpfs tmpfs 5.3M 4.1k 5.3M 1% /run/locktmpfs tmpfs 1.1G 0 1.1G 0% /sys/fs/cgrouptmpfs tmpfs 207M 50k 207M 1% /run/user/1000root@ubuntu:/home/idriver# fdisk /dev/sda // 4.删除其中的所有分区包括 /dev/sda1,然后在重新建立该分区Welcome to fdisk (util-linux 2.27.1).Changes will remain in memory only, until you decide to write them.Be careful before using the write command.Command (m for help):// 常用命令:// m获取帮助// n添加新分区// d删除分区// p打印分区表// t更改分区类型// w将分区表写入磁盘并保存Command (m for help): d // 5.删除分区Selected partition 1Partition 1 has been deleted.Command (m for help): n // 6.新建分区Partition type p primary (0 primary, 0 extended, 4 free) e extended (container for logical partitions)Select (default p): p // 7.选择主分区Partition number (1-4, default 1): First sector (2048-419430399, default 2048): // 默认Last sector, +sectors or +size{K,M,G,T,P} (2048-419430399, default 419430399): //默认Created a new partition 1 of type 'Linux' and of size 200 GiB.Command (m for help): pDisk /dev/sda: 200 GiB, 214748364800 bytes, 419430400 sectorsUnits: sectors of 1 * 512 = 512 bytesSector size (logical/physical): 512 bytes / 512 bytesI/O size (minimum/optimal): 512 bytes / 512 bytesDisklabel type: dosDisk identifier: 0xe4e5e6cbDevice Boot Start End Sectors Size Id Type/dev/sda1 2048 419430399 419428352 200G 83 LinuxCommand (m for help): w // 8.保存The partition table has been altered.Calling ioctl() to re-read partition table.Re-reading the partition table failed.: Device or resource busyThe kernel still uses the old table. The new table will be used at the next reboot or after you run partprobe(8) or kpartx(8).保存后出现错误:无视它继续往下执行

root@ubuntu:/home/idriver# partprobe /dev/sda // 9.通知系统内核分区表的变化root@ubuntu:/home/idriver# resize2fs /dev/sda1 // 10.对文件系统进行扩容resize2fs 1.42.13 (17-May-2015)Filesystem at /dev/sda1 is mounted on /; on-line resizing requiredold_desc_blocks = 7, new_desc_blocks = 13The filesystem on /dev/sda1 is now 52428544 (4k) blocks long.root@ubuntu:/home/idriver# df -TH // 11.查看是否扩容成功Filesystem Type Size Used Avail Use% Mounted onudev devtmpfs 1.1G 0 1.1G 0% /devtmpfs tmpfs 207M 6.6M 201M 4% /run/dev/sda1 ext4 212G 43G 160G 22% /tmpfs tmpfs 1.1G 218k 1.1G 1% /dev/shmtmpfs tmpfs 5.3M 4.1k 5.3M 1% /run/locktmpfs tmpfs 1.1G 0 1.1G 0% /sys/fs/cgrouptmpfs tmpfs 207M 4.1k 207M 1% /run/user/108tmpfs tmpfs 207M 50k 207M 1% /run/user/1000三、扩容后造成开机启动等待1分30秒问题解决办法
说明:虚拟机扩容后,使用fdisk /dev/sda 更改新建分区后,重启系统出现一分30秒等待,是由于分区时删除了swap交换分区,造成系统启动过程中无法找到swap分区。

在root用户下创建swap分区:
1.创建要作为swap分区的文件:增加1GB大小的交换分区,则命令写法如下,其中的count等于想要的块的数量(bs*count=文件大小)。# dd if=/dev/zero of=/root/swapfile bs=1M count=10242.格式化为交换分区文件:# mkswap /root/swapfile #建立swap的文件系统3.启用交换分区文件:# swapon /root/swapfile #启用swap文件4.使系统开机时自启用,在文件/etc/fstab中添加一行:/root/swapfile swap swap defaults 0 0查看swap分区是否创建成功,看到如下信息说明创建成功:

注意要屏蔽/etc/fstab文件内以前的swap:
# /etc/fstab: static file system infORMation.## Use 'blkid' to print the universally unique identifier for a# device; this may be used with UUID= as a more robust way to name devices# that works even if disks are added and removed. See fstab(5).## # / was on /dev/sda1 during installationUUID=4c68a6b8-470e-426c-bc69-0fb601719e42 / ext4 errors=remount-ro 0 1# swap was on /dev/sda5 during installation#UUID=d19075cc-07e2-472c-b59d-247a15ba333e none swap sw 0 0 // 屏蔽/dev/fd0 /media/floppy0 auto rw,user,noauto,exec,utf8 0 0/root/swapfile swap swap defaults 0 0 // 新增 来源地址:https://blog.csdn.net/wangruifengrr/article/details/129860142
--结束END--
本文标题: linux扩展/dev/sda1分区方法
本文链接: https://lsjlt.com/news/402357.html(转载时请注明来源链接)
有问题或投稿请发送至: 邮箱/279061341@qq.com QQ/279061341
2024-03-01
2024-03-01
2024-03-01
2024-03-01
2024-03-01
2024-02-29
2024-02-29
2024-02-29
2024-02-29
2024-02-29
回答
回答
回答
回答
回答
回答
回答
回答
回答
回答
0