文章目录 前言一、升级openSsl1、查看`openssl`版本2、下载并解压3、编译安装 二、升级openSsh1、下载openssh-9.0p1.tar.gz2、解压压缩包3、删除原
openssl版本openssl版本# 查看`openssl`版本[root@localhost opt]# openssl version因为我这里已经升级过了,所以显示最新版

[root@localhost opt]# wget https://www.openssl.org/source/old/1.1.1/openssl-1.1.1p.tar.gz[root@localhost opt]# tar -zxvf openssl-1.1.1p.tar.gz如果在执行wget后指令提示command not found,是因为目标机上没有安装wget指令,需进行wget指令安装;
yum -y install wget[root@localhost opt]# cd openssl-1.1.1p/# 编译[root@localhost openssl-1.1.1p]# ./config --prefix=/usr/local/openssl[root@localhost openssl-1.1.1p]# make && make install[root@localhost openssl-1.1.1p]# mv /usr/bin/openssl /usr/bin/openssl.bak[root@localhost openssl-1.1.1p]# ln -sf /usr/local/openssl/bin/openssl /usr/bin/openssl[root@localhost openssl-1.1.1p]# echo "/usr/local/openssl/lib" >> /etc/ld.so.conf# 设置生效[root@localhost openssl-1.1.1p]# ldconfig -v[root@localhost openssl-1.1.1p]# openssl version
# 下载SSh压缩包[root@localhost opt]# wget Https://cdn.openbsd.org/pub/OpenBSD/OpenSSH/portable/openssh-9.0p1.tar.gz# 建议opt目录下[root@localhost opt]# lsopenssh-9.0p1.tar.gz rh# 解压压缩包[root@localhost opt]# tar -zxvf openssh-9.0p1.tar.gz 
ssh相关文件# 卸载openssh服务[root@localhost opt]# yum remove openssh –y若出现下列/var/run/yum.pid 已被锁定,PID 为 11283 的另一个程序正在运行。 相关错误,
执行 rm -f /var/run/yum.pid 后重新卸载openssh服务

# 手动删除原有ssh相关文件[root@localhost opt]# rm -rf /etc/ssh/*[root@localhost opt]# lsopenssh-9.0p1 openssh-9.0p1.tar.gz rh[root@localhost opt]# cd openssh-9.0p1/# 安装编译[root@localhost openssh-9.0p1]# ./configure --prefix=/usr/ --sysconfdir=/etc/ssh --with-openssl-includes=/usr/local/ssl/include --with-ssl-dir=/usr/local/ssl --with-zlib --with-md5-passWords --with-pam && make && make install安装过程中,可能出现如下错误:
若提示configure: error: *** zlib.h missing - please install first or check config.log ***,执行yum -y install zlib zlib-devel后重新进行安装编译
 若提示
若提示configure: error: *** working libcrypto not found, check config.log,执行yum install -y openssl-devel后重新进行安装编译

若提示configure: error: PAM headers not found,执行yum -y install pam-devel后重新进行安装编译
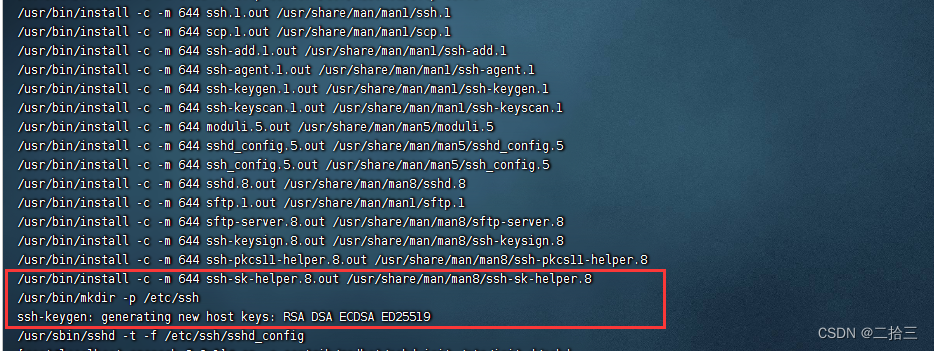
 Openssh安装完成图示:

Openssh安装完成后在 /opt/openssh-9.0p1目录下执行如下命令:
[root@localhost openssh-9.0p1]# cp -a contrib/redhat/sshd.init /etc/init.d/sshd[root@localhost openssh-9.0p1]# cp -a contrib/redhat/sshd.pam /etc/pam.d/sshd.pam[root@localhost openssh-9.0p1]# chmod +x /etc/init.d/sshd[root@localhost openssh-9.0p1]# chkconfig --add sshd[root@localhost openssh-9.0p1]# chkconfig sshd on[root@localhost openssh-9.0p1]# service sshd restart[root@localhost openssh-9.0p1]# ssh -VOpenSSH_9.0p1, OpenSSL 1.0.2k-fips 26 Jan 2017来源地址:https://blog.csdn.net/m0_50932526/article/details/128224055
--结束END--
本文标题: 【Linux 升级Openssh以及Openssl版本】
本文链接: https://lsjlt.com/news/394106.html(转载时请注明来源链接)
有问题或投稿请发送至: 邮箱/279061341@qq.com QQ/279061341
2024-03-01
2024-03-01
2024-03-01
2024-03-01
2024-03-01
2024-02-29
2024-02-29
2024-02-29
2024-02-29
2024-02-29
回答
回答
回答
回答
回答
回答
回答
回答
回答
回答
0