Centos 6.9 编译安装 LAMP apache 2.4 + Mysql 5.7 + PHP5.6.34 + Fast-cgi + xcache 实验环境:VMware Workstation Pro
Centos 6.9 编译安装 LAMP apache 2.4 + Mysql 5.7 + PHP5.6.34 + Fast-cgi + xcache
实验环境:VMware Workstation Pro 14(试用版)
系统平台:
CentOS release 6.9 (Final)             内核  2.6.32-696.el6.x86_64
Apache/2.4.29 (Unix)
php 5.6.34 (cli)
xcache 3.2.0参考Centos 6.9 apahce 2.4.29编译安装
参考CentOS 6.9 自定义单实例 二进制方式 安装mysql5.7.21
# wget http://hk1.php.net/distributions/php-5.6.34.tar.bz2有个别包需要EPEL源,可提前配置好Aliyun的Yum源
注意:以下依赖包仅仅限于下面演示的编译参数,实际按需。
#yum install bzip2-devel libxml2-devel libmcrypt-devel libmcrypt curl-devel gd-devel
如果需要后期动态添加模块,还需要安装autoconf
注意:php-7.0以上版本使用--enable-mysqlnd --withmysqli=mysqlnd ,原--with-mysql不再支持
编译参数
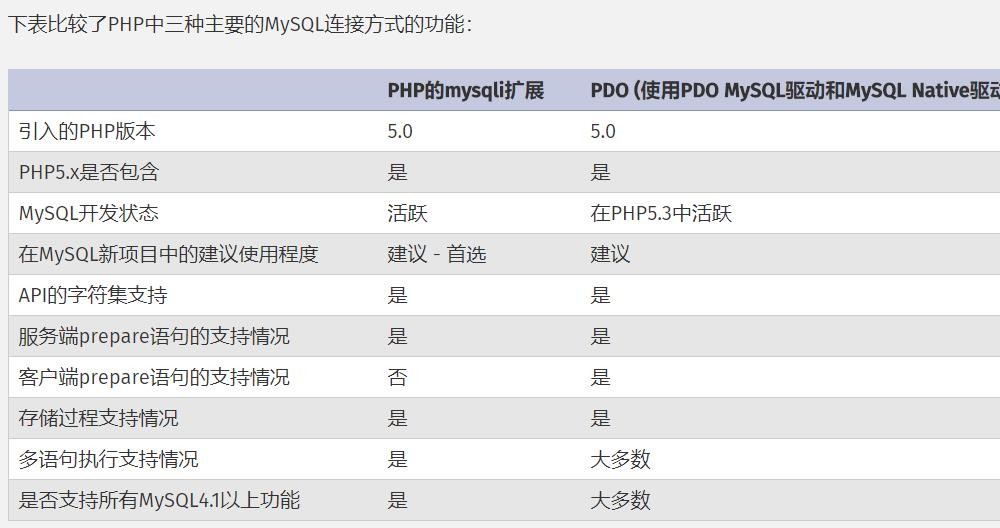
对于mysql的api方法,先了解一下:
PHP5.3以上版本,为了链接MySQL数据库,可以指定mysqlnd,这样在本机就不需要先安装MySQL或MySQL开发包。
mysqlnd从php 5.3开始可用,可以编译时绑定到它(而不用和具体的MySQL客户端库绑定形成依赖)。
从PHP 5.4开始,对于未明确指定--with-mysql的情形,mysql本地驱动将会被安装。
可以参考如下配置:
比如:

--with-mysql       > 相当于该参数值为mysqlnd
--with-mysqli      > 相当于该参数值为mysqlnd
--with-pdo-mysql   > 相当于该参数值为mysqlnd
因为,--with-mysqli=/usr/local/mysql/bin/mysql_config  这种才是明确指定的表示方法
# tar xvf php-5.6.34.tar.bz2
# cd php-5.6.34

./configure --prefix=/usr/local/php-5.6.34 \
--with-openssl \
--enable-mysqlnd \
--with-mysql=/usr/local/mysql \
--with-mysqli \
--with-pdo-mysql \
--enable-mbstring \
--with-freetype-dir \
--with-jpeg-dir \
--with-png-dir \
--with-zlib \
--with-libxml-dir=/usr \
--enable-xml \
--enable-Sockets \
--enable-fpm \
--with-mcrypt \
--with-config-file-path=/etc \
--with-config-file-scan-dir=/etc/php.d \
--with-bz2 \
--with-iconv \
--with-gd \
--with-curl \
--disable-debug \
--enable-calendar
编译与安装
# make -j 8
出现Build complete. 那么,恭喜编译成功

# make install

以下这些提示,按需。
Wrote PEAR system config file at: /usr/local/php-5.6.34/etc/pear.conf
You may want to add: /usr/local/php-5.6.34/lib/php to your php.ini include_path
/app/httpd/php-5.6.34/build/shtool install -c ext/phar/phar.phar /usr/local/php-5.6.34/bin
ln -s -f phar.phar /usr/local/php-5.6.34/bin/phar
Installing PDO headers:           /usr/local/php-5.6.34/include/php/ext/pdo/
创建一个软链接,方便管理版本
#cd /usr/local/
#ln -s php-5.6.34/ php注意,这些文件是在源码目录里
# cp php.ini-production /etc/php.ini
# cp sapi/fpm/init.d.php-fpm /etc/rc.d/init.d/php-fpm
# chmod +x /etc/rc.d/init.d/php-fpm
创建一个存放其他扩展配置的目录
# mkdir /etc/php.d
# vim /etc/rc.d/init.d/php-fpm   > 这一步不修改也行,只不过这里是为了后续切换不同版本时方便

prefix=/usr/local/php > 把这行修改为指定的编译路径# sed -ri.bak s#php-5.6.34#php#g /usr/local/php/etc/php-fpm.conf.default
# mv /usr/local/php/etc/php-fpm.conf.default /usr/local/php/etc/php-fpm.conf
# mv /usr/local/php/etc/php-fpm.d/www.conf.default /usr/local/php/etc/php-fpm.d/www.conf > 不用
# chkconfig --add php-fpm
# chkconfig php-fpm on
# vim /etc/httpd2.4/httpd.conf
确保以下2条取消注释
LoadModule proxy_module modules/mod_proxy.so
LoadModule proxy_fcgi_module modules/mod_proxy_fcgi.so

# 如果使用的是虚拟主机形式,把下面4行添加到主机标签中
AddType application/x-httpd-php .php
AddType application/x-httpd-php-source .phps
ProxyRequests Off
ProxyPaSSMatch ^/(.*\.php)$ fcgi://127.0.0.1:9000/app/www/virtualhost/$1

其中/app/www/virtualhost指的是站点文件目录

例子:

<VirtualHost *:80>
    DocumentRoot "/app/www/virtualhost"
    ServerName www.hunk.tech
    AddType application/x-httpd-php .php
    AddType application/x-httpd-php-source .phps
    ProxyRequests Off
    ProxyPassMatch ^/(.*\.php)$ fcgi://127.0.0.1:9000/app/www/virtualhost/$1

        <IfModule dir_module>
                DirectoryIndex index.php index.html
        </IfModule>

        <Directory "/app/www/virtualhost">
                AllowOverride None
                Options None
                Require all granted
        </Directory>

</VirtualHost>

# service httpd restart
# service php-fpm start#ss -nlt
fcgi正在监听端口
State Recv-Q Send-Q Local Address:Port
LISTEN 0 128 127.0.0.1:9000
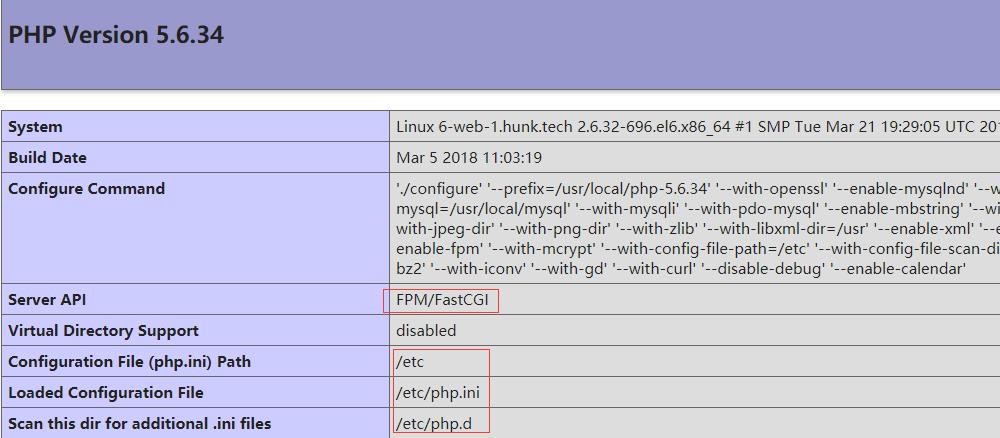
编辑一个php的测试文件
#vim /app/www/virtualhost/index.php
<?php
phpinfo();
?>
在mysql中创建一个用于连接的账户
mysql> create user test@'192.168.5.102' identified by 'passWord';

mysql5.7数据库下已经没有password这个字段了,password字段改成了authentication_string
并且密码策略控制着密码相关

以下为修改默认的密码策略,0=LOW,至少8个字符
mysql> set global validate_password_policy=0
测试代码如下:
# vim /app/www/virtualhost/check.php

<?php
$mysqli = new mysqli("localhost", "test", "12345678");


if ($mysqli->connect_errno) {
    echo "连接失败";
    exit();
}
echo "连接成功";


$mysqli->close();
?>

# curl www.hunk.tech/check.php
连接成功
以下代码为判断mysql和mysqli扩展是否安装
<?php
 function mysqlinstalled (){
  if (function_exists ("mysql_connect")){
   return true;
  } else {
   return false;
  }
 }
 function mysqliinstalled (){
  if (function_exists ("mysqli_connect")){
   return true;
  } else {
   return false;
  }
 }

 if (mysqlinstalled()){
  echo "<p>The mysql extension is installed.</p>";
 } else {
  echo "<p>The mysql extension is not installed..</p>";
 }
 if (mysqliinstalled()){
  echo "<p>The mysqli extension is installed.</p>";
 } else {
  echo "<p>The mysqli extension is not installed..</p>";
 }
?>
#ab -c 1000 -n 5000 192.168.5.102/check.php

Server Software:        Apache/2.4.29
Server Hostname:        192.168.5.102
Server Port:            80

Document Path:          /check.php
Document Length:        12 bytes

Concurrency Level:      1000
Time taken for tests:   6.751 seconds
Complete requests:      5000
Failed requests:        0
Write errors:           0
Total transferred:      915000 bytes
HTML transferred:       60000 bytes
Requests per second:    740.59 [#/sec] (mean)
Time per request:       1350.282 [ms] (mean)
Time per request:       1.350 [ms] (mean, across all concurrent requests)
Transfer rate:          132.35 [Kbytes/sec] received

Connection Times (ms)
              min  mean[+/-sd] median   max
Connect:        0  210 625.4      1    3019
Processing:     1  436 954.0    190    6676
Waiting:        1  435 954.0    189    6675
Total:         63  645 1295.6    194    6734

Percentage of the requests served within a certain time (ms)
  50%    194
  66%    215
  75%    335
  80%    405
  90%   1341
  95%   3439
  98%   6299
  99%   6697
 100%   6734 (longest request)
http://xcache.lighttpd.net
http://xcache.lighttpd.net/pub/Releases/3.2.0/xcache-3.2.0.tar.gz
#yum install m4 autoconf#tar xvf xcache-3.2.0.tar.gz# cd xcache-3.2.0
#/usr/local/php/bin/phpize > 注意,这里指向的是php目录
Configuring for:
PHP Api Version: 20131106
Zend Module Api No: 20131226
Zend Extension Api No: 220131226# ./configure --enable-xcache --with-php-config=/usr/local/php/bin/php-config
注意,--sysconfdir指向的是Php存放配置文件的目录
# make && make install
Installing shared extensions: /usr/local/php-5.6.34/lib/php/extensions/no-debug-non-zts-20131226/#cp xcache.ini /etc/php.d/# service php-fpm restart
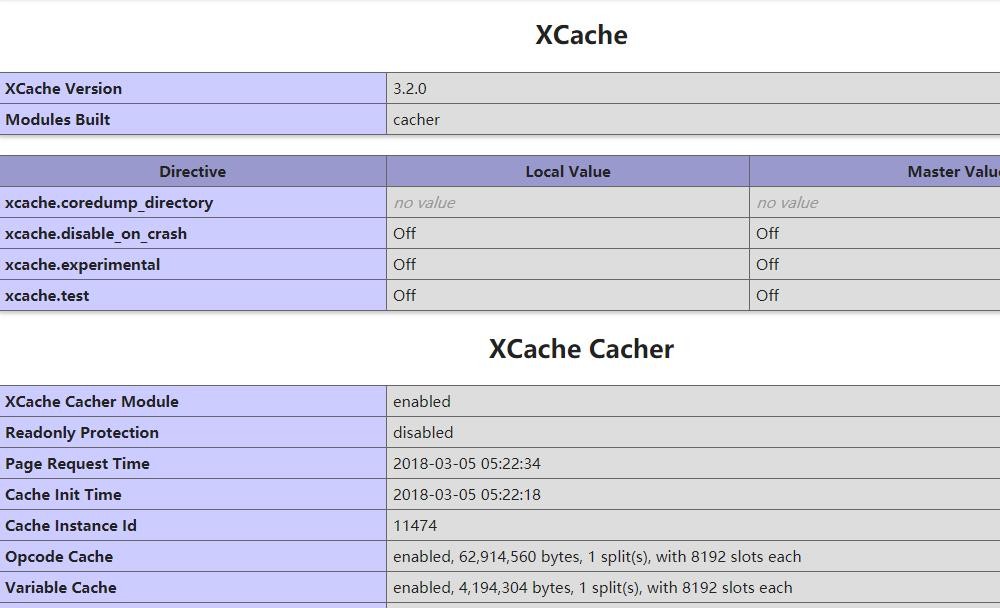
# /usr/local/php/bin/php -m|grep -i xcache
XCache
XCache Cacher通过phpinfo也可以看到

#vim /etc/php.d/xcache.ini
xcache.optimizer =           On
xcache.size  =               1024M

#ab -c 1000 -n 5000 192.168.5.102/check.php

Server Software:        Apache/2.4.29
Server Hostname:        192.168.5.102
Server Port:            80

Document Path:          /check.php
Document Length:        12 bytes

Concurrency Level:      1000
Time taken for tests:   6.541 seconds
Complete requests:      5000
Failed requests:        0
Write errors:           0
Total transferred:      915000 bytes
HTML transferred:       60000 bytes
Requests per second:    764.46 [#/sec] (mean)
Time per request:       1308.116 [ms] (mean)
Time per request:       1.308 [ms] (mean, across all concurrent requests)
Transfer rate:          136.62 [Kbytes/sec] received

Connection Times (ms)
              min  mean[+/-sd] median   max
Connect:        0  277 612.3      2    3017
Processing:     1  425 835.1    156    4186
Waiting:        1  424 835.1    155    4185
Total:         61  702 1187.2    167    5262

Percentage of the requests served within a certain time (ms)
  50%    167
  66%    235
  75%    436
  80%   1021
  90%   2137
  95%   3817
  98%   5138
  99%   5197
 100%   5262 (longest request)
貌似简单的测试并没有发现什么优势呢
--结束END--
本文标题: Centos 6.9 编译安装 LAMP + xcache
本文链接: https://lsjlt.com/news/38747.html(转载时请注明来源链接)
有问题或投稿请发送至: 邮箱/279061341@qq.com QQ/279061341
2024-10-23
2024-10-22
2024-10-22
2024-10-22
2024-10-22
2024-10-22
2024-10-22
2024-10-22
2024-10-22
2024-10-22
回答
回答
回答
回答
回答
回答
回答
回答
回答
回答
0