这篇文章主要介绍“vue3.x+Element Plus如何实现分页器组件”,在日常操作中,相信很多人在Vue3.x+Element Plus如何实现分页器组件问题上存在疑惑,小编查阅了各式资料,整理出简单好用的操作方法
这篇文章主要介绍“vue3.x+Element Plus如何实现分页器组件”,在日常操作中,相信很多人在Vue3.x+Element Plus如何实现分页器组件问题上存在疑惑,小编查阅了各式资料,整理出简单好用的操作方法,希望对大家解答”Vue3.x+Element Plus如何实现分页器组件”的疑惑有所帮助!接下来,请跟着小编一起来学习吧!
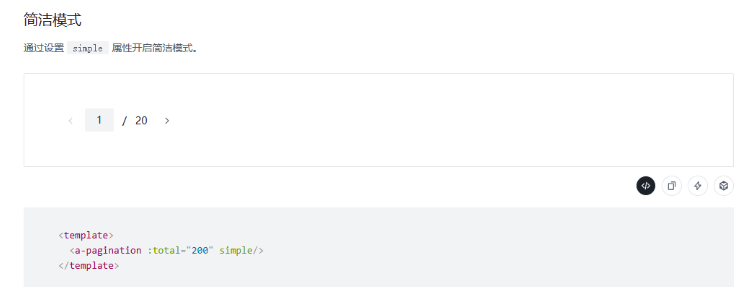
开发中难免会遇到宽度很窄的列表需要使用分页器的情况,这时若使用Element Plus组件的分页器会导致分页器内容超出展示的区域,而Element Plus组件中目前没有Acro Design那样小巧的分页器(Arco Design Vue)如下图所示,如果再引入一个新的UI组件库未免导致项目臃肿,所以基于Vue3.x和Element Plus封装了一个即拿即用的”简洁模式“分页器组件以便不时之需

分页器组件代码部分:
<!-- (简洁模式)分页器组件 --><template> <div class="smallpagination"> <!-- 总数统计 --> <span>{{ '共' + total + '条' }}</span> <!-- 翻页 --> <div class="smallpagination-pager"> <!-- 左翻页 --> <el-icon @click="pageTurning('down')" :class="curPage <= 1 ? 'forbid-pageturning' : ''"> <ArrowLeft /> </el-icon> <!-- 页码 --> <el-input-number @change="handlePageChange" v-model="pageNum" :min="1" :max="pageTotal" :step-strictly="true" :controls="false" /> <b>{{ '/ ' + pageTotal }}</b> <!-- 右翻页 --> <el-icon @click="pageTurning('up')" :class="curPage >= pageTotal ? 'forbid-pageturning' : ''"> <ArrowRight /> </el-icon> </div> </div></template><script setup>import { useAttrs, computed, ref } from 'vue';import { ArrowLeft, ArrowRight} from '@element-plus/icons-vue';// 接收父组件参数const attrs = useAttrs();// 父组件事件const em = defineEmits(['handlePageChange']);// 当前页const pageNum = ref(1);// 父组件传递-当前页码const curPage = computed(() => { pageNum.value = attrs.curPage; return attrs.curPage;});// 父组件传递-总数const total = computed(() => { return attrs.total;});// 总页码数const pageTotal = computed(() => { return attrs.total > 0 ? Math.ceil(attrs.total / attrs.pageSize) : 1;});const handlePageChange = (e) => { if (pageTotal.value <= 1) { return; } em('handlePageChange', e);};const pageTurning = (type) => { // 向前翻页 if (type === 'up') { if (curPage.value >= pageTotal.value || pageTotal.value <= 1) { return; } em('handlePageChange', pageNum.value + 1); } // 向后翻页 else { if (pageTotal.value <= 1 || curPage.value <= 1) { return; } em('handlePageChange', pageNum.value - 1); }};</script><style lang="less" scoped>.smallpagination { width: auto; height: 100%; display: flex; align-items: center; >span { margin-right: 11px; font-size: 14px; font-weight: 400; color: #4E5969; line-height: 21px; } .smallpagination-pager { display: flex; align-items: center; .el-icon { width: 30px; height: 30px; font-size: 14px; color: #4E5969; cursor: pointer; &:hover { background: rgb(247, 248, 250); color: #0082ff; } } .forbid-pageturning { opacity: 0.4; cursor: not-allowed; &:active { color: #4E5969; background: rgb(255, 255, 255); } } >b { margin: 0 5px; font-size: 14px; font-weight: 400; color: #4E5969; } }}</style><style lang="less">.smallpagination { .smallpagination-pager { .el-input-number { width: 40px; margin-left: 5px; span { display: none; } .el-input__wrapper { padding: 0; height: 30px; font-size: 14px; box-sizing: border-box; background: #f2f3f5; box-shadow: none !important; } } }}</style>使用简洁模式分页器组件代码如下:
<template> <div class="xxx-list"> ... <div class="list-bottom-common-page"> <SmallPagination :total="total" :curPage="curPage" :pageSize="pageSize" @handlePageChange="handleCurrentChange"> </SmallPagination> </div> </div></template><script setup>import SmallPagination from '@/components/xxx/SmallPagination.vue';import { ref } from 'vue';// 当前页const curPage = ref(1);// 每页条数const pageSize = ref(20);// 列表总数const total = ref(0);const handleCurrentChange = (val) => { curPage.value = val; ...};</script>最终效果如下:

到此,关于“Vue3.x+Element Plus如何实现分页器组件”的学习就结束了,希望能够解决大家的疑惑。理论与实践的搭配能更好的帮助大家学习,快去试试吧!若想继续学习更多相关知识,请继续关注编程网网站,小编会继续努力为大家带来更多实用的文章!
--结束END--
本文标题: Vue3.x+Element Plus如何实现分页器组件
本文链接: https://lsjlt.com/news/349807.html(转载时请注明来源链接)
有问题或投稿请发送至: 邮箱/279061341@qq.com QQ/279061341
2024-05-24
2024-05-24
2024-05-24
2024-05-24
2024-05-24
2024-05-24
2024-05-24
2024-05-24
2024-05-24
2024-05-24
回答
回答
回答
回答
回答
回答
回答
回答
回答
回答
0