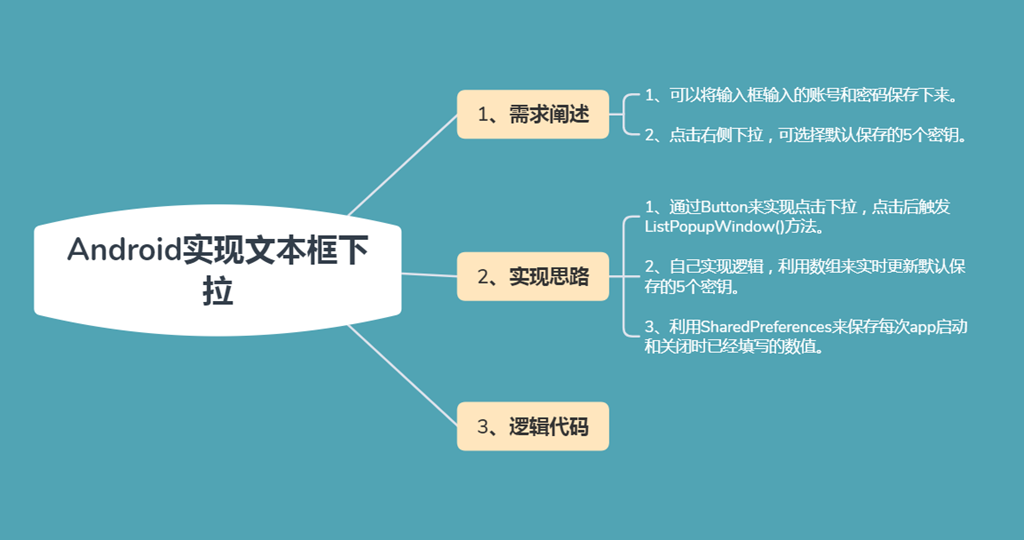
这篇文章将为大家详细讲解有关Android EditText输入框实现下拉且保存最近5个历史记录的示例分析,小编觉得挺实用的,因此分享给大家做个参考,希望大家阅读完这篇文章后可以有所收获。文章结构: 后面又添加了清空历史记录的标签
这篇文章将为大家详细讲解有关Android EditText输入框实现下拉且保存最近5个历史记录的示例分析,小编觉得挺实用的,因此分享给大家做个参考,希望大家阅读完这篇文章后可以有所收获。
文章结构:

后面又添加了清空历史记录的标签,就是在每一次添加更新后台数组后,数组的下一个标签为清空历史记录。
s_btnDown.setOnClickListener(this); //对其进行焦点监听case R.id.btnDown: showListPopulWindow(); //调用显示PopuWindow 函数 break;点击后触发PopuWindow函数,也就是将其下拉框,绑定到TextBox标签的下面。
private void showListPopulWindow() { final DeviceKeySecretManager list = ((MainActivity)getActivity()).deviceKeySecretManager;//要填充的数据 final ListPopupWindow listPopupWindow; listPopupWindow = new ListPopupWindow(getActivity()); listPopupWindow.setAdapter(new ArrayAdapter<String>(getActivity(), android.R.layout.simple_list_item_1, list.geTKEyList()));//用android内置布局,或设计自己的样式 listPopupWindow.setAnchorView(s_etAppKey); //以哪个控件为基准,在该处以mEditText为基准 listPopupWindow.setModal(true); listPopupWindow.setOnItemClickListener(new AdapterView.OnItemClickListener() { //设置项点击监听 @Override public void onItemClick(AdapterView<?> adapterView, View view, int i, long l) { if (list.KeySecretSum==i){ list.Clear(); //点击清空 s_etAppKey.setText(""); //把选择的选项内容展示在EditText上 s_etAppSecret.setText(""); }else{ s_etAppKey.setText(list.getKeyList()[i]); //把选择的选项内容展示在EditText上 s_etAppSecret.setText(list.getSecretList()[i]); } listPopupWindow.dismiss(); //如果已经选择了,隐藏起来 } }); listPopupWindow.show(); //把ListPopWindow展示出来 }用于在发送成功后将历史密钥信息进行缓存,后期将其绑定到下拉列表中,也为了在APP退出和首次加载时,将数据保存和提取到缓存中。
class DeviceKeySecretManager { public DeviceKeySecretManager() { CurrentSaveIndex = 0; } public String[] getKeyList() { return KeyList; } public String[] getSecretList() { return SecretList; } public void addBufferKeyAndSecret(String key, String secret) { if (IntegerConversion.UseLoop(KeyList,key)) { int index=0; for (int i=0;i<KeyList.length;i++) { if (KeyList[i].equals(key)){ index=i; break; } } KeyList[index]=key; SecretList[index]=secret; } else { if (KeySecretSum == 5) { CurrentSaveIndex = CurrentSaveIndex == 5 ? 0 : CurrentSaveIndex; KeyList[CurrentSaveIndex] = key; SecretList[CurrentSaveIndex] = secret; CurrentSaveIndex++; } else { KeyList[CurrentSaveIndex] = key; SecretList[CurrentSaveIndex] = secret; CurrentSaveIndex++; KeySecretSum++; KeyList[CurrentSaveIndex] = "清空历史记录"; } } } public void Clear() { CurrentSaveIndex = 0; KeySecretSum = 0; for (int i = 0; i < KeyList.length; i++) { KeyList[i] = null; } for (int i = 0; i < SecretList.length; i++) { SecretList[i] = null; } } public int CurrentSaveIndex = 0; //当前保存的序号 public int KeySecretSum = 0; //key的总个数,最多存储5个。 private String[] KeyList = new String[6]; private String[] SecretList = new String[5];}APP退出和首次加载时,对数据在本地进行保存和提取;
private void getSavedPreference() { try { SharedPreferences pref = this.getSharedPreferences(getResources().getString(R.string.app_name), MODE_PRIVATE); int sum=pref.getInt("KeySecretSum", 0); for (int i=0;i<=sum;i++){ deviceKeySecretManager.getKeyList()[i]=pref.getString("Key"+i, ""); } for (int i=0;i<sum;i++){ deviceKeySecretManager.getSecretList()[i]=pref.getString("Secret"+i, ""); } deviceKeySecretManager.CurrentSaveIndex=sum==5?0:sum; deviceKeySecretManager.KeySecretSum=sum; } catch (Exception ex) { } } private void setSavePreference() { try { SharedPreferences pref = getSharedPreferences(getResources().getString(R.string.app_name), MODE_PRIVATE); SharedPreferences.Editor edit = pref.edit(); edit.putInt("KeySecretSum", deviceKeySecretManager.KeySecretSum); //现有保存的总个数 for (int i=0;i<=deviceKeySecretManager.KeySecretSum;i++){ edit.putString("Key"+i, deviceKeySecretManager.getKeyList()[i]); } for (int i=0;i<deviceKeySecretManager.KeySecretSum;i++){ edit.putString("Secret"+i, deviceKeySecretManager.getSecretList()[i]); } edit.commit(); } catch (Exception ex) { } }下面是当发送成功后的业务逻辑:
@Override public void onClick(View v) { switch (v.getId()) { case R.id.btnSendData: if (!DeviceManager.getInstance().DeviceIsConnected()) { tu.ToastShow(context, "设备已断开连接,无法进行通讯。"); return; } if (DeviceManager.getInstance().DeviceIsBusy()) { tu.ToastShow(context, "设备忙碌,请等待..."); return; } try { String key,secret; key=s_etAppKey.getText().toString(); secret=s_etAppSecret.getText().toString(); if (key.length()<=0||secret.length()<=0|| TextUtils.isEmpty(key)||TextUtils.isEmpty(secret)){ tu.ToastShow(context, "标识和密钥不能为空!"); return; } //调用方法拼接字符串,发送给下位机设备。 int nResult = DeviceManager.getInstance().WriteRTKData(context, new byte[]{}); if (nResult > 0) { tu.ToastShow(context, "参数写入成功"); ((MainActivity)getActivity()).deviceKeySecretManager.addBufferKeyAndSecret(key,secret); } } catch (Exception ex) { tu.ToastShow(context, "参数写入失败!"); } break; case R.id.btnClearData: //只清空当前的标识和密钥 s_etAppKey.setText(""); s_etAppSecret.setText(""); break; case R.id.btnDown: showListPopulWindow(); //调用显示PopuWindow 函数 break; default: break; } }通过上面的业务分析,代码实现就可以实现具体的需求,保存下最近5个的历史记录。
其实对于写程序而言,难的不是语法和技巧,而是编程思想,对于同一个问题/需求,不同的人有不同的解决办法,谁也不能说谁的方法是错误的,只能说谁的方法是目前为止最有效的。
关于“Android EditText输入框实现下拉且保存最近5个历史记录的示例分析”这篇文章就分享到这里了,希望以上内容可以对大家有一定的帮助,使各位可以学到更多知识,如果觉得文章不错,请把它分享出去让更多的人看到。
--结束END--
本文标题: Android EditText输入框实现下拉且保存最近5个历史记录的示例分析
本文链接: https://lsjlt.com/news/297258.html(转载时请注明来源链接)
有问题或投稿请发送至: 邮箱/279061341@qq.com QQ/279061341
2024-05-24
2024-05-24
2024-05-24
2024-05-24
2024-05-24
2024-05-24
2024-05-24
2024-05-24
2024-05-24
2024-05-24
回答
回答
回答
回答
回答
回答
回答
回答
回答
回答
0