Camera2简介 在Google 推出Android 5.0的时候, Android Camera api 版本升级到了API2(android.hardware.camer
在Google 推出Android 5.0的时候, Android Camera api 版本升级到了API2(android.hardware.camera2), 之前使用的API1(android.hardware.camera)就被标为 Deprecated 了。
Camera API2相较于API1有很大不同, 并且API2是为了配合HAL3进行使用的, API2有很多API1不支持的特性, 比如:
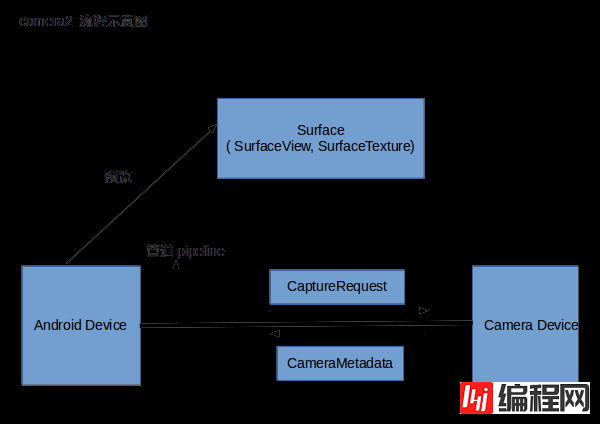
更先进的API架构; 可以获取更多的帧(预览/拍照)信息以及手动控制每一帧的参数; 对Camera的控制更加完全(比如支持调整focus distance, 剪裁预览/拍照图片); 支持更多图片格式(yuv/raw)以及高速连拍等。在API架构方面, Camera2和之前的Camera有很大区别, APP和底层Camera之前可以想象成用管道方式连接, 如下图:

这里引用了管道的概念将安卓设备和摄像头之间联通起来,系统向摄像头发送 Capture 请求,而摄像头会返回 CameraMetadata。这一切建立在一个叫作 CameraCaptureSession 的会话中。
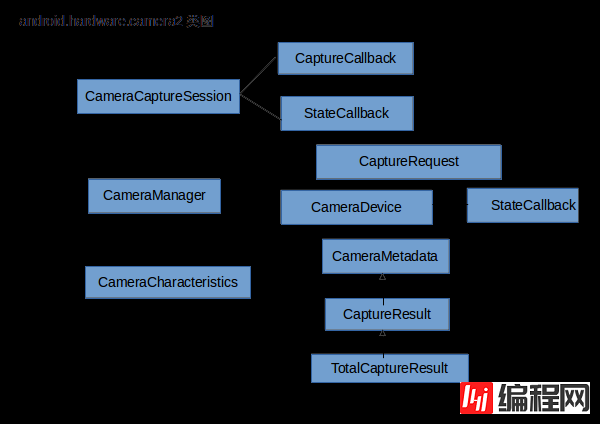
下面是 camera2包中的主要类:

其中 CameraManager 是那个站在高处统管所有摄像投设备(CameraDevice)的管理者,而每个 CameraDevice 自己会负责建立 CameraCaptureSession 以及建立 CaptureRequest。
CameraCharacteristics 是 CameraDevice 的属性描述类,非要做个对比的话,那么它与原来的 Camerainfo 有相似性。
Camera2 API调用基础流程: 通过context.getSystemService(Context.CAMERA_SERVICE) 获取CameraManager; 调用CameraManager .open()方法在回调中得到CameraDevice; 通过CameraDevice.createCaptureSession() 在回调中获取CameraCaptureSession; 构建CaptureRequest, 有三种模式可选 预览/拍照/录像.; 通过 CameraCaptureSession发送CaptureRequest, capture表示只发一次请求, setRepeatingRequest表示不断发送请求; 拍照数据可以在ImageReader.OnImageAvailableListener回调中获取, CaptureCallback中则可获取拍照实际的参数和Camera当前状态。 获取数据后对接RTMP推送:通过OnImageAvailableListenerImpl 获取到原始数据,推送端以大牛直播SDK https://GitHub.com/daniulive/SmarterStreaming/ 的万能推送接口为例,获取数据后,调用SmartPublisherOnImageYUV420888() 完成数据传送,底层进行二次处理后,编码后传输即可。
接口描述:
	public native int SmartPublisherOnImageYUV420888(long handle, int width, int height,
													 int crop_left, int crop_top, int crop_width, int crop_height,
													 ByteBuffer y_plane, int y_row_stride,
													 ByteBuffer u_plane, ByteBuffer v_plane, int uv_row_stride, int uv_pixel_stride,
													 int rotation_degree, int is_vertical_flip, int is_horizontal_flip,
													 int scale_width, int scale_height, int scale_filter_mode);
    private class OnImageAvailableListenerImpl implements ImageReader.OnImageAvailableListener {
        @Override
        public void onImageAvailable(ImageReader reader) {
            Image image = reader.acquireLatestImage();
            if ( image != null )
            {
                if ( camera2Listener != null )
                {
                    camera2Listener.onCameraImageData(image);
                }
                image.close();
            }
        }
    }
    @Override
    public void onCameraImageData(Image image) {
        synchronized(this)
        {
            Rect crop_rect = image.getCropRect();
            if(isPushingRtmp || isRTSPPublisherRunning) {
                if(libPublisher != null)
                {
                    Image.Plane[] planes = image.getPlanes();
                    //  crop_rect.left, crop_rect.top, crop_rect.width(), crop_rect.height(),
                    //  这里缩放宽高可以填0,使用原视视频宽高都可以的
                    libPublisher. SmartPublisherOnImageYUV420888(publisherHandle, image.getWidth(), image.getHeight(),
                            crop_rect.left, crop_rect.top, crop_rect.width(), crop_rect.height(),
                            planes[0].getBuffer(), planes[0].getRowStride(),
                            planes[1].getBuffer(), planes[2].getBuffer(), planes[1].getRowStride(), planes[1].getPixelStride(),
                            displayOrientation, 0, 0,
                            videoWidth, videoHeight, 1);
                }
            }
        }
    }
以上就是基础的Android Camera2介绍,和RTMP调用流程,感兴趣的可以自行学习。
--结束END--
本文标题: 如何实现RTMP推送Android Camera2数据
本文链接: https://lsjlt.com/news/29432.html(转载时请注明来源链接)
有问题或投稿请发送至: 邮箱/279061341@qq.com QQ/279061341
2024-01-21
2023-10-28
2023-10-28
2023-10-27
2023-10-27
2023-10-27
2023-10-27
回答
回答
回答
回答
回答
回答
回答
回答
回答
回答
0