本文实例为大家分享了在Android中如何实现下拉导航选择菜单效果的全过程,供大家参考,具体内容如下 关于下拉导航选择菜单效果在新闻客户端中用的比较多,当然也可以用在其他的项目
本文实例为大家分享了在Android中如何实现下拉导航选择菜单效果的全过程,供大家参考,具体内容如下
关于下拉导航选择菜单效果在新闻客户端中用的比较多,当然也可以用在其他的项目中,这样可以很方便的选择更多的菜单。我们可以让我们的应用顶部有左右滑动或进行切换的导航菜单,也可以为了增强用户体验在应用中添加这样的下拉导航选择菜单效果。
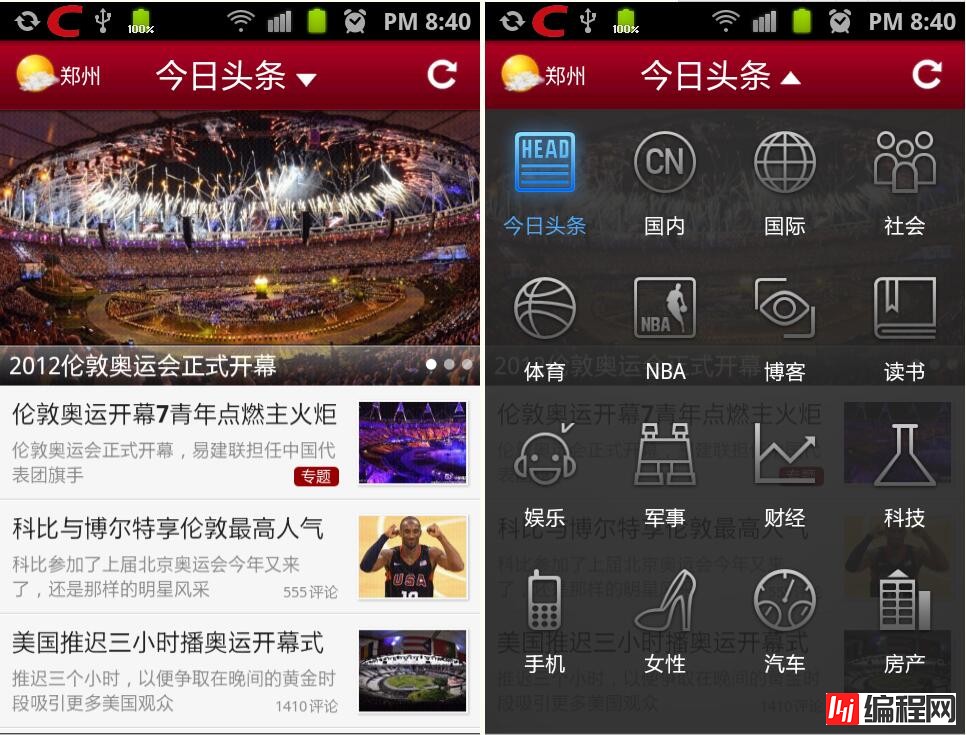
关于它的实现原理,其实也是挺简单的,就是使用PopupWindow来进行展现,在显示时控制其高度并配置以相应的动画效果。在PopupWindow中我使用GridView来控制里面的菜单项,每个菜单项对应相应的图片和文字。当然了,也有其他的实现方式。为了大家能够清楚的理解,让我们先看下效果图,如下所示:

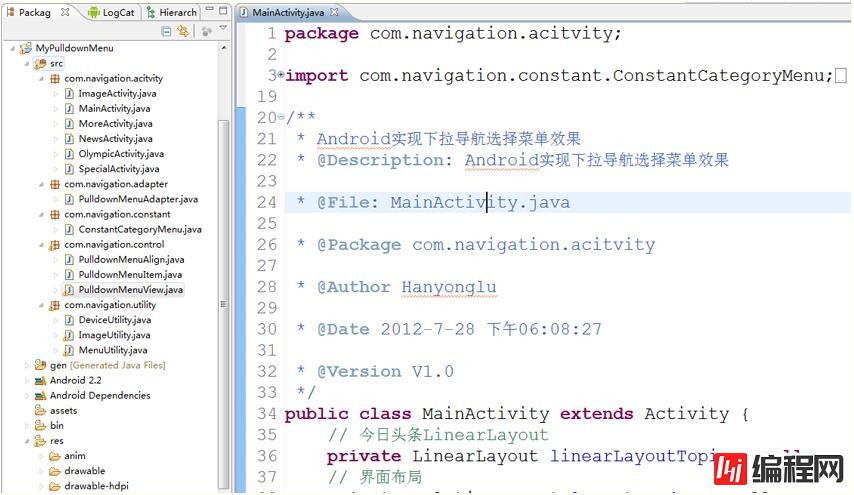
以上就是我实现的示例图,大家已经看到了,就是点击应用顶部中间的文字时展现出来,在我们点击其中一项菜单时隐藏并加载相应菜单的内容,同时该菜单处于选中状态。好了,下面就让我们开始我们的实现过程,还是先看下程序结构图吧:

在程序结构图中,PulldownMenuView是对PopupWindow进行的封装类,PulldownMenuItem是菜单项类,这是两个重要的类。在我们点击应用顶部中间的文字时,要进行展现,展现的同时,要实现对菜单的初始化工作,首先是初始化数据,其主要代码如下:
 private void initData(){
 PulldownMenuItem item = new PulldownMenuItem(context);
 item.setMenuAlign(menuAlign);
 item.setMenuTextColor(menuTextColor);
 item.setMenuTextSize(menuTextSize);
 int txtLength = menuTexts.length;
 int imgLength = menuImageRes.length;
 if (txtLength != 0 && imgLength != 0){
 for (int i = 0; i < imgLength; i++){
 PulldownMenuItem menuItem = new PulldownMenuItem(context, item);
 if(!currentItem.equals(menuTexts[i])){
 menuItem.setImageRes(menuImageRes[i]);
 menuItem.setMenuText(menuTexts[i]);
 }else{
 menuItem.setMenuText(menuTexts[i]);
 menuItem.setMenuTextColor(Color.parseColor("#4FA7F9"));
 menuItem.setImageRes(ConstantCateGoryMenu.newsImageResPress[i]);
 }
 menuMenuItems.add(menuItem);
 }
 } else{
 if (txtLength != 0){
 for (int i = 0; i < txtLength; i++){
 PulldownMenuItem menuItem = new PulldownMenuItem(context, item);
 if(!currentItem.equals(menuTexts[i])){
 menuItem.setMenuText(menuTexts[i]);
 }else{
 menuItem.setMenuText(menuTexts[i]);
 menuItem.setMenuTextColor(Color.parseColor("#4FA7F9"));
 }
 menuMenuItems.add(menuItem);
 }
 }else if (imgLength != 0){
 for (int i = 0; i < imgLength; i++){
 PulldownMenuItem menuItem = new PulldownMenuItem(context, item);
 menuItem.setImageRes(menuImageRes[i]);
 menuMenuItems.add(menuItem);
 }
 }
 }
 }
currentItem代表当前的选择项,在初始化数据过程中,需要检测哪项菜单被选中了,如果某项菜单被选中,则在展开时需要将该项菜单图片和文字颜色设置成相应状态,表示该项菜单被选中。在初始化过程中分为三种情况:第一种是菜单项既有图片也有文字;第二种是菜单项只有文字;第三种是菜单项只有图片;所以在上面代码中需要进行相应判断。上面是初始化菜单中的数据,下面是初始化菜单中的内容:
 private GridView getMenuGirdView(Context context, int columns){
 if (menuMenuItems.isEmpty()){
 // 初始化菜单数据
 initData();
 }
 if (null != menuGridView){
 return menuGridView;
 }
 GridView gridView = new GridView(context);
 gridView.setLayoutParams(new LinearLayout.LayoutParams(
 ViewGroup.LayoutParams.MATCH_PARENT,
 ViewGroup.LayoutParams.MATCH_PARENT));
 // 设置数据适配器
 gridView.setAdapter(new PulldownMenuAdapter(menuMenuItems));
 gridView.setVerticalSpacing(1);
 gridView.setNumColumns(columns);
 gridView.setGravity(Gravity.CENTER);
 gridView.setVerticalScrollBarEnabled(false);
 if (menuBackground != 0){
 gridView.setBackgroundResource(menuBackground);
 }
 if (menuSelector != -1){
 gridView.setSelector(menuSelector);
 }
 gridView.setHorizontalScrollBarEnabled(false);
 setMenuListener(gridView);
 return gridView;
 }
初始化菜单之后,就需要我们菜单中相应的数据,设置数据比较容易,只需要三个数组即可:第一个数组代表菜单项文字内容;第二个数组代表菜单项图片资源,第三个数组代表菜单项被选中的图片资源。如下代码:
 public final static int[] newsImageRes = {
 R.drawable.ic_menu_toutiao,R.drawable.ic_menu_gn,
 R.drawable.ic_menu_gj,R.drawable.ic_menu_sh,
 R.drawable.ic_menu_sport,R.drawable.ic_menu_nba,
 R.drawable.ic_menu_blog,R.drawable.ic_menu_book,
 R.drawable.ic_menu_yule,R.drawable.ic_menu_mil,
 R.drawable.ic_menu_cj,R.drawable.ic_menu_tech,
 R.drawable.ic_menu_mobile,R.drawable.ic_menu_women,
 R.drawable.ic_menu_car,R.drawable.ic_menu_house
 };

 public final static int[] newsImageResPress = {
 R.drawable.ic_menu_toutiao_press,R.drawable.ic_menu_gn_press,
 R.drawable.ic_menu_gj_press,R.drawable.ic_menu_sh_press,
 R.drawable.ic_menu_sport_press,R.drawable.ic_menu_nba_press,
 R.drawable.ic_menu_blog_press,R.drawable.ic_menu_book_press,
 R.drawable.ic_menu_yule_press,R.drawable.ic_menu_mil_press,
 R.drawable.ic_menu_cj_press,R.drawable.ic_menu_tech_press,
 R.drawable.ic_menu_mobile_press,R.drawable.ic_menu_women_press,
 R.drawable.ic_menu_car_press,R.drawable.ic_menu_house_press
 };

 public final static String[] newsMenuTexts = {
 "今日头条","国内","国际","社会","体育","NBA","博客","读书",
 "娱乐","军事","财经","科技","手机","女性","汽车","房产"
 };
菜单项使用GridView实现,我们还需要设置每个菜单项的监听事件,在选中一项菜单后或是点击返回键或点击菜单键时实现隐藏,代码如下:
 private void setMenuListener(GridView gridView){
 if (null == gridView.getOnItemClickListener()){
 gridView.setOnItemClickListener(new OnItemClickListener(){
 @Override
 public void onItemClick(
 AdapterView<?> parent,
 View view,
 int position,
 long id){
 if (null != menuItemListener){
 menuItemListener.onMenuItemClick(parent, view, position);
 }
 hide();
 }
 });
 }
 // 按返回键或菜单键隐藏菜单
 gridView.setOnKeyListener(new OnKeyListener(){
 @Override
 public boolean onKey(View v, int keyCode, KeyEvent event){
 if (event.getAction() == KeyEvent.ACTION_DOWN){
 switch (keyCode){
 case KeyEvent.KEYCODE_BACK:
 case KeyEvent.KEYCODE_MENU:
 hide();
 break;
 }
 }
 return false;
 }
 });
 }
在PulldownMenuView类中的show()和hide()方法中,主要是实现菜单的显示与隐藏。在show()方法中,要计算每行存放的菜单数、设置相应的高度、菜单整体的背景、动画效果、菜单显示的位置等效果。具体不再详述。
我们在显示下拉导航选择菜单前还需要配置菜单相应的参数,比如显示位置、背景图片、高度等。这就是在MenuUtility类中要实现的,代码如下:
package com.navigation.utility;
import com.navigation.acitvity.R;
import com.navigation.control.PulldownMenuView;
import Android.content.Context;
import android.view.View;

public class MenuUtility {
 private Context context = null;
 // PulldownMenuView对象
 private PulldownMenuView menu = null;
 // 图片资源
 private int[] imageRes = null;
 // 文字内容
 private String[] texts = null;
 // 菜单高度
 private int height = 0;
 private View anchorView = null;

 public MenuUtility() {
 // TODO Auto-generated constructor stub
 }

 public MenuUtility(Context context) {
 // TODO Auto-generated constructor stub
 this(context,null,null,0,null);
 }

 public MenuUtility(Context context,int[] imageRes,String[] texts,int height,View anchorView){
 this.context = context;
 this.imageRes = imageRes;
 this.texts = texts;
 this.height = height;
 this.anchorView = anchorView;
 }

 public void setImageRes(int[] imageRes){
 this.imageRes = imageRes;
 }

 public void setTexts(String[] texts){
 this.texts = texts;
 }

 public void setHeight(int height){
 this.height = height;
 }

 public void setAnchorView(View anchor){
 anchorView = anchor;
 }

 public PulldownMenuView getPulldownMenuView(String currentItem){
 PulldownMenuView menu = new PulldownMenuView(context);
 menu.setImageRes(imageRes);
 menu.setMenuText(texts);
 menu.setHeight(height);
 menu.setAnchorView(anchorView);
 menu.setCurrentItem(currentItem);
 menu.setBackground(R.drawable.navigation_bg);
 return menu;
 }

 public PulldownMenuView getPopupMenuView(){
 PulldownMenuView menu = new PulldownMenuView(context);
 menu.setImageRes(imageRes);
 menu.setMenuText(texts);
 // menu.setLocation(Gravity.BOTTOM | Gravity.CENTER);
 menu.setAnimStyle(R.style.pulldown_in_out);
 menu.setBackground(R.drawable.navigation_bg);
 return menu;
 }
}
既然是使用PopupWindow实现我们的效果,当然了,它也可以以向上弹出的方式展现。在我这个示例中,需要它展现的位置是在顶部横条下面展现,所以设置:
menu.setAnchorView(anchorView);
另外,在MainActivity中需要设置它的显示高度,在这里高度需要在顶部横条和底部RadioGroup之间,这就需要我们获取手机屏幕的高度减去顶部横条的高度,再减去底部RadioGroup的高度,最后减去手机菜单栏的高度。在点击某项菜单后,还需要将顶部中间文字和右边三角图片进行相应的变换。代码如下所示:
package com.navigation.acitvity;
import com.navigation.constant.ConstantCategoryMenu;
import com.navigation.control.PulldownMenuView;
import com.navigation.control.PulldownMenuView.OnMenuItemClickListener;
import com.navigation.utility.DeviceUtility;
import com.navigation.utility.MenuUtility;
import android.app.Activity;
import android.os.Bundle;
import android.view.View;
import android.view.View.OnClickListener;
import android.widget.AdapterView;
import android.widget.FrameLayout;
import android.widget.ImageView;
import android.widget.LinearLayout;
import android.widget.RelativeLayout;
import android.widget.TextView;

public class MainActivity extends Activity {
 // 今日头条LinearLayout
 private LinearLayout linearLayoutTopic = null;
 // 界面布局
 private RelativeLayout layoutHeader = null;
 private LinearLayout layoutBottom = null;
 private FrameLayout layoutBody = null;
 // PulldownMenuView基本操作类
 private MenuUtility menuUtility = null;
 // PulldownMenuView对象
 private PulldownMenuView pullDownMenu = null;
 private TextView tvTopic = null;
 private ImageView ivTopic = null;
 private int height = 0;

 @Override
 public void onCreate(Bundle savedInstanceState) {
 super.onCreate(savedInstanceState);
 setContentView(R.layout.main);
 // 初始化
 initViews();
 }

 protected void initViews(){
 ivTopic = (ImageView) findViewById(R.id.imageViewTopic);
 tvTopic = (TextView) findViewById(R.id.textViewTopic);
 linearLayoutTopic = (LinearLayout)findViewById(R.id.linearLayoutTopic);
 linearLayoutTopic.setOnClickListener(TopicOnClickListener);
 layoutHeader = (RelativeLayout) findViewById(R.id.layout_top_header);
 layoutBottom = (LinearLayout) findViewById(R.id.layout_bottom);
 layoutBody = (FrameLayout) findViewById(R.id.layout_body);
 height = DeviceUtility.getScreenSize(this)[1] -
 layoutHeader.getLayoutParams().height -
 layoutBottom.getLayoutParams().height -
 DeviceUtility.getStatusBarHeight(this);
 menuUtility = new MenuUtility(
 MainActivity.this,
 ConstantCategoryMenu.newsImageRes,
 ConstantCategoryMenu.newsMenuTexts,
 height,layoutHeader);
 }

 protected void showPulldownMenu(){
 pullDownMenu = menuUtility.getPulldownMenuView((String)tvTopic.getText());
 ivTopic.setImageResource(R.drawable.ic_menu_trangle_up);
 }

 protected void hidePulldownMenu(){
 pullDownMenu.releasePopupMenuView();
 ivTopic.setImageResource(R.drawable.ic_menu_trangle_down);
 }
 // 顶部今日头条事件监听器
 private OnClickListener TopicOnClickListener = new OnClickListener() {
 @Override
 public void onClick(View v) {
 // 开始显示下拉菜单
 showPulldownMenu();
 // TODO Auto-generated method stub
 pullDownMenu.setOnMenuItemClickListener(new OnMenuItemClickListener() {
 @Override
 public void onMenuItemClick(AdapterView<?> parent, View view, int position) {
 // TODO Auto-generated method stub
 tvTopic.setText(ConstantCategoryMenu.newsMenuTexts[position]);
 layoutBody.setBackgroundResource(ConstantCategoryMenu.newsBodyRes[position]);
 }
 @Override
 public void hideMenu() {
 // TODO Auto-generated method stub
 hidePulldownMenu();
 }
 });
 pullDownMenu.show();
 }
 };
}
我们在获取MainActivity中顶部横条和底部RadioGroup的高度时需要注意在布局文件中设置其相应的layout_height,否则,我们是获取不到其高度的。程序中间的主体部分是截取了几张图片,这个大家可以根据自己的需要设置成自己的数据格式。这点知道就可以了。
以上便是Android中实现下拉导航选择菜单效果的实现过程,是在PopupWindow中嵌入GridView实现,当然也可以在PopupWindow中嵌入ListView等各种控件实现相应的效果,也可以对PopupWindow实现各种和样的变幻效果,具体过程这里就不再详述了,有兴趣的朋友我们可以一起探讨。
源码下载:下拉导航选择菜单
您可能感兴趣的文章:Android制作微信app顶部menu菜单(ActionBar)Android App中DrawerLayout抽屉效果的菜单编写实例Android界面设计(APP设计趋势 左侧隐藏菜单右边显示content)Android实现顶部导航菜单左右滑动效果Android滑动优化高仿QQ6.0侧滑菜单(滑动优化)Android实现自定义滑动式抽屉效果菜单android RecyclerView侧滑菜单,滑动删除,长按拖拽,下拉刷新上拉加载Android仿微信滑动弹出编辑、删除菜单效果、增加下拉刷新功能Android利用滑动菜单框架实现滑动菜单效果Android实现美团APP的底部滑动菜单
--结束END--
本文标题: Android仿今日头条APP实现下拉导航选择菜单效果
本文链接: https://lsjlt.com/news/24913.html(转载时请注明来源链接)
有问题或投稿请发送至: 邮箱/279061341@qq.com QQ/279061341
2024-01-21
2023-10-28
2023-10-28
2023-10-27
2023-10-27
2023-10-27
2023-10-27
回答
回答
回答
回答
回答
回答
回答
回答
回答
回答
0