Python 官方文档:入门教程 => 点击学习
目录Hystrix(hi si ju ke si)概述Hystix 主要功能隔离Hystrix 降级Hystrix降级-服务提供方初始化程序和Fiegn程序一致Hystrix降级-服
Hystix 是 Netflix 开源的一个延迟和容错库,用于隔离访问远程服务、第三方库,防止出现级联失败(雪崩)。
雪崩:一个服务失败,导致整条链路的服务都失败的情形。
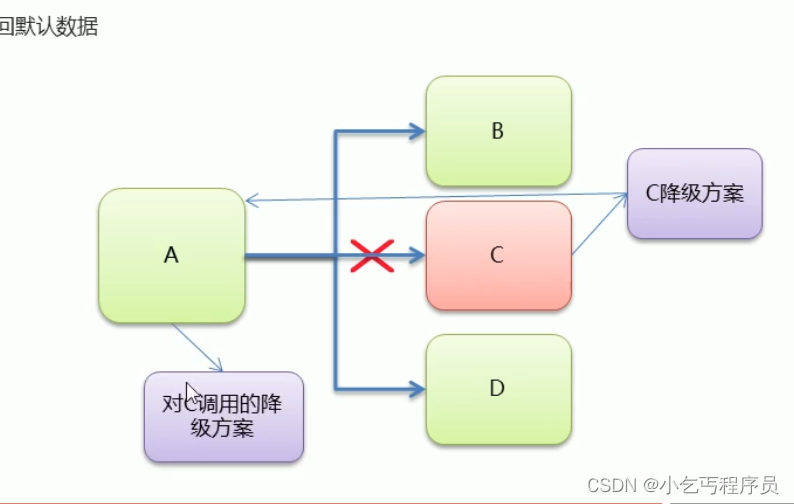
Hystix 降级:当服务发生异常或调用超时,返回默认数据
需要修改的程序
package com.itheima.provider;
import org.springframework.boot.SpringApplication;
import org.springframework.boot.autoconfigure.SpringBootApplication;
import org.springframework.cloud.client.circuitbreaker.EnableCircuitBreaker;
import org.springframework.cloud.netflix.eureka.EnableEurekaClient;

@EnableEurekaClient //该注解 在新版本中可以省略
@SpringBootApplication
@EnableCircuitBreaker ///开启Hystrix功能
public class ProviderApp {
    public static void main(String[] args) {
        SpringApplication.run(ProviderApp.class,args);
    }
}
测试的程序
package com.itheima.provider.controller;
import com.itheima.provider.domain.Goods;
import com.itheima.provider.service.GoodsService;
import com.netflix.hystrix.contrib.javanica.annotation.HystrixCommand;
import com.netflix.hystrix.contrib.javanica.annotation.HystrixProperty;
import org.springframework.beans.factory.annotation.Autowired;
import org.springframework.beans.factory.annotation.Value;
import org.springframework.WEB.bind.annotation.GetMapping;
import org.springframework.web.bind.annotation.PathVariable;
import org.springframework.web.bind.annotation.RequestMapping;
import org.springframework.web.bind.annotation.RestController;
import java.util.Date;

@RestController
@RequestMapping("/goods")
public class GoodsController {
    @Autowired
    private GoodsService goodsService;
    @Value("${server.port}")
    private int port;

    @GetMapping("/findOne/{id}")
    @HystrixCommand(fallbackMethod = "findOne_fallback",commandProperties = {
            //设置Hystrix的超时时间 默认1s
            @HystrixProperty(name="execution.isolation.thread.timeoutInMilliseconds",value = "3000")
    })///指定降级后的方法
    public Goods findOne(@PathVariable("id") int id)  {
        ///1 造个异常
        //int i =3/0;
        try {
            Thread.sleep(2000);//sleep interrupted
        } catch (InterruptedException e) {
            e.printStackTrace();
        }
        Goods goods = goodsService.findOne(id);
        goods.setTitle(goods.getTitle() + ":" + port);//将端口号,设置到了 商品标题上
        return goods;
    }

    public Goods findOne_fallback(int id) {
        Goods goods = new Goods();
        goods.setTitle("降级了~~~");
        return goods;
    }
}
指定坐标
   <!--hystrix-->
        <dependency>
            <groupId>org.springframework.cloud</groupId>
            <artifactId>spring-cloud-starter-netflix-hystrix</artifactId>
        </dependency>
application.yml修改
server:
port: 9000eureka:
instance:
hostname: localhost # 主机名
client:
service-url:
defaultZone: Http://localhost:8761/eureka
spring:
application:
name: hystrix-consumer # 设置当前应用的名称。将来会在eureka中Application显示。将来需要使用该名称来获取路径
#开启feign对hystrix支持
feign:
hystrix:
enabled: true
ConsumerApp修改
package com.itheima.consumer;
import org.springframework.boot.SpringApplication;
import org.springframework.boot.autoconfigure.SpringBootApplication;
import org.springframework.cloud.client.discovery.EnableDiscoveryClient;
import org.springframework.cloud.netflix.eureka.EnableEurekaClient;
import org.springframework.cloud.openfeign.EnableFeignClients;
@EnableDiscoveryClient // 激活DiscoveryClient
@EnableEurekaClient
@SpringBootApplication
@EnableFeignClients //开启Feign的功能
public class ConsumerApp {
    public static void main(String[] args) {
        SpringApplication.run(ConsumerApp.class,args);
    }
}
修改GoodsFeignClient方法
package com.itheima.consumer.feign;
import com.itheima.consumer.domain.Goods;
import org.springframework.cloud.openfeign.FeignClient;
import org.springframework.web.bind.annotation.GetMapping;
import org.springframework.web.bind.annotation.PathVariable;
@FeignClient(value = "HYSTRIX-PROVIDER",fallback = GoodsFeignClientFallback.class)
public interface GoodsFeignClient {
    @GetMapping("/goods/findOne/{id}")
    public Goods findGoodsById(@PathVariable("id") int id);
}
复写方法
package com.itheima.consumer.feign;
import com.itheima.consumer.domain.Goods;
import org.springframework.stereotype.Component;

@Component
public class GoodsFeignClientFallback implements  GoodsFeignClient{
    @Override
    public Goods findGoodsById(int id) {
        Goods goods = new Goods();
        goods.setTitle("又被降级了~~");
        return goods;
    }
}
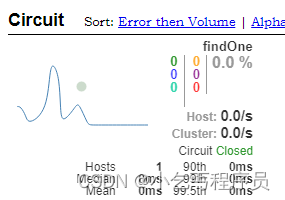
Hystrix 熔断机制,用于监控微服务调用情况,当失败的情况达到预定的阈值(5秒失败20次),会打开断路器,拒绝所有请求,直到服务恢复正常为止。

//设置Hystrix的超时时间 默认1s
@HystrixProperty(name="execution.isolation.thread.timeoutInMilliseconds",value = "3000"),
//监控的时间 默认5000ms
@HystrixProperty(name="circuitBreaker.sleepWindowInMilliseconds",value = "1000"),
//失败次数,默认20次
@HystrixProperty(name="circuitBreaker.requestVolumeThreshold",value = "2"),
//失败率 百分之50
@HystrixProperty(name="circuitBreaker.errorThresholdPercentage",value = "100")
1. 创建监控模块
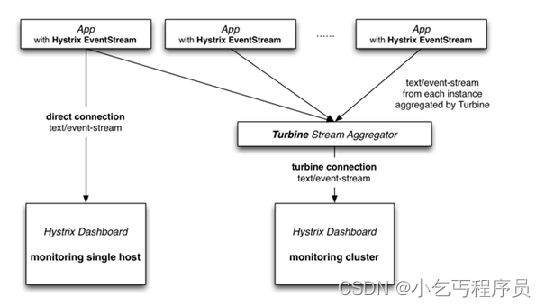
创建hystrix-monitor模块,使用Turbine聚合监控多个Hystrix dashboard功能,
2. 引入Turbine聚合监控起步依赖
<?xml version="1.0" encoding="UTF-8"?>
<project xmlns="http://Maven.apache.org/POM/4.0.0"
         xmlns:xsi="http://www.w3.org/2001/XMLSchema-instance"
         xsi:schemaLocation="http://maven.apache.org/POM/4.0.0 http://maven.apache.org/xsd/maven-4.0.0.xsd">
    <parent>
        <artifactId>hystrix-parent</artifactId>
        <groupId>com.itheima</groupId>
        <version>1.0-SNAPSHOT</version>
    </parent>
    <modelVersion>4.0.0</modelVersion>
    <artifactId>hystrix-monitor</artifactId>
    <properties>
        <project.build.sourceEncoding>UTF-8</project.build.sourceEncoding>
        <project.reporting.outputEncoding>UTF-8</project.reporting.outputEncoding>
        <java.version>1.8</java.version>
    </properties>
    <dependencies>
    	<!--单独熔断监控-->
        <dependency>
            <groupId>org.springframework.cloud</groupId>
            <artifactId>spring-cloud-starter-netflix-hystrix-dashboard</artifactId>
        </dependency>
		<!--聚合熔断监控-->
        <dependency>
            <groupId>org.springframework.cloud</groupId>
            <artifactId>spring-cloud-starter-netflix-turbine</artifactId>
        </dependency>
        <dependency>
            <groupId>org.springframework.boot</groupId>
            <artifactId>spring-boot-starter-actuator</artifactId>
        </dependency>
        <dependency>
            <groupId>org.springframework.cloud</groupId>
            <artifactId>spring-cloud-starter-netflix-eureka-client</artifactId>
        </dependency>
        <dependency>
            <groupId>org.springframework.boot</groupId>
            <artifactId>spring-boot-starter-test</artifactId>
            <scope>test</scope>
        </dependency>
    </dependencies>
    <build>
        <plugins>
            <plugin>
                <groupId>org.springframework.boot</groupId>
                <artifactId>spring-boot-maven-plugin</artifactId>
            </plugin>
        </plugins>
    </build>
</project>
3. 修改application.yml
spring:
application.name: hystrix-monitor
server:
port: 8769
turbine:
combine-host-port: true
# 配置需要监控的服务名称列表
app-config: hystrix-provider,hystrix-consumer
cluster-name-expression: "'default'"
aggregator:
cluster-config: default
#instanceUrlSuffix: /actuator/hystrix.stream
eureka:
client:
serviceUrl:
defaultZone: http://localhost:8761/eureka/
4. 创建启动类
@SpringBootApplication
@EnableEurekaClient
@EnableTurbine //开启Turbine 很聚合监控功能
@EnableHystrixDashboard //开启Hystrix仪表盘监控功能
public class HystrixMonitorApp {
    public static void main(String[] args) {
        SpringApplication.run(HystrixMonitorApp.class, args);
    }
}
需要分别修改 hystrix-provider 和 hystrix-consumer 模块:
1、导入依赖:
		<dependency>
            <groupId>org.springframework.boot</groupId>
            <artifactId>spring-boot-starter-actuator</artifactId>
        </dependency>
        <dependency>
            <groupId>org.springframework.cloud</groupId>
            <artifactId>spring-cloud-starter-netflix-hystrix</artifactId>
        </dependency>
        <dependency>
            <groupId>org.springframework.cloud</groupId>
            <artifactId>spring-cloud-starter-netflix-hystrix-dashboard</artifactId>
        </dependency>
2、配置Bean
此处为了方便,将其配置在启动类中。
@Bean
    public ServletReGIStrationBean getServlet() {
        HystrixMetriCSStreamServlet streamServlet = new HystrixMetricsStreamServlet();
        ServletRegistrationBean registrationBean = new ServletRegistrationBean(streamServlet);
        registrationBean.setLoadOnStartup(1);
        registrationBean.addUrlMappings("/actuator/hystrix.stream");
        registrationBean.setName("HystrixMetricsStreamServlet");
        return registrationBean;
    }
3、启动类上添加注解@EnableHystrixDashboard
@EnableDiscoveryClient
@EnableEurekaClient
@SpringBootApplication
@EnableFeignClients
@EnableHystrixDashboard // 开启Hystrix仪表盘监控功能
public class ConsumerApp {
    public static void main(String[] args) {
        SpringApplication.run(ConsumerApp.class,args);
    }
    @Bean
    public ServletRegistrationBean getServlet() {
        HystrixMetricsStreamServlet streamServlet = new HystrixMetricsStreamServlet();
        ServletRegistrationBean registrationBean = new ServletRegistrationBean(streamServlet);
        registrationBean.setLoadOnStartup(1);
        registrationBean.addUrlMappings("/actuator/hystrix.stream");
        registrationBean.setName("HystrixMetricsStreamServlet");
        return registrationBean;
    }
}
1、启动服务:
2、访问:
在浏览器访问http://localhost:8769/hystrix/ 进入Hystrix Dashboard界面
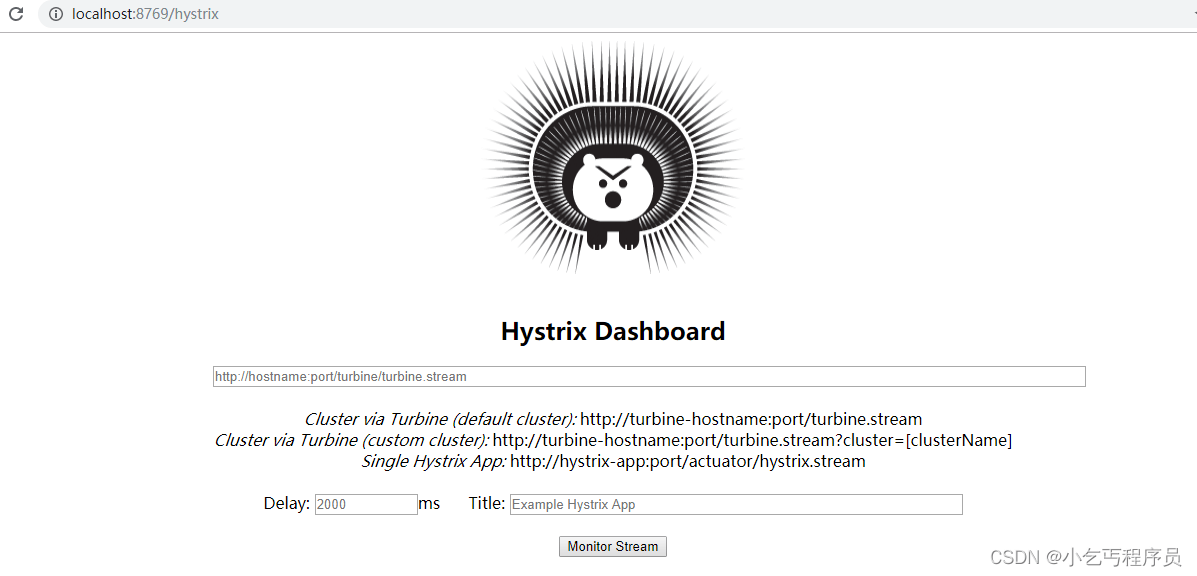
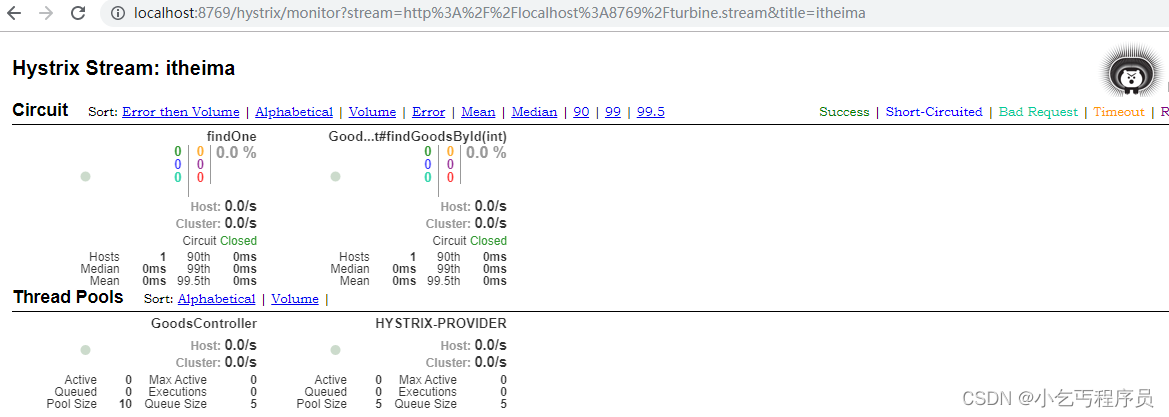
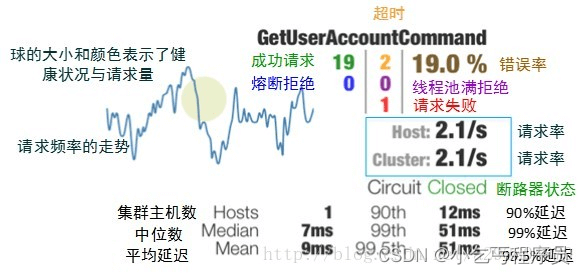
界面中输入监控的Url地址 http://localhost:8769/turbine.stream,监控时间间隔2000毫秒和title,如下图
到此这篇关于SpringCloud Hystrix熔断器使用方法介绍的文章就介绍到这了,更多相关SprinGCloud Hystrix熔断器内容请搜索编程网以前的文章或继续浏览下面的相关文章希望大家以后多多支持编程网!
--结束END--
本文标题: SpringCloudHystrix熔断器使用方法介绍
本文链接: https://lsjlt.com/news/200541.html(转载时请注明来源链接)
有问题或投稿请发送至: 邮箱/279061341@qq.com QQ/279061341
2024-03-01
2024-03-01
2024-03-01
2024-02-29
2024-02-29
2024-02-29
2024-02-29
2024-02-29
2024-02-29
2024-02-29
回答
回答
回答
回答
回答
回答
回答
回答
回答
回答
0