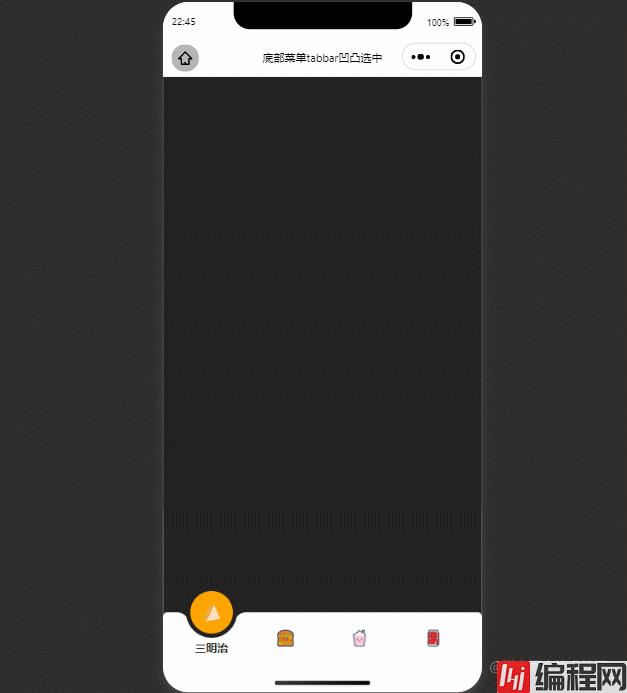
目录1.实现效果2.实现原理2.1 引入阿里巴巴矢量图标2.2 CSS函数var2.3 iOS底部安全距离2.4 css属性transition2.5 box-shadow2.6 b

可参考文章:微信小程序引入外部icon(阿里巴巴矢量图标)[1]^{[1]}[1]
css的var函数[2]^{[2]}[2]:var() 函数用于插入自定义的属性值,如果一个属性值在多处被使用,该方法就很有用。
语法:
var(custom-property-name, value)| 值 | 描述 |
|---|---|
| custom-property-name | 必需。自定义属性的名称,必需以 -- 开头。 |
| value | 可选。备用值,在属性不存在的时候使用。 |
eg:
page {
  --color: #222;
  background: var(--color);
  --bg: orange;
  --w: 175rpx;
}苹果官方推荐:使用env(),constant()来进行底部安全距离适配。
iOS11 新增特性,WEBkit 的一个 CSS 函数,用于设定安全区域与边界的距离,有四个预定义的变量: safe-area-inset-left:安全区域距离左边边界的距离 safe-area-inset-right:安全区域距离右边边界的距离 safe-area-inset-top:安全区域距离顶部边界的距离 safe-area-inset-bottom :安全距离底部边界的距离 一般情况下,关注safe-area-inset-bottom即可。
使用前提:
css3 transition 属性[3]^{[3]}[3]:transition 属性设置元素当过渡效果。注:始终指定transition-duration属性,否则持续时间为0,transition不会有任何效果。
语法:
transition: property duration timing-function delay;| 值 | 描述 |
|---|---|
| transition-property | 指定CSS属性的name,transition效果 |
| transition-duration | transition效果需要指定多少秒或毫秒才能完成 |
| transition-timing-function | 指定transition效果的转速曲线 |
| transition-delay | 定义transition效果开始的时候 |
CSS3 box-shadow 属性[4]^{[4]}[4]:可以设置一个或多个下拉阴影的框。 boxShadow 属性把一个或多个下拉阴影添加到框上。该属性是一个用逗号分隔阴影的列表,每个阴影由 2-4 个长度值、一个可选的颜色值和一个可选的 inset 关键字来规定。省略长度的值是 0。
语法:
box-shadow: h-shadow v-shadow blur spread color inset;| 值 | 说明 |
|---|---|
| h-shadow | 必需的。水平阴影的位置。允许负值 |
| v-shadow | 必需的。垂直阴影的位置。允许负值 |
| blur | 可选。模糊距离 |
| spread | 可选。阴影的大小 |
| color | 可选。阴影的颜色。在CSS颜色值寻找颜色值的完整列表 |
| inset | 可选。从外层的阴影(开始时)改变阴影内侧阴影 |
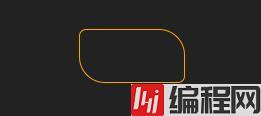
CSS3 border-radius 属性:[5]^{[5]}[5]border-radius 允许你设置元素的外边框圆角。当使用一个半径时确定一个圆形,当使用两个半径时确定一个椭圆。这个(椭)圆与边框的交集形成圆角效果。
语法
border-radius: 1-4 length|% / 1-4 length|%;注:每个半径的四个值的顺序是:左上角,右上角,右下角,左下角。如果省略左下角,右上角是相同的。如果省略右下角,左上角是相同的。如果省略右上角,左上角是相同的。
eg:

view{
  margin: 50px auto;
  border-radius: 15rpx 50rpx;
  width: 200rpx;
  height: 100rpx;
  border: 1px solid orange;
}


page {
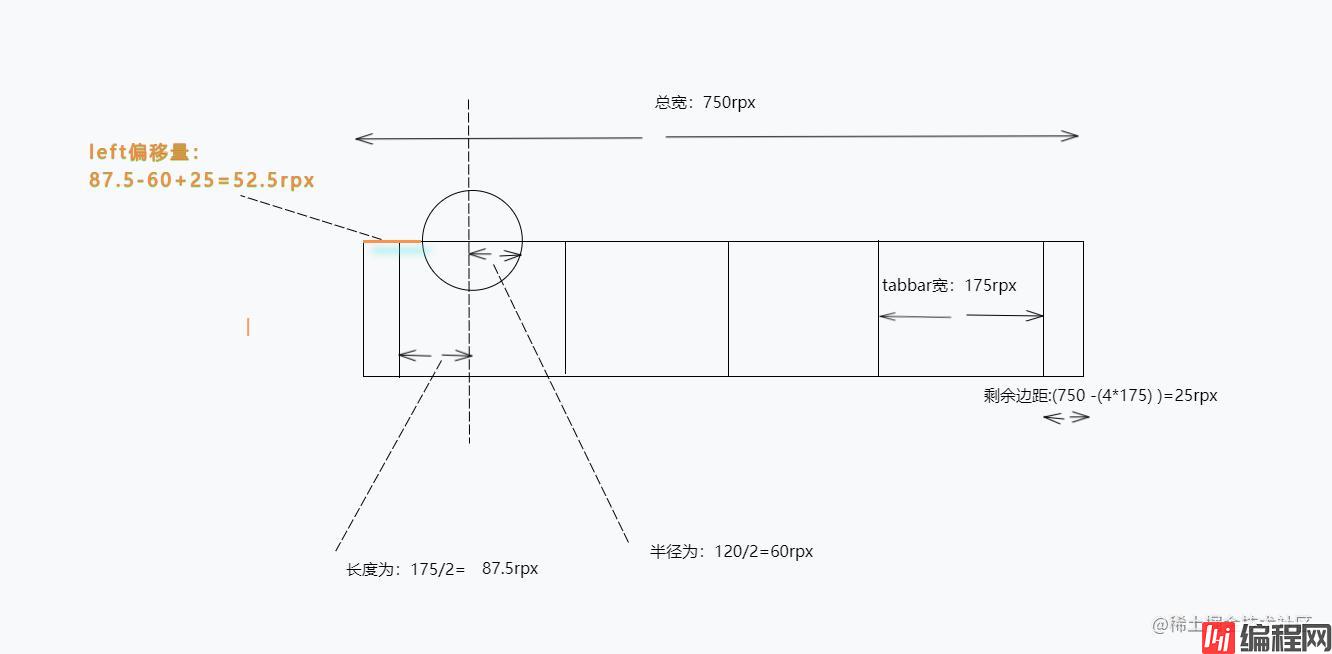
  --w: 175rpx;//tabbar宽度
  --t: 750rpx;//总宽度
  --c: 120rpx;//选中背景宽度

  padding-bottom: calc(constant(safe-area-inset-bottom) +140rpx);
  padding-bottom: calc(env(safe-area-inset-bottom) + 140rpx);
}
-left-pad: calc(var(--t) - (4 * var(--w)));
left: calc((var(--left-pad) / 2) + (var(--w) / 2) - (var(--c) / 2)); top: calc(-50% + constant(safe-area-inset-bottom) / 2);
top: calc(-50% + env(safe-area-inset-bottom) / 2); transform: translateX(calc(var(--w) * var(--n)));
//--w:tabbar宽度,--n对应currIndex

.active-tabbar-box::before,
.active-tabbar-box::after {
content: "";
position: absolute;
top: 50%;
width: 30rpx;
height: 30rpx;
background: transparent;
}
.active-tabbar-box::before {
left: -33rpx;
border-radius: 0 30rpx 0 0;
box-shadow: 0 -15rpx 0 0 var(--color);
}
.active-tabbar-box::after {
right: -33rpx;
border-radius: 30rpx 0 0 0;
box-shadow: 0 -15rpx 0 0 var(--color);
}<view class="tabbar-box">
<block wx:for="{{menu}}" wx:key="list">
<view class="menu-item {{currIndex==index && 'active'}}" catchtap="tabClick" data-index="{{index}}">
<view class="iconfont {{item.icon}}"></view>
<text>{{item.name}}</text>
</view>
</block>
<view class="active-tabbar-box" style="--n:{{currIndex}}"></view>
</view>Page({
data: {
currIndex: 0,
menu: [{
name: "三明治",
icon: "icon-susua-2-53"
},
{
name: "汉堡",
icon: "icon-susuhanbao"
},
{
name: "冰沙",
icon: "icon-susubingsha"
},
{
name: "可乐",
icon: "icon-susukele"
},
]
},
tabClick(e) {
let {
index
} = e.currentTarget.dataset;
this.setData({
currIndex: index,
})
},
})@import "../utils/icon-font.wxss";
page {
--color: #222;
background: var(--color);
--bg: orange;
--w: 175rpx;
--t: 750rpx;
--c: 120rpx;
padding-bottom: calc(constant(safe-area-inset-bottom) +140rpx);
padding-bottom: calc(env(safe-area-inset-bottom) + 140rpx);
}
.tabbar-box {
background: #fff;
border-radius: 10rpx 10rpx 0 0;
position: relative;
height: 120rpx;
width: var(--t);
display: flex;
align-items: center;
justify-content: center;
position: fixed;
left: 0;
bottom: 0;
z-index: 10;
padding-bottom: constant(safe-area-inset-bottom);
padding-bottom: env(safe-area-inset-bottom);
}
.menu-item {
display: flex;
align-items: center;
justify-content: center;
flex-direction: column;
width: var(--w);
height: 100%;
-webkit-tap-highlight-color: rgba(0, 0, 0, 0);
}
.menu-item .iconfont {
font-size: 40rpx;
color: var(--color);
transition: 0.5s all;
position: relative;
z-index: 9;
}
.menu-item text {
position: absolute;
font-size: 26rpx;
font-weight: bold;
color: #222;
transition: 0.5s all;
opacity: 0;
transform: translateY(50rpx);
}
.menu-item.active .iconfont {
transform: translateY(-60rpx);
}
.menu-item.active text {
opacity: 1;
transform: translateY(22rpx);
}
.active-tabbar-box {
box-sizing: border-box;
position: absolute;
width: var(--c);
height: var(--c);
background: var(--bg);
--left-pad: calc(var(--t) - (4 * var(--w)));
left: calc((var(--left-pad) / 2) + (var(--w) / 2) - (var(--c) / 2));
  top: calc(-50% + constant(safe-area-inset-bottom) / 2);
  top: calc(-50% + env(safe-area-inset-bottom) / 2);
border-radius: 50%;
border: 10rpx solid var(--color);
transition: 0.5s all;
}
.active-tabbar-box::before,
.active-tabbar-box::after {
  content: "";
  position: absolute;
  top: 50%;
  width: 30rpx;
  height: 30rpx;
  background: transparent;
}
.active-tabbar-box::before {
  left: -33rpx;
  border-radius: 0 30rpx 0 0;
  box-shadow: 0 -15rpx 0 0 var(--color);
}
.active-tabbar-box::after {
  right: -33rpx;
  border-radius: 30rpx 0 0 0;
  box-shadow: 0 -15rpx 0 0 var(--color);
}
.active-tabbar-box {
transform: translateX(calc(var(--w) * var(--n)));
}[1].微信小程序引入外部icon(阿里巴巴矢量图标)
[2].CSS的var函数
[3].CSS3 transition 属性
[4].CSS3 box-shadow 属性
[5].CSS3 border-radius 属性
到此这篇关于微信小程序实现tabbar凹凸圆选中动画效果的文章就介绍到这了,更多相关小程序tabbar凹凸圆选中动画内容请搜索编程网以前的文章或继续浏览下面的相关文章希望大家以后多多支持编程网!
--结束END--
本文标题: 微信小程序实现tabbar凹凸圆选中动画效果实例
本文链接: https://lsjlt.com/news/168109.html(转载时请注明来源链接)
有问题或投稿请发送至: 邮箱/279061341@qq.com QQ/279061341
2024-01-12
2023-05-20
2023-05-20
2023-05-20
2023-05-20
2023-05-20
2023-05-20
2023-05-20
2023-05-20
2023-05-20
回答
回答
回答
回答
回答
回答
回答
回答
回答
回答
0