目录1、作用2、插槽内心2.1、默认插槽2.2、具名插槽(命名插槽)2.3、作用域插槽实现原理1、作用 父组件向子组件传递内容扩展、复用、定制组件 2、插槽内心 2.1、默认插槽 把
把父组件中的数组,显示在子组件中,子组件通过一个slot插槽标签显示父组件中的数据。
子组件
<template>
  <div class="slotChild">
    <h4>{{msg}}</h4>
    <slot>这是子组件插槽默认的值</slot>
  </div>
</template>
<script>
export default {
  name: "slotChild",
  data() {
    return {
      msg: "Vue中的插槽---子组件"
    }
  }
}
</script>
父组件
<template>
  <div class="slotStudy">
    <h1>{{ msg }}</h1>
    <SlotChild>
      <p>这是父组件传入的值,将会替换子组件中slot中编写的默认值</p>
    </SlotChild>
  </div>
</template>
<script>
import SlotChild from "@/components/slot/SlotChild";
export default {
  name: "slotStudy",
  components: {SlotChild},
  data() {
    return {
      msg: "vue中的插槽---父组件"
    }
  }
}
</script>
<SlotChild></SlotChild>

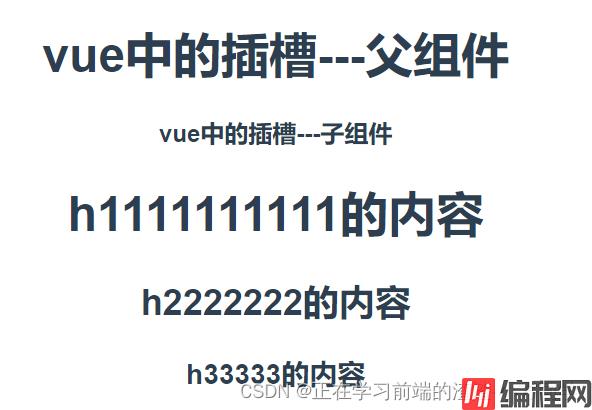
父组件中通过slot属性,给插槽命名,在子组件中通过slot标签,根据定义好的名字填充到对应的位置。这样就可以指定多个可区分的slot,在使用组件时灵活的进行插值。
子组件:
<template>
  <div class="slotChild">
    <h4>{{msg}}</h4>
    <h1><slot name="h_1"></slot></h1>
    <h2><slot name="h_2"></slot></h2>
    <h3><slot name="h_3"></slot></h3>
  </div>
</template>
<script>
export default {
  name: "slotChild",
  data() {
    return {
      msg: "vue中的插槽---子组件"
    }
  }
}
</script>
父组件:
<template>
  <div class="slotStudy">
    <h1>{{ msg }}</h1>
    <SlotChild>
      <template v-slot:h_1>h1111111111的内容</template>
      <!--      #简写-->
      <template #h_2>h2222222的内容</template>
      <template v-slot:h_3>h33333的内容</template>
    </SlotChild>
  </div>
</template>
<script>
import SlotChild from "@/components/slot/SlotChild";
export default {
  name: "slotStudy",
  components: {SlotChild},
  data() {
    return {
      msg: "vue中的插槽---父组件"
    }
  }
}
</script>
用得不多。
将子组件中data的数据传出,在父组件中使用。子组件渲染作用域插槽时,可以将子组件内部的数据传递给父组件,让父组件根据子组件的传递过来的数据决定如何渲染该插槽。在标签中通过v-slot="要传过来的数据"来接收数据。
实现原理:当子组件vm实例化时,获取到父组件传入的slot标签的内容,存放在vm. s l o t 中,默认插槽为 v m . slot中,默认插槽为vm. slot中,默认插槽为vm.slot.default,具名插槽为vm. s l o t . x x x , x x x 为插槽名,当组件执行渲染函数时候,遇到 s l o t 标签,使用 slot.xxx,xxx 为插槽名,当组件执行渲染函数时候,遇到slot标签,使用 slot.xxx,xxx为插槽名,当组件执行渲染函数时候,遇到slot标签,使用slot中的内容进行替换,此时可以为插槽传递数据,若存在数据,则可称该插槽为作用域插槽。
子组件:
<template>
  <div class="slotChild">
    <h4>{{ msg }}</h4>
    <h1>
      <slot :str="strDate" name="n_str">{{ strDate.name }}</slot>
    </h1>
    <h2>
      <slot :str="strDate" name="j_str">{{ strDate.job }}</slot>
    </h2>
  </div>
</template>
<script>
export default {
  name: "slotChild",
  data() {
    return {
      msg: "vue中的插槽---子组件",
      strDate: {
        name: "学习前端的小方同学",
        job: "找工作中",
        age:"我每年都是18"
      }
    }
  }
}
</script>
父组件:
<template>
  <div class="slotStudy">
    <h1>{{ msg }}</h1>
    <SlotChild>
      <template #n_str="strProps">
        {{ strProps.str.job }}
      </template>
      <template v-slot:j_str="strProps">
        {{ strProps.str.age }}
      </template>
    </SlotChild>
  </div>
</template>
<script>
import SlotChild from "@/components/slot/SlotChild";
export default {
  name: "slotStudy",
  components: {SlotChild},
  data() {
    return {
      msg: "vue中的插槽---父组件"
    }
  }
}
</script>
到此这篇关于Vue中slot插槽作用与原理详解的文章就介绍到这了,更多相关Vue slot插槽内容请搜索编程网以前的文章或继续浏览下面的相关文章希望大家以后多多支持编程网!
--结束END--
本文标题: Vue中slot插槽作用与原理详解
本文链接: https://lsjlt.com/news/168017.html(转载时请注明来源链接)
有问题或投稿请发送至: 邮箱/279061341@qq.com QQ/279061341
2024-01-12
2023-05-20
2023-05-20
2023-05-20
2023-05-20
2023-05-20
2023-05-20
2023-05-20
2023-05-20
2023-05-20
回答
回答
回答
回答
回答
回答
回答
回答
回答
回答
0