目录一.什么是dotnetmonitor二.入门.netCLI工具容器镜像三.Httpapi四.触发器五.反馈原文:Announcing dotnet monitor in .NET
原文:Announcing dotnet monitor in .NET 6
我们在 2020 年 6 月首次推出了dotnet monitor 作为实验工具,并在去年(2020年)努力将其转变为生产级工具。今天,我很高兴地的宣布 dotnet monitor 的第一个正式版将和 .NET 6 一起发布,作为 .NET 6 的一部分。
dotnet monitor 已经为 Azure App Service(linux)提供 .NET 应用程序的诊断工具提供支持,我们希望它在更多环境中使用。
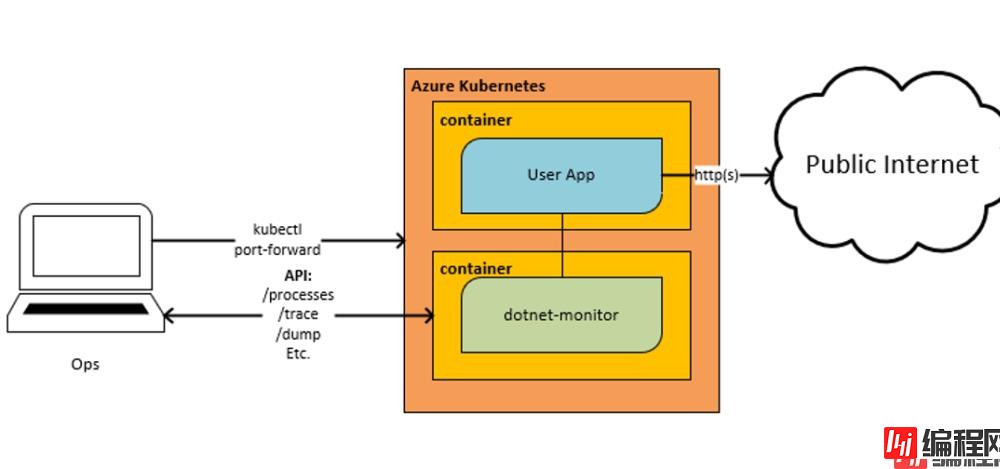
在不同的环境中运行 .NET 应用程序可能会使收集诊断信息(例如日志、跟踪、dump)变得困难。dotnet monitor 是一种工具,它提供了一种统一的方法来收集这些诊断信息,而不管您是在桌面计算机(desktop Machine 可理解为我们日常使用的电脑)还是在 kubernetes 集群中运行。
收集这些诊断信息有两种不同的机制:
dotnet monitor 可以通过两种不同的分发机制获得:
dotnet monitor CLI 工具首先需要安装 .NET 6 SDK,如果你没有足够新的 SDK,可以通过 .NET 下载网页获取安装包进行安装。
你可以使用一下命令获取最新版的 dotnet monitor:
dotnet tool install -g dotnet-monitor --version 6.0.0
如果你已经安装但是想更新到最新,可以运行以下命令:
dotnet tool update -g dotnet-monitor --version 6.0.0
dotnet monitor 容器镜像在 MCR 上可用,你可以通过以下命令获取最新的镜像:
Docker pull mcr.microsoft.com/dotnet/monitor:6.0.0
dotnet monitor 公开了一个 HTTP API 来查询可用进程、收集诊断信息并检查请求信息的状态。
暴露了以下 HTTP API:
下面的示例演示如何使用 dotnet monitor 从目标进程开始,在60秒的时间内从Microsoft.Aspnetcore.Server.Kestrel.Connections 日志级别为 Debug 的日志流数据。
PS> curl.exe -X POST "https://localhost:52323/logs?name=myWEBApp&durationSeconds=60" `
-H "Accept: application/x-ndJSON" `
-H "Content-Type: application/json" `
--neGotiate -u $(whoami)`
-d '{"filterSpecs": {"Microsoft.AspNetCore.Server.Kestrel.Connections": "Debug"}}'
{"Timestamp":"2021-11-05 08:12:54Z","LogLevel":"Debug","EventId":39,"EventName":"ConnectionAccepted","Category":"Microsoft.AspNetCore.Server.Kestrel.Connections","Message":"Connection id u00220HMD06BUKL2CUu0022 accepted.","State":{"Message":"Connection id u00220HMD06BUKL2CUu0022 accepted.","ConnectionId":"0HMD06BUKL2CU","{OriginalFORMat}":"Connection id u0022{ConnectionId}u0022 accepted."}}
{"Timestamp":"2021-11-05 08:12:54Z","LogLevel":"Debug","EventId":1,"EventName":"ConnectionStart","Category":"Microsoft.AspNetCore.Server.Kestrel.Connections","Message":"Connection id u00220HMD06BUKL2CUu0022 started.","State":{"Message":"Connection id u00220HMD06BUKL2CUu0022 started.","ConnectionId":"0HMD06BUKL2CU","{OriginalFormat}":"Connection id u0022{ConnectionId}u0022 started."}}
{"Timestamp":"2021-11-05 08:12:54Z","LogLevel":"Debug","EventId":9,"EventName":"ConnectionKeepAlive","Category":"Microsoft.AspNetCore.Server.Kestrel.Connections","Message":"Connection id u00220HMD06BUKL2CUu0022 completed keep alive response.","State":{"Message":"Connection id u00220HMD06BUKL2CUu0022 completed keep alive response.","ConnectionId":"0HMD06BUKL2CU","{OriginalFormat}":"Connection id u0022{ConnectionId}u0022 completed keep alive response."},"Scopes":[{"ConnectionId":"0HMD06BUKL2CU"},{"RequestId":"0HMD06BUKL2CU:00000002","RequestPath":"/"}]}
如上面的示例所示,您可以使用 dotnet monitor 按需从目标进程中捕获诊断信息。除了日志,您还可以从目标进程收集跟踪、内存转储、GC转储和 metrics。

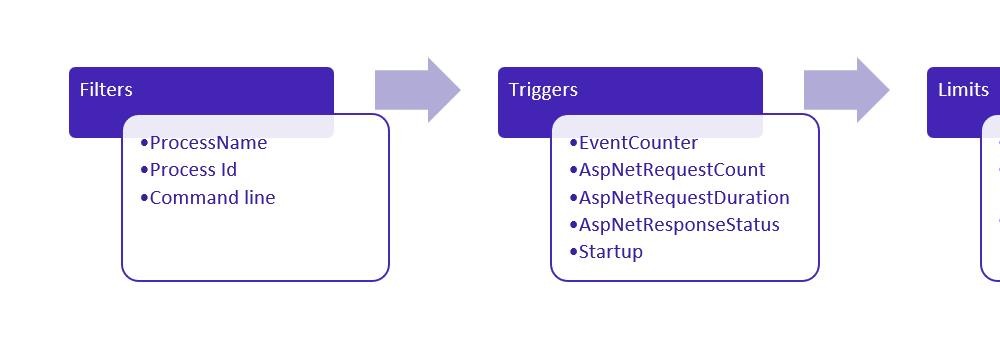
dotnet monitor 可以配置为根据发现的进程中的条件自动收集诊断信息。 发现新进程时,如果该进程数据与规则匹配,则 dotnet monitor 将尝试应用配置的规则。 应用的规则将开始监视触发器描述的条件的过程。 如果满足该条件,则假定尚未达到指定的限制来执行操作列表。

示例:如果 dotnet monitor 检测到持续超过一分钟的CPU使用率在80%以上,则它将收集进程 dump,限制每小时不超过1个。
{
  "CollectionRules": {
    "HighCpuRule": {
      "Filters": [
        {
          "Key": "ProcessName",
          "Value": "MyApp",
          "MatchType": "Exact"
        }
      ],
      "Trigger": {
        "Type": "EventCounter",
        "Settings": {
          "ProviderName": "System.Runtime",
          "CounterName": "cpu-usage",
          "GreaterThan": 80,
          "SlidingWindowDuration": "00:01:00"
        }
      },
      "Limits": {
        "ActionCount": 1,
        "ActionCountSlidingWindowDuration": "1:00:00"
      },
      "Actions": [
        {
          "Type": "CollectDump",
          "Settings": {
            "Type": "Triage",
            "Egress": "myBlobStorageAccount"
          }
        }
      ]
    }
  }
}规则文档:https://GitHub.com/dotnet/dotnet-monitor/blob/main/documentation/collectionrules.md
github issue: https://github.com/dotnet/dotnet-monitor/issues/new/choose
到此这篇关于.NET 6 中的 dotnet monitor的文章就介绍到这了,更多相关.NET6 dotnet monitor内容请搜索编程网以前的文章或继续浏览下面的相关文章希望大家以后多多支持编程网!
--结束END--
本文标题: .NET 6 中的 dotnet monitor详细解析
本文链接: https://lsjlt.com/news/159329.html(转载时请注明来源链接)
有问题或投稿请发送至: 邮箱/279061341@qq.com QQ/279061341
2023-05-21
2023-05-21
2023-05-21
2023-05-21
2023-05-20
2023-05-20
2023-05-20
2023-05-20
2023-05-20
2023-05-20
回答
回答
回答
回答
回答
回答
回答
回答
回答
回答
0