Python 官方文档:入门教程 => 点击学习
目录SpringBoot jpaRepository对Entity序列化1. 问题2. 写个基本的JpaRepository的使用最后一个简单的测试springboot 使用JpaR
一开始,我没有对实体类Inventory序列化,导致在使用内嵌数据库H2的JPA时,它直接安装字母序列把表Inventory的字段生成。
举例,原来我按照
inventory(id, name, quantity, type, comment)顺序写的数据库导入表,但是因为没有序列化,导致表结构变成
inventory(id, comment,name, quantity, type )所以后面JPA处理失败。
顺便记录一下写spring cloud 基于和H2 database的jpa简单restful 程序。
实体类Inventory
package com.example.demo;
import java.io.Serializable;
import javax.persistence.Column;
import javax.persistence.Entity;
import javax.persistence.GeneratedValue;
import javax.persistence.Id;
import javax.persistence.SequenceGenerator;

@Entity
public class Inventory implements Serializable{
    private static final long serialVersionUID = 1L;
    @Id
    @SequenceGenerator(name="inventory_generator", sequenceName="inventory_sequence", initialValue = 2)
    @GeneratedValue(generator = "inventory_generator")
    private Integer id;
    @Column(nullable = false)
    private String name;
    @Column(nullable = false)
    private Integer quantity;
    @Column(nullable = false)
    private Integer type;
    @Column(nullable = false)
    private String comment;
    public Inventory(Integer id, String name, Integer quantity, Integer type, String comment) {
        super();
        this.id = id;
        this.name = name;
        this.quantity = quantity;
        this.type = type;
        this.comment = comment;
    }
    public Inventory() {
        super();
    }
    public Integer getId() {
        return id;
    }
    public void setId(Integer id) {
        this.id = id;
    }
    public String getName() {
        return name;
    }
    public void setName(String name) {
        this.name = name;
    }
    public Integer getQuantity() {
        return quantity;
    }
    public void setQuantity(Integer quantity) {
        this.quantity = quantity;
    }
    public Integer getType() {
        return type;
    }
    public void setType(Integer type) {
        this.type = type;
    }
    public String getComment() {
        return comment;
    }
    public void setComment(String comment) {
        this.comment = comment;
    }
    @Override
    public String toString() {
        return "Inventory [id=" + id + ", name=" + name + ", quantity=" + quantity + ", type=" + type + ", comment="
                + comment + "]";
    }
}下面使用JpaRepository简化开发流程,非常舒服地定义简单的service 接口即可,会自动实现,大赞。
package com.example.demo;
import org.springframework.data.jpa.repository.JpaRepository;
public interface InventoryRepository extends JpaRepository<Inventory, Integer> {
    Inventory findById(Integer id);
}我把controller方法放到了springboot启动类里面,这又是一个大问题,因为我的项目只有放在这才能被dispatcher转发,简直了。
这里的@EnableDiscoveryClient 是因为我在做spring cloud的eureka 服务发现,需要这个注解让注册中心发现这个服务。
package com.example.demo;
import java.time.LocalTime;
import org.springframework.beans.factory.annotation.Autowired;
import org.springframework.beans.factory.annotation.Value;
import org.springframework.boot.SpringApplication;
import org.springframework.boot.autoconfigure.SpringBootApplication;
import org.springframework.cloud.client.discovery.EnableDiscoveryClient;
import org.springframework.transaction.annotation.Transactional;
import org.springframework.WEB.bind.annotation.GetMapping;
import org.springframework.web.bind.annotation.PathVariable;
import org.springframework.web.bind.annotation.RequestMapping;
import org.springframework.web.bind.annotation.ResponseBody;
import org.springframework.web.bind.annotation.RestController;

@SpringBootApplication
@EnableDiscoveryClient
@RestController
public class InventoryApplication {
    public static void main(String[] args) {
        SpringApplication.run(InventoryApplication.class, args);
    }
    @Autowired
    private InventoryRepository inventoryRepository;

    @Value("${server.port}")
    private Integer port;
    @RequestMapping("/info")
    public String info(){
        inventoryRepository.save(new Inventory(1, "火锅底料", 10000, 1, "你吃火锅,我吃底料"));
        inventoryRepository.save(new Inventory(2, "微服务架构", 100, 2, "微服务还是要考虑 一波"));
        return "{Inventory[port:"+port+", info:库存微服务"+"]}";
    }

    @GetMapping("/get/{id}")
    @ResponseBody
    @Transactional
    public String getById(@PathVariable("id")Integer id){
        return inventoryRepository.findById(id).toString();
    }

    @GetMapping("/")
    @ResponseBody
    @Transactional
    public String re(){
        return inventoryRepository.findAll().toString();
    }

    @GetMapping("/delete/{id}")
    @ResponseBody
    @Transactional
    public String delete(@PathVariable("id")Integer id){
        inventoryRepository.delete(id);
        return "delete successfully";
    }

    @GetMapping("/save/id={id}&name={name}&quantity={quantity}&type={type}&comment={comment}")

    public String save(@PathVariable("id")Integer id,@PathVariable("name")String name,
            @PathVariable("quantity")Integer quantity,@PathVariable("type")Integer type,
            @PathVariable("comment")String comment){
        inventoryRepository.save(new Inventory(id,name,quantity,type,comment));
        System.out.println(new Inventory(id,name,quantity,type,comment));
        //强调一下identity和auto
        return "save successfully";
    }

    @GetMapping("/update/id={id}&name={name}&quantity={quantity}&type={type}&comment={comment}")
    @ResponseBody
    @Transactional
    public String update(@PathVariable("id")Integer id,@PathVariable("name")String name,
            @PathVariable("quantity")Integer quantity,@PathVariable("type")Integer type,
            @PathVariable("comment")String comment){
        Inventory inventory=inventoryRepository.findById(id);
        if(inventory.getComment().length()<LocalTime.now().toString().length()){
            inventory.setComment(inventory.getComment()+LocalTime.now());
        }else{
            inventory.setComment(inventory.getComment().substring(0,inventory.getComment().length()-
                    LocalTime.now().toString().length())+LocalTime.now());
        }
        inventoryRepository.save(inventory);
        inventoryRepository.flush();
        return "update successfully";
    }
}application.properties的配置很关键,搜了不少教程。
spring.jpa.show-sql=true
logging.pattern.level=trace
server.port=8765
spring.application.name=inventory
server.Tomcat.max-threads=1000
eureka.instance.leaseRenewalIntervalInSeconds= 10
eureka.client.reGIStryFetchIntervalSeconds= 5
eureka.client.serviceUrl.defaultZone=Http://localhost:8889/eureka
#eureka.client.service-url.defaultZone=http://${eureka.instance.hostname}:${eureka.instance.server.port}/eureka

#spring.thymeleaf.prefix=classpath:/templates/
#spring.thymeleaf.suffix=.html
#spring.thymeleaf.mode=HTML5
#spring.thymeleaf.encoding=UTF-8
# ;charset=<encoding> is added
#spring.thymeleaf.content-type=text/html
# set to false for hot refresh
spring.h2.console.enabled=true
spring.thymeleaf.cache=false
spring.jpa.hibernate.ddl-auto=update
#这里是把h2持久化到本地文件夹,这可以保持数据
spring.datasource.url=jdbc:h2:file:C\:/h2/h2cache;AUTO_SERVER=TRUE;DB_CLOSE_DELAY=-1
logging.file=c\:/h2/logging.log
logging.level.org.hibernate=debug
#spring.datasource.data=classpath:import.sql
数据库是自动导入的,只要命名方式是import.sql, 放在src/main/resources下面就可以
insert into inventory(id, name, quantity, type, comment) values (1, "火锅底料", 10000, 1, "你吃火锅,我吃底料")
insert into inventory(id, name, quantity, type, comment) values (2, "微服务架构", 100, 2, "微服务还是要考虑 一波")
junit测试一波
package com.example.demo;
import org.junit.Test;
import org.junit.runner.RunWith;
import org.springframework.beans.factory.annotation.Autowired;
import org.springframework.boot.test.context.SpringBootTest;
import org.springframework.test.context.junit4.SpringRunner;
@RunWith(SpringRunner.class)
@SpringBootTest
public class InventoryApplicationTests {

    @Autowired
    private InventoryRepository inventoriRepository;

    @Test
    public void test2() {
        System.out.println(inventoriRepository.findAll());
    }
}
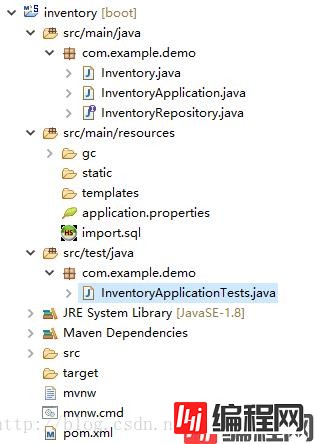
上图是项目结构图
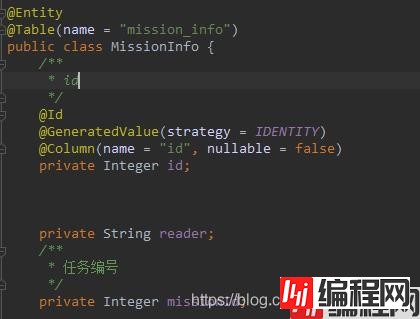
在对数据库操作时使用 MissionInfoRepository,对应的实体类必须用下面两个注解修饰
@Entity
@Table(name = "mission_info")
主键用下面修饰
 @Id
 @GeneratedValue(strategy = IDENTITY)
 @Column(name = "id", nullable = false)

属性命名如果使用驼峰,例如missionId,表中字段对应mission_id,否则对数据库操作的时候会报错,所以在表字段定义的时候,方便代码里使用JPA的话,表字段定义多个词之间用“_”隔开,而不是驼峰定义表字段。
以上为个人经验,希望能给大家一个参考,也希望大家多多支持编程网。
--结束END--
本文标题: springbootjpaRepository为何一定要对Entity序列化
本文链接: https://lsjlt.com/news/159246.html(转载时请注明来源链接)
有问题或投稿请发送至: 邮箱/279061341@qq.com QQ/279061341
2024-03-01
2024-03-01
2024-03-01
2024-02-29
2024-02-29
2024-02-29
2024-02-29
2024-02-29
2024-02-29
2024-02-29
回答
回答
回答
回答
回答
回答
回答
回答
回答
回答
0