Python 官方文档:入门教程 => 点击学习
一、RabbitMQ的rpc简介 实际业务中,有的时候我们还需要等待消费者返回结果给我们,或者是说我们需要消费者上的一个功能、一个方法或是一个接口返回给我们相应的值,而往往大型的系统
实际业务中,有的时候我们还需要等待消费者返回结果给我们,或者是说我们需要消费者上的一个功能、一个方法或是一个接口返回给我们相应的值,而往往大型的系统软件,生产者跟消费者之间都是相互独立的两个系统,部署在两个不同的电脑上,不能通过直接对象.方法的形式获取想要的结果,这时候我们就需要用到RPC(Remote Procedure Call)远程过程调用方式。
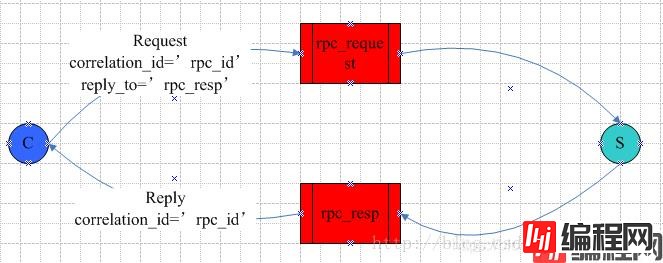
RabbitMQ实现RPC的方式很简单,生产者发送一条带有标签(消息ID(correlation_id)+回调队列名称)的消息到发送队列,消费者(也称RPC服务端)从发送队列获取消息并处理业务,解析标签的信息将业务结果发送到指定的回调队列,生产者从回调队列中根据标签的信息获取发送消息的返回结果。

如图,客户端C发送消息,指定消息的ID=rpc_id,回调响应的队列名称为rpc_resp,消息从C发送到rpc_request队列,服务端S获取消息业务处理之后,将correlation_id附加到响应的结果发送到指定的回调队列rpc_resp中,客户端从回调队列获取消息,匹配与发送消息的correlation_id相同的值为消息应答结果。
注意:springboot中使用的时候,correlation_id为系统自动生成的,reply_to在加载AmqpTemplate实例的时候设置的。
实例:
说明:队列1为发送队列,队列2为返回队列
1.先配置rabbitmq
package com.ws.common;

import org.springframework.amqp.core.Binding;
import org.springframework.amqp.core.BindingBuilder;
import org.springframework.amqp.core.Queue;
import org.springframework.amqp.core.TopicExchange;
import org.springframework.amqp.rabbit.connection.CachinGConnectionFactory;
import org.springframework.amqp.rabbit.connection.ConnectionFactory;
import org.springframework.amqp.rabbit.core.RabbitTemplate;
import org.springframework.amqp.rabbit.listener.SimpleMessageListenerContainer;
import org.springframework.beans.factory.annotation.Autowired;
import org.springframework.beans.factory.annotation.Value;
import org.springframework.context.annotation.Bean;
import org.springframework.context.annotation.Configuration;


@Configuration
public class RabbitMQConfig {
	public static final String TOPIC_QUEUE1 = "topic.queue1";
    public static final String TOPIC_QUEUE2 = "topic.queue2";
    public static final String TOPIC_EXCHANGE = "topic.exchange";

    @Value("${spring.rabbitmq.host}")
    private String host;
    @Value("${spring.rabbitmq.port}")
    private int port;
    @Value("${spring.rabbitmq.username}")
    private String username;
    @Value("${spring.rabbitmq.passWord}")
    private String password;

    @Autowired
    ConnectionFactory connectionFactory;

    @Bean(name = "connectionFactory")
    public ConnectionFactory connectionFactory() {
    	CachingConnectionFactory connectionFactory = new CachingConnectionFactory();
    	connectionFactory.setHost(host);
    	connectionFactory.setPort(port);
    	connectionFactory.setUsername(username);
    	connectionFactory.setPassword(password);
    	connectionFactory.setVirtualHost("/");
    	return connectionFactory;
    }

    @Bean
    public RabbitTemplate rabbitTemplate() {
    	RabbitTemplate rabbitTemplate = new RabbitTemplate(connectionFactory);
    	//设置reply_to(返回队列,只能在这设置)
    	rabbitTemplate.setReplyAddress(TOPIC_QUEUE2);
    	rabbitTemplate.setReplyTimeout(60000);
    	return rabbitTemplate;
    }
    //返回队列监听器(必须有)
    @Bean(name="replyMessageListenerContainer")
    public SimpleMessageListenerContainer createReplyListenerContainer() {
         SimpleMessageListenerContainer listenerContainer = new SimpleMessageListenerContainer();
         listenerContainer.setConnectionFactory(connectionFactory);
         listenerContainer.setQueueNames(TOPIC_QUEUE2);
         listenerContainer.setMessageListener(rabbitTemplate());
         return listenerContainer;
    }


    //创建队列
    @Bean
    public Queue topicQueue1() {
        return new Queue(TOPIC_QUEUE1);
    }
    @Bean
    public Queue topicQueue2() {
        return new Queue(TOPIC_QUEUE2);
    }

    //创建交换机
    @Bean
    public TopicExchange topicExchange() {
        return new TopicExchange(TOPIC_EXCHANGE);
    }

    //交换机与队列进行绑定
    @Bean
    public Binding topicBinding1() {
        return BindingBuilder.bind(topicQueue1()).to(topicExchange()).with(TOPIC_QUEUE1);
    }
    @Bean
    public Binding topicBinding2() {
        return BindingBuilder.bind(topicQueue2()).to(topicExchange()).with(TOPIC_QUEUE2);
    }
}
2.发送消息并同步等待返回值
@Autowired
private RabbitTemplate rabbitTemplate;


//报文body
String sss = "报文的内容";
//封装Message
Message msg = this.con(sss);
log.info("客户端--------------------"+msg.toString());
//使用sendAndReceive方法完成rpc调用
Message message=rabbitTemplate.sendAndReceive(RabbitMQConfig.TOPIC_EXCHANGE, RabbitMQConfig.TOPIC_QUEUE1, msg);
//提取rpc回应内容body
String response = new String(message.getBody());
log.info("回应:" + response);
log.info("rpc完成---------------------------------------------");


public Message con(String s) {
	MessageProperties mp = new MessageProperties();
	byte[] src = s.getBytes(Charset.forName("UTF-8"));
	//mp.setReplyTo("adsdas");   加载AmqpTemplate时设置,这里设置没用
	//mp.setCorrelationId("2222");   系统生成,这里设置没用
	mp.setContentType("application/JSON");
	mp.setContentEncoding("UTF-8");
	mp.setContentLength((long)s.length());
	return new Message(src, mp);
}
3.写消费者
package com.ws.listener.mq;

import java.NIO.charset.Charset;

import org.springframework.amqp.core.Message;
import org.springframework.amqp.core.MessageProperties;
import org.springframework.amqp.rabbit.annotation.RabbitListener;
import org.springframework.amqp.rabbit.core.RabbitTemplate;
import org.springframework.beans.factory.annotation.Autowired;
import org.springframework.stereotype.Component;

import com.ws.common.RabbitMQConfig;

import lombok.extern.slf4j.Slf4j;

@Slf4j
@Component
public class Receiver {
	@Autowired
	private RabbitTemplate rabbitTemplate;

	@RabbitListener(queues=RabbitMQConfig.TOPIC_QUEUE1)
	public void receiveTopic1(Message msg) {
		log.info("队列1:"+msg.toString());
		String msgBody = new String(msg.getBody());
		//数据处理,返回的Message
		Message repMsg = con(msgBody+"返回了", msg.getMessageProperties().getCorrelationId());

		rabbitTemplate.send(RabbitMQConfig.TOPIC_EXCHANGE, RabbitMQConfig.TOPIC_QUEUE2, repMsg);

    }
	@RabbitListener(queues=RabbitMQConfig.TOPIC_QUEUE2)
	public void receiveTopic2(Message msg) {
		log.info("队列2:"+msg.toString());

    }

	public Message con(String s, String id) {
		MessageProperties mp = new MessageProperties();
		byte[] src = s.getBytes(Charset.forName("UTF-8"));
		mp.setContentType("application/json");
		mp.setContentEncoding("UTF-8");
		mp.setCorrelationId(id);

		return new Message(src, mp);
	}
}
日志打印:
2019-06-26 17:11:16.607 [Http-nio-8080-exec-4] INFO com.ws.controller.UserController - 客户端--------------------(Body:‘报文的内容' MessageProperties [headers={}, contentType=application/json, contentEncoding=UTF-8, contentLength=5, deliveryMode=PERSISTENT, priority=0, deliveryTag=0])
2019-06-26 17:11:16.618 [SimpleAsyncTaskExecutor-1] INFO com.ws.listener.mq.Receiver - 队列1:(Body:‘报文的内容' MessageProperties [headers={}, correlationId=1, replyTo=topic.queue2, contentType=application/json, contentEncoding=UTF-8, contentLength=0, receivedDeliveryMode=PERSISTENT, priority=0, redelivered=false, receivedExchange=topic.exchange, receivedRoutingKey=topic.queue1, deliveryTag=1, consumerTag=amq.ctag-8IzlhblYmTebqUYd-uferw, consumerQueue=topic.queue1])
2019-06-26 17:11:16.623 [http-nio-8080-exec-4] INFO com.ws.controller.UserController - 回应:报文的内容返回了
2019-06-26 17:11:16.623 [http-nio-8080-exec-4] INFO com.ws.controller.UserController - rpc完成---------------------------------------------
到此这篇关于SpringBoot中使用RabbitMQ的RPC功能的文章就介绍到这了,更多相关SpringBoot使用RabbitMQ内容请搜索编程网以前的文章或继续浏览下面的相关文章希望大家以后多多支持编程网!
--结束END--
本文标题: 详解SpringBoot中使用RabbitMQ的RPC功能
本文链接: https://lsjlt.com/news/157381.html(转载时请注明来源链接)
有问题或投稿请发送至: 邮箱/279061341@qq.com QQ/279061341
2024-03-01
2024-03-01
2024-03-01
2024-02-29
2024-02-29
2024-02-29
2024-02-29
2024-02-29
2024-02-29
2024-02-29
回答
回答
回答
回答
回答
回答
回答
回答
回答
回答
0