Python 官方文档:入门教程 => 点击学习
目录1.高级(插件机制)1.1自动填充1.1.1 原理1.1.2 基本操作1.2乐观锁1.2.1 什么是乐观锁1.2.2. 实现1.2.3 注意事项1.3逻辑删除1.3.1 什么是逻
项目中经常会遇到一些数据,每次都使用相同的方式填充,例如记录的创建时间,更新时间等。
我们可以使用mybatis Plus的自动填充功能,完成这些字段的赋值工作:
com.baomidou.mybatisplus.core.handlers.MetaObjectHandler,确定填充具体操作@TableField(fill = ...) 确定字段填充的时机步骤一:修改表添加字段
alter table tmp_customer add column create_time date;
alter table tmp_customer add column update_time date;
步骤二:修改JavaBean
package com.czxy.mp.domain;

import com.baomidou.mybatisplus.annotation.*;
import lombok.Data;

import java.util.Date;


@Data
@TableName("tmp_customer")
public class Customer {
    @TableId(type = IdType.AUTO)
    private Integer cid;
    private String cname;
    private String passWord;
    private String telephone;
    private String money;

    @TableField(value="create_time",fill = FieldFill.INSERT)
    private Date createTime;

    @TableField(value="update_time",fill = FieldFill.UPDATE)
    private Date updateTime;

}
步骤三:编写处理类

package com.czxy.mp.handler;

import com.baomidou.mybatisplus.core.handlers.MetaObjectHandler;
import org.apache.ibatis.reflection.MetaObject;
import org.springframework.stereotype.Component;

import java.util.Date;


@Component
public class MyMetaObjectHandler implements MetaObjectHandler {

    @Override
    public void insertFill(MetaObject metaObject) {
        this.setFieldValByName("createTime", new Date(), metaObject);
    }


    @Override
    public void updateFill(MetaObject metaObject) {
        this.setFieldValByName("updateTime", new Date(), metaObject);
    }
}步骤四:测试
 @Test
    public void testInsert() {
        Customer customer = new Customer();
        customer.setCname("测试888");

        customerMapper.insert(customer);
    }

    @Test
    public void testUpdate() {
        Customer customer = new Customer();
        customer.setCid(11);
        customer.setTelephone("999");

        customerMapper.updateById(customer);
}不会发生。读锁。肯定发生。写锁。取出记录时,获取当前version
更新时,带上这个version
执行更新时, set version = newVersion where version = oldVersion
如果version不对,就更新失败
步骤:
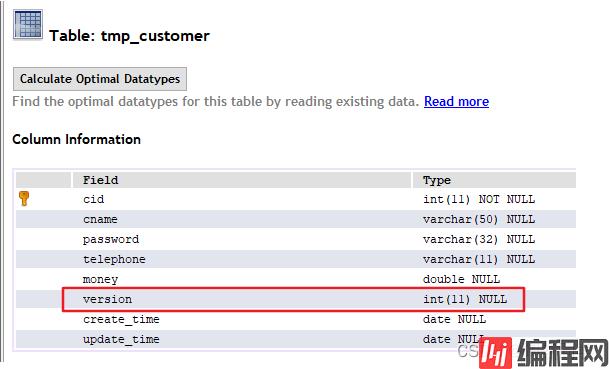
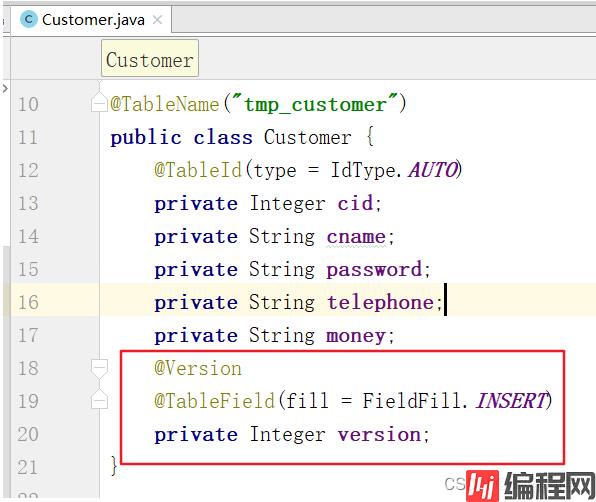
package com.czxy.mp.domain;

import com.baomidou.mybatisplus.annotation.*;
import lombok.Data;


@Data
@TableName("tmp_customer")
public class Customer {
    @TableId(type = IdType.AUTO)
    private Integer cid;
    private String cname;
    private String password;
    private String telephone;
    private String money;
    @Version
    @TableField(fill = FieldFill.INSERT)
    private Integer version;
}
package com.czxy.mp.config;

import com.baomidou.mybatisplus.core.handlers.MetaObjectHandler;
import org.apache.ibatis.reflection.MetaObject;
import org.springframework.stereotype.Component;

import java.util.Date;


@Component
public class MyMetaObjectHandler implements MetaObjectHandler {

    @Override
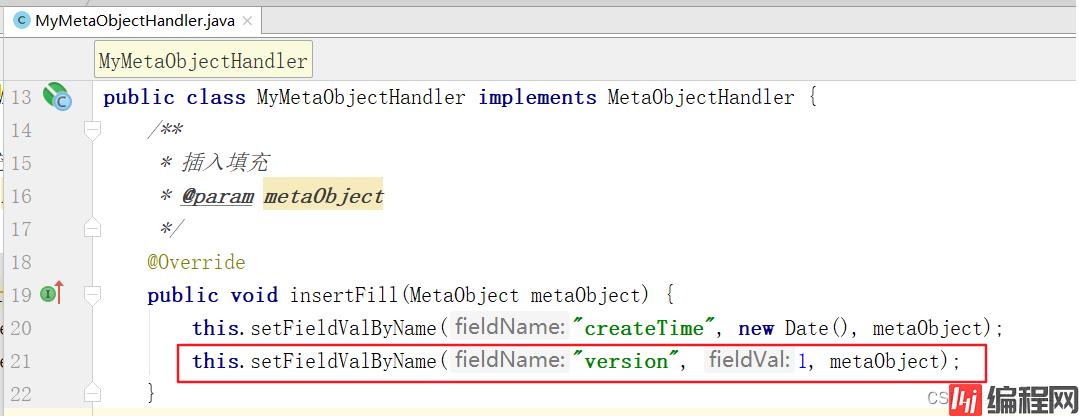
    public void insertFill(MetaObject metaObject) {
        this.setFieldValByName("createTime", new Date(), metaObject);
        this.setFieldValByName("version", 1, metaObject);
    }


    @Override
    public void updateFill(MetaObject metaObject) {
        this.setFieldValByName("updateTime", new Date(), metaObject);
    }
}
步骤四:修改 MybatisPlusConfig 开启乐观锁
package com.czxy.mp.config;

import com.baomidou.mybatisplus.annotation.DbType;
import com.baomidou.mybatisplus.extension.plugins.MybatisPlusInterceptor;
import com.baomidou.mybatisplus.extension.plugins.OptimisticLockerInterceptor;
import com.baomidou.mybatisplus.extension.plugins.inner.OptimisticLockerInnerInterceptor;
import com.baomidou.mybatisplus.extension.plugins.inner.PaginationInnerInterceptor;
import org.springframework.context.annotation.Bean;
import org.springframework.context.annotation.Configuration;


@Configuration
public class MybatisPlusConfig {
     */

    @Bean
    public MybatisPlusInterceptor mybatisPlusInterceptor(){

        MybatisPlusInterceptor mybatisPlusInterceptor = new MybatisPlusInterceptor();
        // 分页插件
        mybatisPlusInterceptor.addInnerInterceptor(new PaginationInnerInterceptor(DbType.Mysql));
        // 乐观锁
        mybatisPlusInterceptor.addInnerInterceptor(new OptimisticLockerInnerInterceptor());

        return mybatisPlusInterceptor;
    }
} @Test
public void testUpdate() {
Customer customer = new Customer();
customer.setCid(14);
customer.setCname("测试999");
// 与数据库中数据一致,将更新成功,否则返回失败。
customer.setVersion(1);
int i = customerMapper.updateById(customer);
System.out.println(i);
}支持的数据类型只有:int,Integer,long,Long,Date,Timestamp,LocalDateTime
整数类型下
newVersion = oldVersion + 1
newVersion会回写到entity中仅支持
updateById(id)与update(entity, wrapper)方法在
update(entity, wrapper)方法下,wrapper不能复用!!!数据库表的version字段,必须有默认值(SQL语句默认值、或MyBatisPlus自动填充)
在进行更新操作时,必须设置version值,否则无效。
逻辑删除,也称为假删除。就是在表中提供一个字段用于记录是否删除,实际该数据没有被删除。
步骤:
步骤一:环境(表提供字段deleted、JavaBean属性 deleted、填充默认值0)
步骤二:修改JavaBean,添加注解 @TableLogic
步骤一:修改表结构添加deleted字段
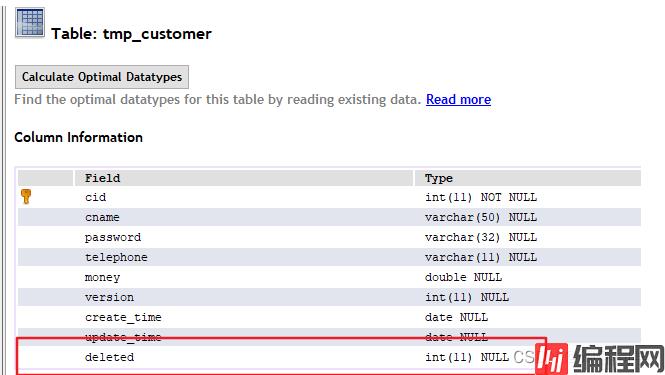
步骤二:修改JavaBean,给deleted字段添加@TableLogic
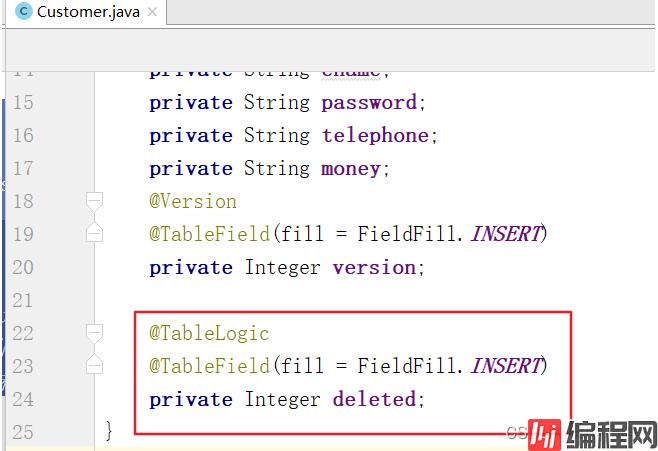
package com.czxy.mp.domain;

import com.baomidou.mybatisplus.annotation.*;
import lombok.Data;


@Data
@TableName("tmp_customer")
public class Customer {
    @TableId(type = IdType.AUTO)
    private Integer cid;
    private String cname;
    private String password;
    private String telephone;
    private String money;
    @Version
    @TableField(fill = FieldFill.INSERT)
    private Integer version;

    @TableLogic
    @TableField(fill = FieldFill.INSERT)
    private Integer deleted;
}
步骤三:添加数据时,设置默认“逻辑未删除值”
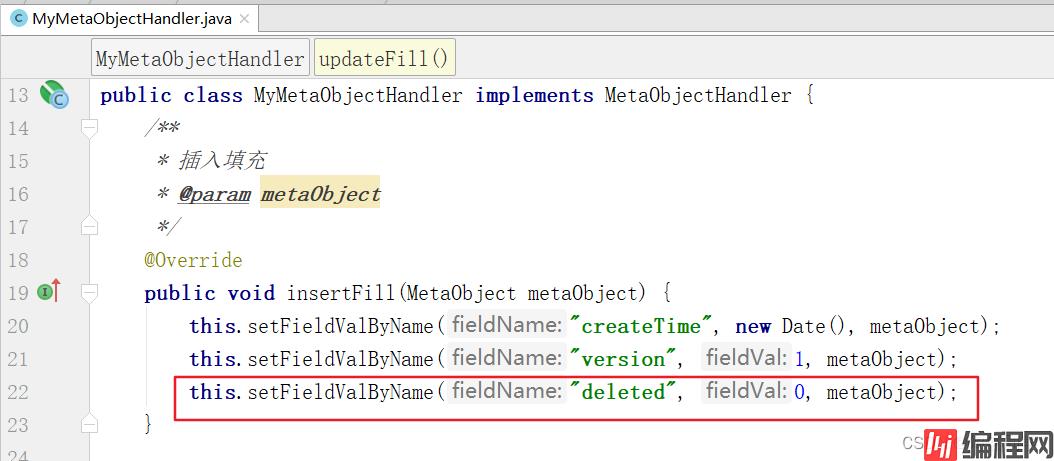
package com.czxy.mp.config;

import com.baomidou.mybatisplus.core.handlers.MetaObjectHandler;
import org.apache.ibatis.reflection.MetaObject;
import org.springframework.stereotype.Component;

import java.util.Date;


@Component
public class MyMetaObjectHandler implements MetaObjectHandler {

    @Override
    public void insertFill(MetaObject metaObject) {
        this.setFieldValByName("createTime", new Date(), metaObject);
        this.setFieldValByName("version", 1, metaObject);
        this.setFieldValByName("deleted", 0, metaObject);
    }


    @Override
    public void updateFill(MetaObject metaObject) {
        this.setFieldValByName("updateTime", new Date(), metaObject);
    }
}
步骤四:测试
  @Test
    public void testDelete() {
        // 删除时,必须保证deleted数据为“逻辑未删除值”
        int i = customerMapper.deleteById(12);
        System.out.println(i);
}WHERE deleted=0。如果查询没有数据,检查deleted字段的值。如果使用了全局配置,可以不使用注解@TableLogic
mybatis-plus:
  global-config:
    db-config:
      logic-delete-field: deleted  # 局逻辑删除的实体字段名
      logic-delete-value: 1  # 逻辑已删除值(默认为 1)
logic-not-delete-value: 0 # 逻辑未删除值(默认为 0)UPDATE `tmp_customer` SET `deleted`='0' WHERE `cid`='13';方案2:直接使用update语句,==不能==解决问题。
 @Test
    public void testUpdate() {
        Customer customer = new Customer();
        customer.setCid(13);
        customer.setDeleted(0);
        //更新
        customerMapper.updateById(customer);
    }
方案3:修改Mapper,添加 recoveryById 方法,进行数据恢复。
@Mapper
public interface CustomerMapper extends BaseMapper<Customer> {

    @Update("update tmp_customer set deleted = 0 where cid = #{cid}")
    public void recoveryById(@Param("cid") Integer cid);
}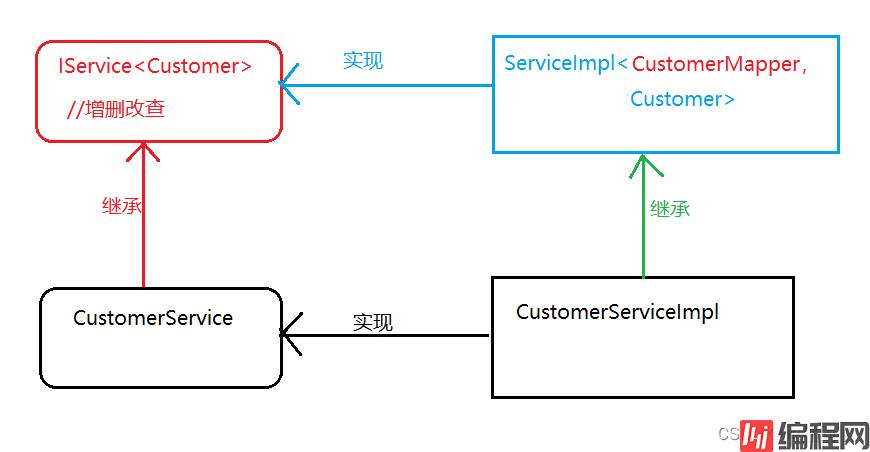

service接口
package com.czxy.service;
  import com.baomidou.mybatisplus.extension.service.IService;
  import com.czxy.domain.Customer;
  public interface CustomerService extends IService<Customer> {
  }
service实现类
package com.czxy.service.impl;
import com.baomidou.mybatisplus.extension.service.impl.ServiceImpl;
import com.czxy.domain.Customer;
import com.czxy.mapper.CustomerMapper;
import com.czxy.service.CustomerService;
import org.springframework.stereotype.Service;
import org.springframework.transaction.annotation.Transactional;
@Service
@Transactional
public class CustomerServiceImpl extends ServiceImpl<CustomerMapper,Customer> implements CustomerService {

}package com.czxy.test;
import com.czxy.mp.Day62MybatisPlusApplication;
import com.czxy.mp.domain.Customer;
import com.czxy.mp.service.CustomerService;
import org.junit.Test;
import org.junit.runner.RunWith;
import org.springframework.boot.test.context.SpringBootTest;
import org.springframework.test.context.junit4.SpringRunner;
import javax.annotation.Resource;
import java.util.List;
@RunWith(SpringRunner.class)
@SpringBootTest(classes = Day62MybatisPlusApplication.class)
public class TestDay62CustomerService {
@Resource
private CustomerService customerService;
@Test
public void testSelectList() {
List<Customer> list = customerService.list();
list.forEach(System.out::println);
}
@Test
public void testInsert() {
Customer customer = new Customer();
customer.setCname("张三");
customer.setPassword("9999");
// 添加
customerService.save(customer);
}
@Test
public void testUpdate() {
Customer customer = new Customer();
customer.setCid(14);
customer.setCname("777");
customer.setPassword("777");
customerService.updateById(customer);
}
@Test
public void testSaveOrUpdate() {
Customer customer = new Customer();
customer.setCid(15);
customer.setCname("999");
customer.setPassword("99");
customerService.saveOrUpdate(customer);
}
@Test
public void testDelete() {
customerService.removeById(15);
}
}该功能依赖
p6spy组件,完美的输出打印 SQL 及执行时长
p6spy 依赖引入
<dependency>
    <groupId>p6spy</groupId>
    <artifactId>p6spy</artifactId>
    <version>3.9.1</version>
</dependency>
核心yml配置
spring:
  datasource:
  	# p6spy 提供的驱动代理类,
    driver-class-name: com.p6spy.engine.spy.P6SpyDriver
    # url 固定前缀为 jdbc:p6spy,跟着冒号为对应数据库连接地址
    url: jdbc:p6spy:mysql://127.0.0.1:3306...
spy.properties 配置
#3.2.1以上使用
modulelist=com.baomidou.mybatisplus.extension.p6spy.MybatisPlusLogFactory,com.p6spy.engine.outage.P6OutageFactory
#3.2.1以下使用或者不配置
#modulelist=com.p6spy.engine.logging.P6LogFactory,com.p6spy.engine.outage.P6OutageFactory
# 自定义日志打印
logMessageFORMat=com.baomidou.mybatisplus.extension.p6spy.P6SpyLogger
#日志输出到控制台
appender=com.baomidou.mybatisplus.extension.p6spy.StdoutLogger
# 使用日志系统记录 sql
#appender=com.p6spy.engine.spy.appender.Slf4JLogger
# 设置 p6spy driver 代理
dereGISterdrivers=true
# 取消JDBC URL前缀
useprefix=true
# 配置记录 Log 例外,可去掉的结果集有error,info,batch,debug,statement,commit,rollback,result,resultset.
excludecateGories=info,debug,result,commit,resultset
# 日期格式
dateformat=yyyy-MM-dd HH:mm:ss
# 实际驱动可多个
#driverlist=org.h2.Driver
# 是否开启慢SQL记录
outagedetection=true
# 慢SQL记录标准 2 秒
outagedetectioninterval=2为了保护数据库配置及数据安全,在一定的程度上控制开发人员流动导致敏感信息泄露
生成秘钥。进行加密配置信息使用秘钥步骤1-2:使用工具类生成秘钥以及对敏感信息进行加密
package com.czxy;
import com.baomidou.mybatisplus.core.toolkit.AES;
import org.junit.Test;
public class TestAES {
    @Test
    public void testAes() {
        String randomKey = AES.generateRandomKey();

        String url =  "jdbc:p6spy:mysql://127.0.0.1:3306/zx_edu_teacher?useUnicode=true&characterEncoding=utf8";
        String username = "root";
        String password = "1234";

        String urlAES = AES.encrypt(url, randomKey);
        String usernameAES = AES.encrypt(username, randomKey);
        String passwordAES = AES.encrypt(password, randomKey);

        System.out.println("--mpw.key=" + randomKey);
        System.out.println("mpw:" + urlAES);
        System.out.println("mpw:" + usernameAES);
        System.out.println("mpw:" + passwordAES);
    }
}
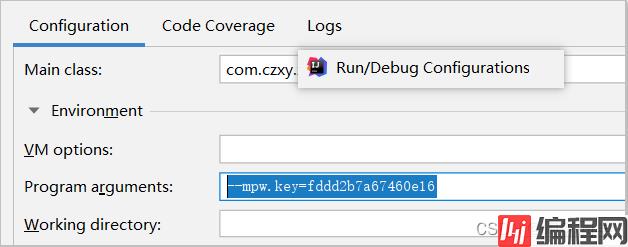
// jar 启动参数( idea 设置 Program arguments , 服务器可以设置为启动环境变量 )
//--mpw.key=fDDD2b7a67460e16
//mpw:7kSEISvq3QWfnSh6vQZc2xgE+XF/sJ0WS/sgGkYpCOTQRjO1poLi3gfmGZNOwKzfqZUec0odiwAdmxcS7lfueENGIx8OmIe//d9imrGFpnkrf8jNSHdzfNPCUi3MbmUb
//mpw:qGbCMksqA90jjiGXXRr7lA==
//mpw:xKG9GABlywqar6CGPOSJKQ==
步骤3:配置加密信息

步骤4:使用秘钥启动服务
到此这篇关于MyBatis-Plus插件机制以及通用Service、新功能的文章就介绍到这了,更多相关MyBatis-Plus插件通用Service内容请搜索编程网以前的文章或继续浏览下面的相关文章希望大家以后多多支持编程网!
--结束END--
本文标题: MyBatis-Plus插件机制及通用Service新功能
本文链接: https://lsjlt.com/news/154169.html(转载时请注明来源链接)
有问题或投稿请发送至: 邮箱/279061341@qq.com QQ/279061341
2024-03-01
2024-03-01
2024-03-01
2024-02-29
2024-02-29
2024-02-29
2024-02-29
2024-02-29
2024-02-29
2024-02-29
回答
回答
回答
回答
回答
回答
回答
回答
回答
回答
0