Python 官方文档:入门教程 => 点击学习
目录1. SpEL 回顾2. 如何自定义3. 自定义 ExpressionRoot1. SpEL 回顾 经过上篇文章的学习,小伙伴们已经知道了,在 spring Security 中
经过上篇文章的学习,小伙伴们已经知道了,在 spring Security 中,@PreAuthorize、@PostAuthorize 等注解都是支持 SpEL 表达式的。
在 SpEL 表达式中,如果上来就直接写要执行的方法名,那么就说明这个方法是 RootObject 对象中的方法,如果要执行其他对象的方法,那么还需要写上对象的名字,例如如下两个例子:
@PreAuthorize("hasAuthority('system:user:add')")
public String add() {
    return "add";
}
上面这个例子中,表达式中的方法是 hasAuthority,没有写对象名,那么就说明这个方法是 SpEL 中 RootObject 对象中的方法。
@PreAuthorize("@ss.hasPermi('monitor:operlog:list')")
@GetMapping("/list")
public TableDatainfo list(SysOperLog operLog) {
    startPage();
    List<SysOperLog> list = operLogService.selectOperLogList(operLog);
    return getDataTable(list);
}
上面这个例子中,权限注解中的表达式方法是 @ss.hasPermi('monitor:operlog:list'),其中 ss 是指 Spring 容器中的一个对象名,hasPermi 则是这个对象中的方法。
好啦,经过前面文章的学习,这些基本知识大家都已经掌握了。
其实上面给出来的第二个例子就是一个自定义的例子。
不过,这种自定义方式太自由了,自由到没有在 Spring Security 架构内完成这件事。所以,今天我想和小伙伴们聊一聊,如何在不使用第三方对象的情况下,来自定义一个权限判断的表达式。
首先小伙伴们知道,我们在 @PreAuthorize 注解中使用的不用加对象名就能调用的权限方法,如 hasAuthority、hasPermission、hasRole、hasAnyRole 等,基本上都是由 SecurityExpressionRoot 及其子类提供的,准确来说是由 MethodSecurityExpressionRoot 类提供的。
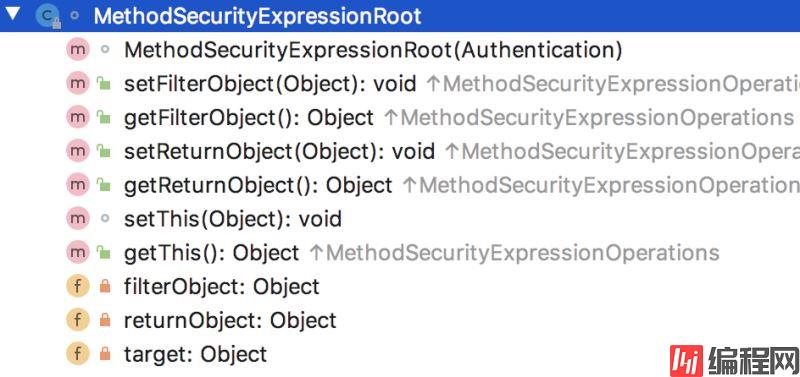
MethodSecurityExpressionRoot 类实际上继承自 SecurityExpressionRoot,只不过增加了过滤对象以及返回值对象。我们来看下 MethodSecurityExpressionRoot 的方法摘要:

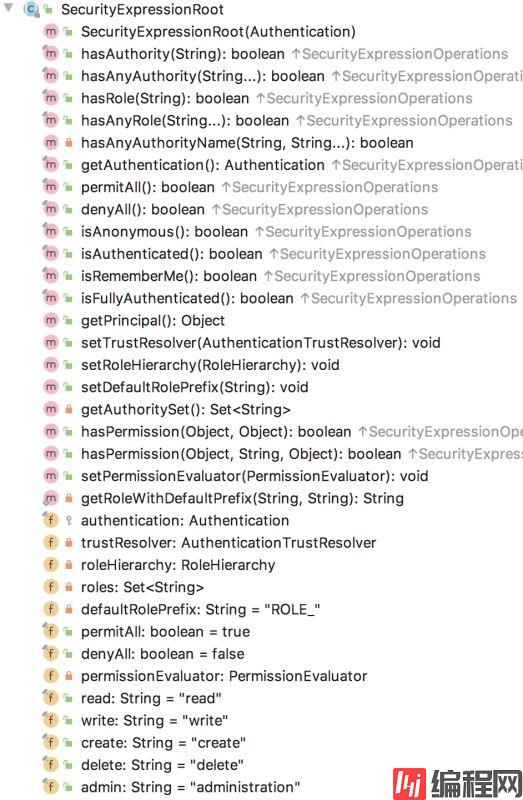
再来看看 SecurityExpressionRoot 中的方法:

这些就是 RootObject 对象中的所有方法了,也是我们能够在 @PreAuthorize 注解中使用的所有方法了。
那么现在想在已有方法上继续扩展新方法,那么我们可以通过自定义类继承自 SecurityExpressionRoot 对象,扩展这个 RootObject 对象,在该对象中继续添加新的方法,进而实现自定义权限表达式。
好啦,说干就干,开搞!
本文的案例在前文的基础上继续完成,所以这里我就不从头开始写了。
首先我们自定义一个类继承自 SecurityExpressionRoot 并实现 MethodSecurityExpressionOperations 接口(本来直接继承自 MethodSecurityExpressionRoot 即可,但是因为这个类不是 public 的,没法继承,所以我们就实现 MethodSecurityExpressionOperations 接口即可):
public class CustomSecurityExpressionRoot extends SecurityExpressionRoot implements MethodSecurityExpressionOperations {

    private Object filterObject;
    private Object returnObject;
    private AntPathMatcher antPathMatcher = new AntPathMatcher();


    public CustomSecurityExpressionRoot(Authentication authentication) {
        super(authentication);
    }


    public boolean hasPermission(String permission) {
        //获取当前登录用户所具有的权限
        Collection<? extends GrantedAuthority> authorities = authentication.getAuthorities();
        for (GrantedAuthority authority : authorities) {
            if (antPathMatcher.match(authority.getAuthority(), permission)) {
                return true;
            }
        }
        return false;
    }


    public boolean hasAnyPermissions(String... permissions) {
        if (permissions == null || permissions.length == 0) {
            return false;
        }
        Collection<? extends GrantedAuthority> authorities = authentication.getAuthorities();
        for (GrantedAuthority authority : authorities) {
            for (String permission : permissions) {
                if (antPathMatcher.match(authority.getAuthority(), permission)) {
                    return true;
                }
            }
        }
        return false;
    }

    public boolean hasAllPermissions:(String... permissions) {
        Collection<? extends GrantedAuthority> authorities = authentication.getAuthorities();
        if (permissions == null || permissions.length == 0) {
            return false;
        }
        for (String permission : permissions) {
            boolean flag = false;
            for (GrantedAuthority authority : authorities) {
                if (antPathMatcher.match(authority.getAuthority(), permission)) {
                    flag = true;
                }
            }
            if (!flag) {
                return false;
            }
        }
        return true;
    }

    @Override
    public void setFilterObject(Object filterObject) {
        this.filterObject = filterObject;
    }

    @Override
    public Object getFilterObject() {
        return filterObject;
    }

    @Override
    public void setReturnObject(Object returnObject) {
        this.returnObject = returnObject;
    }

    @Override
    public Object getReturnObject() {
        return returnObject;
    }

    @Override
    public Object getThis() {
        return this;
    }
}
加了 @Override 注解的方法,都是普普通通的常规方法,没啥好说的。我们自己主要实现了三个方法,分别是:
这里边的逻辑我就不啰嗦了,都是基本的 Java 语法而已。
另外,用 AntPathMatcher 做比对是为了支持通配符,这个在上篇文章中已经说过了,这里不再赘述。
Spring Security 中,MethodSecurityExpressionRoot 的配置是通过 DefaultMethodSecurityExpressionHandler 来完成的,现在我们自定义了 CustomSecurityExpressionRoot,那也得有一个 Handler 来配置 CustomSecurityExpressionRoot,所以,再来一个类继承自 DefaultMethodSecurityExpressionHandler,如下:
public class CustomMethodSecurityExpressionHandler extends DefaultMethodSecurityExpressionHandler {
    @Override
    protected MethodSecurityExpressionOperations createSecurityExpressionRoot(Authentication authentication, MethodInvocation invocation) {
        CustomSecurityExpressionRoot root = new CustomSecurityExpressionRoot(authentication);
        root.setTrustResolver(getTrustResolver());
        root.setPermissionEvaluator(getPermissionEvaluator());
        root.setRoleHierarchy(getRoleHierarchy());
        return root;
    }
}
在 createSecurityExpressionRoot 方法中创建一个 CustomSecurityExpressionRoot 对象,对象的 TrustResolver、权限评估器以及角色层级等,统统都用默认的方案即可。
配置完成后,再配置一下 CustomMethodSecurityExpressionHandler 这个 Bean 即可,如下:
@Bean
CustomMethodSecurityExpressionHandler customMethodSecurityExpressionHandler() {
    return new CustomMethodSecurityExpressionHandler();
}
好啦,这就注入成功了。
接下来,我们就可以在权限注解中使用这个自定义的方法了:
@PreAuthorize("hasPermission('system:user:add')")
public String add() {
    return "add";
}
这个自定义权限表达式的思路,说到底还是在 Spring Security 体系中玩,个人感觉这种方式更合理一些。
到此这篇关于详解如何在Spring Security中自定义权限表达式的文章就介绍到这了,更多相关Spring Security自定义权限表达式内容请搜索编程网以前的文章或继续浏览下面的相关文章希望大家以后多多支持编程网!
--结束END--
本文标题: 详解如何在Spring Security中自定义权限表达式
本文链接: https://lsjlt.com/news/154164.html(转载时请注明来源链接)
有问题或投稿请发送至: 邮箱/279061341@qq.com QQ/279061341
2024-03-01
2024-03-01
2024-03-01
2024-02-29
2024-02-29
2024-02-29
2024-02-29
2024-02-29
2024-02-29
2024-02-29
回答
回答
回答
回答
回答
回答
回答
回答
回答
回答
0