目录前言动画解析编码实现总结前言 之前一篇我们讲了 Flutter组合动画实现的方式 —— 交错动画。借助 GIF 和绘图技巧是可以做到类似 GIF 那种效果
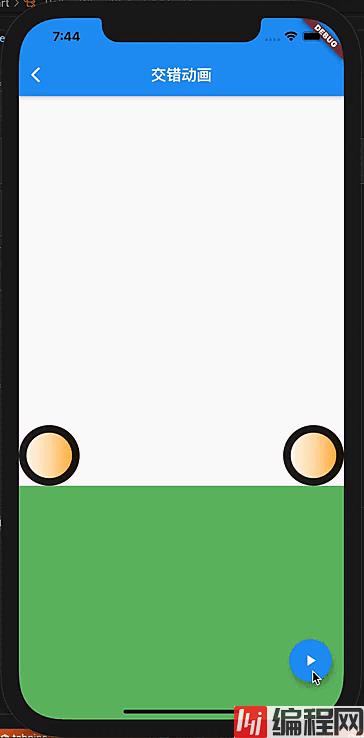
之前一篇我们讲了 Flutter组合动画实现的方式 —— 交错动画。借助 GIF 和绘图技巧是可以做到类似 GIF 那种效果的。本篇我们来一个应用实例,我们让轮子在草地滚动着前进,而且还能粘上“绿色的草”,运行效果如下动画所示。

上面实现的效果实际上由三个动画组成:
这三个动画是同时进行的,因此需要使用到交错动画,即使用一个 AnimationController来控制三个 Tween 对象实现上述的动画组合。
首先是轮子组件的定义,为了让轮子转动的效果能够看到,我们给轮子填充了线性的渐变色,然后轮子的尺寸、旋转速度(time)和边框颜色由上级组件来控制。整个实现很简单,就是一个加了装饰的 Container 而已。
class Wheel extends StatelessWidget {
  final double size;
  final Color color;
  final double time;
  const Wheel({
    Key? key,
    required this.size,
    required this.time,
    required this.color,
  }) : super(key: key);

  @override
  Widget build(BuildContext context) {
    return Container(
      width: size,
      height: size,
      transfORM: Matrix4.identity()..rotateZ(2 * pi * time),
      transformAlignment: Alignment.center,
      decoration: BoxDecoration(
        border: Border.all(color: color, width: 10.0),
        borderRadius: BorderRadius.circular(size / 2),
        gradient: LinearGradient(
          colors: [
            Colors.white,
            Colors.orange[100]!,
            Colors.orange[400]!,
          ],
        ),
      ),
    );
  }
}
然后是整个页面布局,整个页面布局其实就是一个 Stack,然后底部是绿色的 Container再加两个轮子,都是使用 Positioned 来确定各自的位置。然后就是通过受控的Tween 对象控制轮子的旋转速度,轮子外边沿颜色和移动的距离,代码如下,其中轮子移动距离通过控制边距实现。
Widget build(BuildContext context) {
  final bottomHeight = MediaQuery.of(context).size.height / 3;
  return Scaffold(
    appBar: AppBar(
      title: const Text('交错动画'),
    ),
    body: Stack(children: [
      Positioned(
        child: Container(
          width: double.infinity,
          height: bottomHeight,
          color: Colors.green[400],
        ),
        bottom: 0,
        left: 0,
        right: 0,
      ),
      Positioned(
          child: Wheel(
            size: wheelSize,
            color: _color.value!,
            time: _time.value,
          ),
          left: _offset.value * MediaQuery.of(context).size.width,
          bottom: bottomHeight),
      Positioned(
          child: Wheel(
            size: wheelSize,
            color: _color.value!,
            time: -_time.value,
          ),
          right: _offset.value * MediaQuery.of(context).size.width,
          bottom: bottomHeight)
    ]),
    floatingActionButton: FloatingActionButton(
      child: Icon(Icons.play_arrow),
      onPressed: () {
        if (_controller.isCompleted) {
          _controller.reverse();
        } else if (!_controller.isAnimating) {
          _controller.forward();
        }
      },
    ),
  );
}
最后就是构建受AnimationController 控制的 Tween 对象了,这个在Flutter 做出 GIF 动画效果已经介绍过了,代码如下:
late AnimationController _controller;
late Animation<double> _time;
late Animation<double> _offset;
late Animation<Color?> _color;

final wheelSize = 80.0;

@override
void initState() {
  _controller =
      AnimationController(duration: Duration(seconds: 4), vsync: this)
        ..addListener(() {
          setState(() {});
        });

  _time = Tween<double>(begin: 0, end: 8.0).animate(
    CurvedAnimation(
      parent: _controller,
      curve: Interval(
        0.0,
        1.0,
        curve: Curves.linear,
      ),
    ),
  );
  _offset = Tween<double>(begin: 0, end: 1.0).animate(
    CurvedAnimation(
      parent: _controller,
      curve: Interval(
        0.0,
        1.0,
        curve: Curves.easeInCubic,
      ),
    ),
  );
  _color = ColorTween(begin: Colors.black87, end: Colors.green).animate(
    CurvedAnimation(
      parent: _controller,
      curve: Interval(
        0.0,
        0.8,
        curve: Curves.easeIn,
      ),
    ),
  );
  super.initState();
}
就这样,一对奔向对方的轮子动画效果就完成了!
交错动画实际上可以实现非常有创意的动效,只是这样会需要很高的绘图技巧,比如使用 CustomPaint 来做。接下来的几篇我们来介绍一下 CustomPaint相关的内容。
以上就是Android Flutter制作交错动画的示例代码的详细内容,更多关于Android Flutter交错动画的资料请关注编程网其它相关文章!
--结束END--
本文标题: AndroidFlutter制作交错动画的示例代码
本文链接: https://lsjlt.com/news/152809.html(转载时请注明来源链接)
有问题或投稿请发送至: 邮箱/279061341@qq.com QQ/279061341
2024-01-21
2023-10-28
2023-10-28
2023-10-27
2023-10-27
2023-10-27
2023-10-27
回答
回答
回答
回答
回答
回答
回答
回答
回答
回答
0