Python 官方文档:入门教程 => 点击学习
目录1. 说明2. 公共部分2.1 添加依赖2.2 添加proto依赖文件2.3 通过protobuf生成Java代码3. server端接口具体实现4 client端接口具体实现1
grpc基于protobuf来定义接口。分为server端和client端。其中server端提供接口实现,client通过调用server端接口从而获取期望数据。
        <dependency>
            <groupId>net.devh</groupId>
            <artifactId>grpc-spring-boot-starter</artifactId>
            <version>2.12.0.RELEASE</version>
        </dependency>
        <dependency>
            <!-- Java 9+ compatibility -->
            <groupId>javax.annotation</groupId>
            <artifactId>javax.annotation-api</artifactId>
        </dependency>
添加插件(注意:如果waGon-provider-api无法自动引入,可以现在依赖中引入,以便于依赖的下载,然后在删除依赖坐标即可)
<plugin>
                <!--                    protobuf生成插件-->
                <groupId>org.xolstice.Maven.plugins</groupId>
                <artifactId>protobuf-maven-plugin</artifactId>
                <version>0.6.1</version>
                <configuration>
                    <protocArtifact>com.google.protobuf:protoc:3.17.3:exe:${os.detected.classifier}
                    </protocArtifact>
                    <pluginId>grpc-java</pluginId>
                    <pluginArtifact>io.grpc:protoc-gen-grpc-java:1.39.0:exe:${os.detected.classifier}
                    </pluginArtifact>
                    <!--默认值-->
                    <protoSourceRoot>${project.basedir}/src/main/proto</protoSourceRoot>
                    <outputDirectory>${project.basedir}/src/main/java</outputDirectory>
                    <clearOutputDirectory>false</clearOutputDirectory>
                </configuration>
                <executions>
                    <execution>
                        <goals>
                            <goal>compile</goal>
                            <goal>compile-custom</goal>
                        </goals>
                    </execution>
                </executions>
            </plugin>
添加目录src/main/proto,并将目录设置为Source Root,然后在目录src/main/proto下添加文件hello.proto,内容如下
syntax = "proto3"; //指定proto版本
package com.server;
// 生成的Java代码的包名
option java_package = "com.grpc.server";
// 请求参数
message HelloReq{
    string name = 1;
}
// 返回参数
message HelloResp{
    string ret = 1;
}
// rpc service
service HelloService{
	// service中需要进行调用的具体方法
    rpc hello(HelloReq) returns (HelloResp){}
}
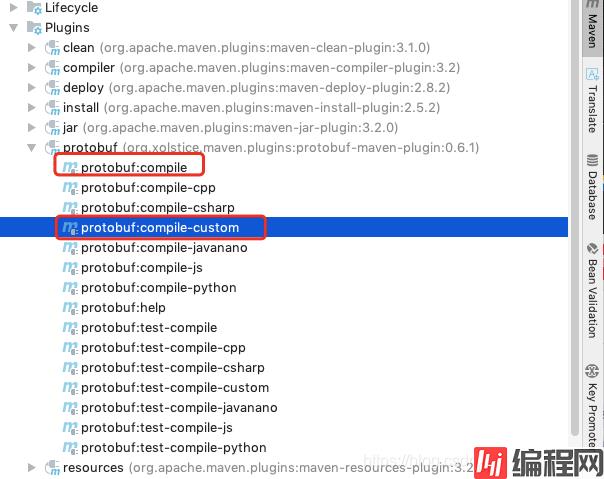
插件导入成功后,点击下图选中的protobuf:compile和protbuf:compile-custom 依次生成对应的Java代码(也就是接口依赖代码)

service代码如下
import io.grpc.stub.StreamObserver;
import net.devh.boot.grpc.server.service.GrpcService;
@GrpcService
public class HelloService extends HelloServiceGrpc.HelloServiceImplBase {
    @Override
    public void hello(Hello.HelloReq request, StreamObserver<Hello.HelloResp> responseObserver) {
        Hello.HelloResp resp = Hello.HelloResp.newBuilder().setRet("你好-->"+request.getName()).build();
        responseObserver.onNext(resp);
        responseObserver.onCompleted();
    }
}
client端测试调用代码如下
import org.junit.jupiter.api.Test;
import org.springframework.beans.factory.annotation.Autowired;
import org.springframework.boot.test.context.SpringBootTest;
@SpringBootTest
public class GrpcTest {
    @Autowired
    private HelloSerivce helloSerivce;
    @Test
    public void test1() throws  Exception{
        helloSerivce.haha("牛哈哈");
    }
}
以上就是maven grpc整合springboot demo的详细内容,更多关于maven grpc整合springboot 的资料请关注编程网其它相关文章!
--结束END--
本文标题: maven grpc整合springboot demo
本文链接: https://lsjlt.com/news/147515.html(转载时请注明来源链接)
有问题或投稿请发送至: 邮箱/279061341@qq.com QQ/279061341
2024-03-01
2024-03-01
2024-03-01
2024-02-29
2024-02-29
2024-02-29
2024-02-29
2024-02-29
2024-02-29
2024-02-29
回答
回答
回答
回答
回答
回答
回答
回答
回答
回答
0