Python 官方文档:入门教程 => 点击学习
直接进入主题 立方体每列颜色不同: # Import libraries import matplotlib.pyplot as plt from mpl_toolkits.mplo
直接进入主题
立方体每列颜色不同:
# Import libraries
import matplotlib.pyplot as plt
from mpl_toolkits.mplot3D import Axes3D
import numpy as np


# Create axis
axes = [5,5,5]

# Create Data
data = np.ones(axes, dtype=np.bool)

# Controll Tranperency
alpha = 0.9

# Control colour
colors = np.empty(axes + [4], dtype=np.float32)

colors[0] = [1, 0, 0, alpha]  # red
colors[1] = [0, 1, 0, alpha]  # green
colors[2] = [0, 0, 1, alpha]  # blue
colors[3] = [1, 1, 0, alpha]  # yellow
colors[4] = [1, 1, 1, alpha]  # grey

# Plot figure
fig = plt.figure()
ax = fig.add_subplot(111, projection='3d')

# Voxels is used to customizations of
# the sizes, positions and colors.
ax.voxels(data, facecolors=colors, edgecolors='grey')

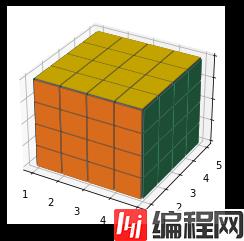
立方体各面颜色不同:
import matplotlib.pyplot as plt
import numpy as np


def generate_rubik_cube(nx, ny, nz):
    """
    根据输入生成指定尺寸的魔方
    :param nx:
    :param ny:
    :param nz:
    :return:
    """
    # 准备一些坐标
    n_voxels = np.ones((nx + 2, ny + 2, nz + 2), dtype=bool)

    # 生成间隙
    size = np.array(n_voxels.shape) * 2
    filled_2 = np.zeros(size - 1, dtype=n_voxels.dtype)
    filled_2[::2, ::2, ::2] = n_voxels

    # 缩小间隙
    # 构建voxels顶点控制网格
    # x, y, z均为6x6x8的矩阵,为voxels的网格,3x3x4个小方块,共有6x6x8个顶点。
    # 这里//2是精髓,把索引范围从[0 1 2 3 4 5]转换为[0 0 1 1 2 2],这样就可以单独设立每个方块的顶点范围
    x, y, z = np.indices(np.array(filled_2.shape) + 1).astype(float) // 2  # 3x6x6x8,其中x,y,z均为6x6x8

    x[1::2, :, :] += 0.95
    y[:, 1::2, :] += 0.95
    z[:, :, 1::2] += 0.95

    # 修改最外面的面
    x[0, :, :] += 0.94
    y[:, 0, :] += 0.94
    z[:, :, 0] += 0.94

    x[-1, :, :] -= 0.94
    y[:, -1, :] -= 0.94
    z[:, :, -1] -= 0.94

    # 去除边角料
    filled_2[0, 0, :] = 0
    filled_2[0, -1, :] = 0
    filled_2[-1, 0, :] = 0
    filled_2[-1, -1, :] = 0

    filled_2[:, 0, 0] = 0
    filled_2[:, 0, -1] = 0
    filled_2[:, -1, 0] = 0
    filled_2[:, -1, -1] = 0

    filled_2[0, :, 0] = 0
    filled_2[0, :, -1] = 0
    filled_2[-1, :, 0] = 0
    filled_2[-1, :, -1] = 0

    # 给魔方六个面赋予不同的颜色
    colors = np.array(['#ffd400', "#fffffb", "#f47920", "#d71345", "#145b7d", "#45b97c"])
    facecolors = np.full(filled_2.shape, '#77787b')  # 设一个灰色的基调
    # facecolors = np.zeros(filled_2.shape, dtype='U7')
    facecolors[:, :, -1] = colors[0]    # 上黄
    facecolors[:, :, 0] = colors[1]     # 下白
    facecolors[:, 0, :] = colors[2]     # 左橙
    facecolors[:, -1, :] = colors[3]    # 右红
    facecolors[0, :, :] = colors[4]     # 前蓝
    facecolors[-1, :, :] = colors[5]    # 后绿

    ax = plt.figure().add_subplot(projection='3d')
    ax.voxels(x, y, z, filled_2, facecolors=facecolors)
    plt.show()


if __name__ == '__main__':
    generate_rubik_cube(4, 4, 4)

彩色透视立方体:
from __future__ import division

import numpy as np

from mpl_toolkits.mplot3d import Axes3D
from mpl_toolkits.mplot3d.art3d import Poly3DCollection
from matplotlib.pyplot import figure, show


def quad(plane='xy', origin=None, width=1, height=1, depth=0):
    u, v = (0, 0) if origin is None else origin

    plane = plane.lower()
    if plane == 'xy':
        vertices = ((u, v, depth),
                    (u + width, v, depth),
                    (u + width, v + height, depth),
                    (u, v + height, depth))
    elif plane == 'xz':
        vertices = ((u, depth, v),
                    (u + width, depth, v),
                    (u + width, depth, v + height),
                    (u, depth, v + height))
    elif plane == 'yz':
        vertices = ((depth, u, v),
                    (depth, u + width, v),
                    (depth, u + width, v + height),
                    (depth, u, v + height))
    else:
        raise ValueError('"{0}" is not a supported plane!'.fORMat(plane))

    return np.array(vertices)


def grid(plane='xy',
         origin=None,
         width=1,
         height=1,
         depth=0,
         width_segments=1,
         height_segments=1):
    u, v = (0, 0) if origin is None else origin

    w_x, h_y = width / width_segments, height / height_segments

    quads = []
    for i in range(width_segments):
        for j in range(height_segments):
            quads.append(
                quad(plane, (i * w_x + u, j * h_y + v), w_x, h_y, depth))

    return np.array(quads)


def cube(plane=None,
         origin=None,
         width=1,
         height=1,
         depth=1,
         width_segments=1,
         height_segments=1,
         depth_segments=1):
    plane = (('+x', '-x', '+y', '-y', '+z', '-z')
             if plane is None else
             [p.lower() for p in plane])
    u, v, w = (0, 0, 0) if origin is None else origin

    w_s, h_s, d_s = width_segments, height_segments, depth_segments

    grids = []
    if '-z' in plane:
        grids.extend(grid('xy', (u, w), width, depth, v, w_s, d_s))
    if '+z' in plane:
        grids.extend(grid('xy', (u, w), width, depth, v + height, w_s, d_s))

    if '-y' in plane:
        grids.extend(grid('xz', (u, v), width, height, w, w_s, h_s))
    if '+y' in plane:
        grids.extend(grid('xz', (u, v), width, height, w + depth, w_s, h_s))

    if '-x' in plane:
        grids.extend(grid('yz', (w, v), depth, height, u, d_s, h_s))
    if '+x' in plane:
        grids.extend(grid('yz', (w, v), depth, height, u + width, d_s, h_s))

    return np.array(grids)


canvas = figure()
axes = Axes3D(canvas)

quads = cube(width_segments=4, height_segments=4, depth_segments=4)

# You can replace the following line by whatever suits you. Here, we compute
# each quad colour by averaging its vertices positions.
RGB = np.average(quads, axis=-2)
# Setting +xz and -xz plane faces to black.
RGB[RGB[..., 1] == 0] = 0
RGB[RGB[..., 1] == 1] = 0
# Adding an alpha value to the colour array.
RGBA = np.hstack((RGB, np.full((RGB.shape[0], 1), .85)))

collection = Poly3DCollection(quads)
collection.set_color(RGBA)
axes.add_collection3d(collection)

show()

到此这篇关于python画立方体--魔方的文章就介绍到这了,更多相关Python画魔方内容请搜索编程网以前的文章或继续浏览下面的相关文章希望大家以后多多支持编程网!
--结束END--
本文标题: python画立方体--魔方
本文链接: https://lsjlt.com/news/144240.html(转载时请注明来源链接)
有问题或投稿请发送至: 邮箱/279061341@qq.com QQ/279061341
2024-03-01
2024-03-01
2024-03-01
2024-02-29
2024-02-29
2024-02-29
2024-02-29
2024-02-29
2024-02-29
2024-02-29
回答
回答
回答
回答
回答
回答
回答
回答
回答
回答
0