Python 官方文档:入门教程 => 点击学习
目录前言实现方法高斯模糊亚克力纹理亚克力标签测试前言 windows10 在 UWP 应用中支持亚克力画刷,可以在部件的底部绘制亚克力效果的背景图。下面我们使用 QLabel 来模拟
windows10 在 UWP 应用中支持亚克力画刷,可以在部件的底部绘制亚克力效果的背景图。下面我们使用 QLabel 来模拟这个磨砂过程。
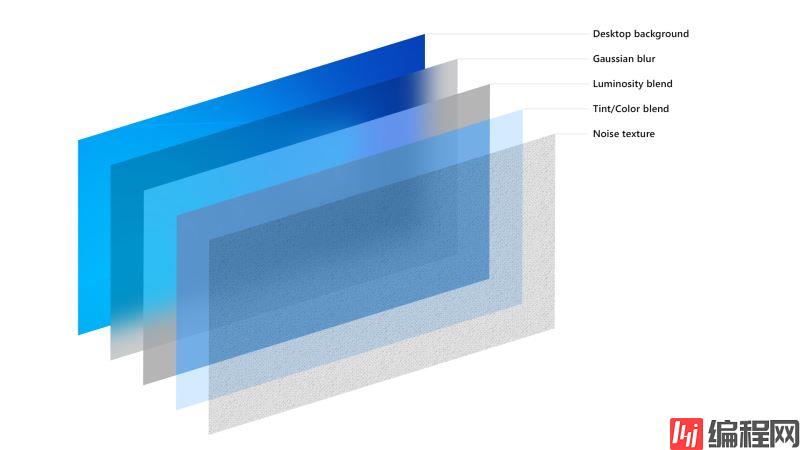
MSDN 文档中介绍了亚克力材料的配方,包括:高斯模糊、亮度混合、色调混合和噪声纹理。

我们先来实现高斯模糊的效果,使用 scipy 可以很轻松的实现这个过程:
# coding:utf-8
import numpy as np
from PIL import Image
from PyQt5.QtGui import QPixmap
from scipy.ndimage.filters import gaussian_filter


def gaussianBlur(imagePath: str, blurRadius=18, brightFactor=1, blurPicSize: tuple = None) -> np.ndarray:
    """ 对图片进行高斯模糊处理

    Parameters
    ----------
    imagePath: str
        图片路径

    blurRadius: int
        模糊半径

    brightFactor:float
        亮度缩放因子

    blurPicSize: tuple
        高斯模糊前将图片缩放到指定大小,可以加快模糊速度

    Returns
    -------
    image: `~np.ndarray` of shape `(w, h, c)`
        高斯模糊后的图像
    """
    if not imagePath.startswith(':'):
        image = Image.open(imagePath)
    else:
        image = Image.froMQpixmap(QPixmap(imagePath))

    if blurPicSize:
        # 调整图片尺寸,减小计算量,还能增加额外的模糊
        w, h = image.size
        ratio = min(blurPicSize[0] / w, blurPicSize[1] / h)
        w_, h_ = w * ratio, h * ratio

        if w_ < w:
            image = image.resize((int(w_), int(h_)), Image.ANTIALIAS)

    image = np.array(image)

    # 处理图像是灰度图的情况
    if len(image.shape) == 2:
        image = np.stack([image, image, image], axis=-1)

    # 对每一个颜色通道分别磨砂
    for i in range(3):
        image[:, :, i] = gaussian_filter(
            image[:, :, i], blurRadius) * brightFactor

    return image
接下来在 QLabel 上面绘制出亮度混合、色调混合和噪声纹理,一般色调混合使用的颜色是图像的主题色,可以用 colorthief 库提取,这里就不赘述了:
class AcrylicTextureLabel(QLabel):
    """ 亚克力纹理标签 """

    def __init__(self, tintColor: QColor, luminosityColor: QColor, noiseOpacity=0.03, parent=None):
        """
        Parameters
        ----------
        tintColor: QColor
            RGB 主色调

        luminosityColor: QColor
            亮度层颜色

        noiseOpacity: float
            噪声层透明度

        parent:
            父级窗口
        """
        super().__init__(parent=parent)
        self.tintColor = QColor(tintColor)
        self.luminosityColor = QColor(luminosityColor)
        self.noiseOpacity = noiseOpacity
        self.noiseImage = QImage('resource/noise.png')
        self.setAttribute(Qt.WA_TranslucentBackground)

    def setTintColor(self, color: QColor):
        """ 设置主色调 """
        self.tintColor = color
        self.update()

    def paintEvent(self, e):
        """ 绘制亚克力纹理 """
        acrylicTexture = QImage(64, 64, QImage.FORMat_ARGB32_Premultiplied)

        # 绘制亮度层
        acrylicTexture.fill(self.luminosityColor)

        # 绘制主色调
        painter = QPainter(acrylicTexture)
        painter.fillRect(acrylicTexture.rect(), self.tintColor)

        # 绘制噪声
        painter.setOpacity(self.noiseOpacity)
        painter.drawImage(acrylicTexture.rect(), self.noiseImage)

        acrylicBrush = QBrush(acrylicTexture)
        painter = QPainter(self)
        painter.fillRect(self.rect(), acrylicBrush)
用到的噪声图像如下图所示:

最后在 QLabel 上叠加磨砂图像和亚克力纹理,可以通过 Image.toqpixmap() 将 Image 转换为 QPixmap:
class AcrylicLabel(QLabel):
    """ 亚克力标签 """

    def __init__(self, blurRadius: int, tintColor: QColor, luminosityColor=QColor(255, 255, 255, 0),
                 maxBlurSize: tuple = None, parent=None):
        """
        Parameters
        ----------
        blurRadius: int
            磨砂半径

        tintColor: QColor
            主色调

        luminosityColor: QColor
            亮度层颜色

        maxBlurSize: tuple
            最大磨砂尺寸,越小磨砂速度越快

        parent:
            父级窗口
        """
        super().__init__(parent=parent)
        self.imagePath = ''
        self.blurPixmap = QPixmap()
        self.blurRadius = blurRadius
        self.maxBlurSize = maxBlurSize
        self.acrylicTextureLabel = AcrylicTextureLabel(
            tintColor, luminosityColor, parent=self)

    def setImage(self, imagePath: str):
        """ 设置图片 """
        if imagePath == self.imagePath:
            return

        self.imagePath = imagePath
        image = Image.fromarray(gaussianBlur(
            imagePath, self.blurRadius, 0.85, self.maxBlurSize))
        self.blurPixmap = image.toqpixmap()  # type:QPixmap
        self.setPixmap(self.blurPixmap)
        self.adjustSize()

    def setTintColor(self, color: QColor):
        """ 设置主色调 """
        self.acrylicTextureLabel.setTintColor(color)

    def resizeEvent(self, e):
        super().resizeEvent(e)
        self.acrylicTextureLabel.resize(self.size())
        self.setPixmap(self.blurPixmap.scaled(
            self.size(), Qt.KeepAspectRatioByExpanding, Qt.SmoothTransformation))
下面是测试用的埃罗芒阿老师:

代码如下:
# coding:utf-8
import sys

from PyQt5.QtGui import QColor
from PyQt5.QtWidgets import QApplication

from acrylic import AcrylicLabel


app = QApplication(sys.argv)
w = AcrylicLabel(20, QColor(105, 114, 168, 102))
w.setImage('resource/ClariS_ヒトリゴト (アニメ盤).jpg')
w.show()
app.exec_()
结果如下:

到此这篇关于利用PyQt5中QLabel组件实现亚克力磨砂效果的文章就介绍到这了,更多相关PyQt5 QLabel磨砂效果内容请搜索编程网以前的文章或继续浏览下面的相关文章希望大家以后多多支持编程网!
--结束END--
本文标题: 利用PyQt5中QLabel组件实现亚克力磨砂效果
本文链接: https://lsjlt.com/news/143867.html(转载时请注明来源链接)
有问题或投稿请发送至: 邮箱/279061341@qq.com QQ/279061341
2024-03-01
2024-03-01
2024-03-01
2024-02-29
2024-02-29
2024-02-29
2024-02-29
2024-02-29
2024-02-29
2024-02-29
回答
回答
回答
回答
回答
回答
回答
回答
回答
回答
0