目录MVVM的理解MVVM的原理脏检查机制:数据劫持相同点实现MVVM总结MVVM的理解 MVVM拆开来即为Model-View-ViewModel,有View,ViewModel

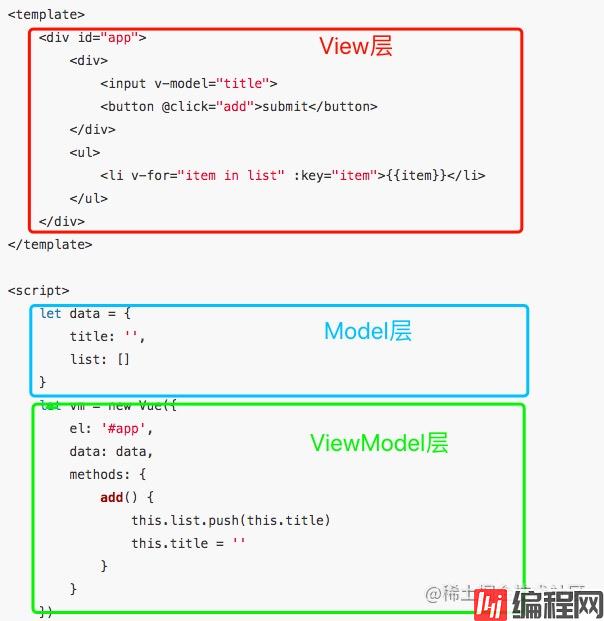
MVVM拆开来即为Model-View-ViewModel,有View,ViewModel,Model三部分组成。View层代表的是视图、模版,负责将数据模型转化为UI展现出来。Model层代表的是模型、数据,可以在Model层中定义数据修改和操作的业务逻辑。ViewModel层连接Model和View。
在MVVM的架构下,View层和Model层并没有直接联系,而是通过ViewModel层进行交互。ViewModel层通过双向数据绑定将View层和Model层连接了起来,使得View层和Model层的同步工作完全是自动的。因此开发者只需关注业务逻辑,无需手动操作DOM,复杂的数据状态维护交给MVVM统一来管理。在vue.js中MVVM的体现:

在不同的框架当中,MVVM实现的原理是不同的:
angular.js就是采取的脏检查机制,当发生了某种事件(例如输入),Angular.js会检查新的数据结构和之前的数据结构是否发生来变动,来决定是否更新视图。
Vue.js的实现方式,对数据(Model)进行劫持,当数据变动时,数据会出发劫持时绑定的方法,对视图进行更新。
脏检查机制和数据劫持是有许多相同点的,例如,它们都有三个步骤:
<!DOCTYPE html>
<html lang="en">
<head>
    <meta charset="UTF-8">
    <title>Two-way data-binding</title>
</head>
<body>
    <div id="app">
        <input type="text" v-model="text">
        {{ text }}
    </div>
    <script>
        function observe (obj, vm) {
            Object.keys(obj).forEach(function (key) {
                defineReactive(vm, key, obj[key]);
            });
        }
        function defineReactive (obj, key, val) {
            var dep = new Dep();
            Object.defineProperty(obj, key, {
                get: function () {
                    if (Dep.target) dep.addSub(Dep.target);
                    return val
                },
                set: function (newVal) {
                    if (newVal === val) return
                    val = newVal;
                    dep.notify();
                }
            });
        }
        function nodeToFragment (node, vm) {
            var flag = document.createDocumentFragment();
            var child;
            while (child = node.firstChild) {
                compile(child, vm);
                flag.appendChild(child);
            }
            return flag;
        }
        function compile (node, vm) {
            var reg = /\{\{(.*)\}\}/;
            // 节点类型为元素
            if (node.nodeType === 1) {
                var attr = node.attributes;
                // 解析属性
                for (var i = 0; i < attr.length; i++) {
                    if (attr[i].nodeName == 'v-model') {
                        var name = attr[i].nodeValue; // 获取v-model绑定的属性名
                        node.addEventListener('input', function (e) {
                            // 给相应的data属性赋值,进而触发该属性的set方法
                            vm[name] = e.target.value;
                        });
                        node.value = vm[name]; // 将data的值赋给该node
                        node.removeAttribute('v-model');
                    }
                }
                new Watcher(vm, node, name, 'input');
            }
            // 节点类型为text
            if (node.nodeType === 3) {
                if (reg.test(node.nodeValue)) {
                    var name = RegExp.$1; // 获取匹配到的字符串
                    name = name.trim();
                    new Watcher(vm, node, name, 'text');
                }
            }
        }

        function Watcher (vm, node, name, nodeType) {
        //  this为watcher函数
            Dep.target = this;
        //  console.log(this);
            this.name = name;
            this.node = node;
            this.vm = vm;
            this.nodeType = nodeType;
            this.update();
            Dep.target = null;
        }
        Watcher.prototype = {
            update: function () {
                this.get();
                if (this.nodeType == 'text') {
                    this.node.nodeValue = this.value;
                }
                if (this.nodeType == 'input') {
                    this.node.value = this.value;
                }
            },
            // 获取daa中的属性值
            get: function () {
                this.value = this.vm[this.name]; // 触发相应属性的get
            }
        }
        function Dep () {
            this.subs = []
        }
        Dep.prototype = {
            addSub: function(sub) {
                this.subs.push(sub);
            },
            notify: function() {
                this.subs.forEach(function(sub) {
                    sub.update();
                });
            }
        };
        function Vue (options) {
            this.data = options.data;
            var data = this.data;
            observe(data, this);
            var id = options.el;
            var dom = nodeToFragment(document.getElementById(id), this);
            // 编译完成后,将dom返回到app中
            document.getElementById(id).appendChild(dom);
        }
        var vm = new Vue({
            el: 'app',
            data: {
                text: 'hello world'
            }
        });
    </script>
</body>
</html>到此这篇关于Vue.js中MVVM的文章就介绍到这了,更多相关Vue.js中MVVM内容请搜索编程网以前的文章或继续浏览下面的相关文章希望大家以后多多支持编程网!
--结束END--
本文标题: 详细聊聊Vue.js中的MVVM
本文链接: https://lsjlt.com/news/141217.html(转载时请注明来源链接)
有问题或投稿请发送至: 邮箱/279061341@qq.com QQ/279061341
2024-01-12
2023-05-20
2023-05-20
2023-05-20
2023-05-20
2023-05-20
2023-05-20
2023-05-20
2023-05-20
2023-05-20
回答
回答
回答
回答
回答
回答
回答
回答
回答
回答
0