Python 官方文档:入门教程 => 点击学习
类图如下: SimpleCredentialsMatcher是明文匹配,也是shrio框架默认的比对方式,网上的例子多是此方式。实际项目中,数据库中的密码一般是密文,此时密码的匹配
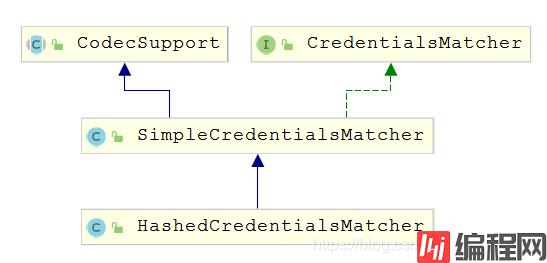
类图如下:

SimpleCredentialsMatcher是明文匹配,也是shrio框架默认的比对方式,网上的例子多是此方式。实际项目中,数据库中的密码一般是密文,此时密码的匹配需使用HashedCredentialsMatcher完成。
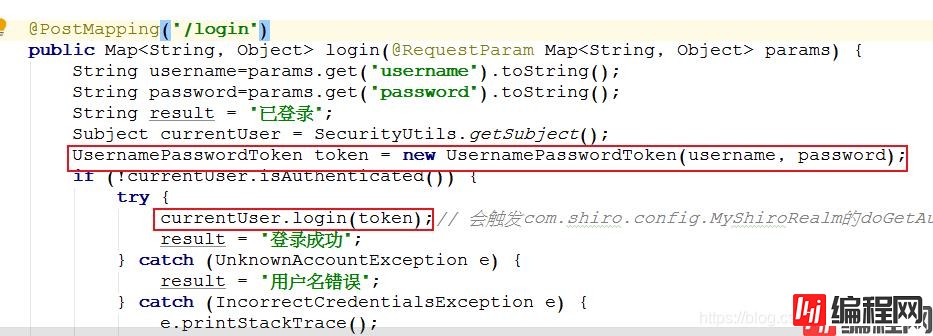
在controller中通过Subject的login(token)将接收过来用户账号和密码(明文)交给shrio框架,示例代码如下

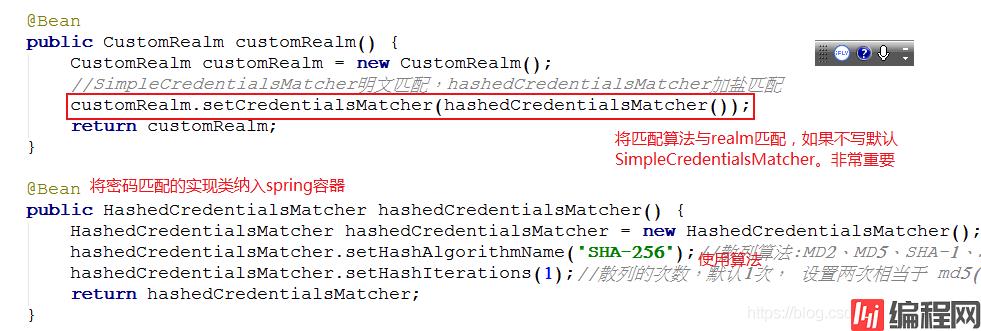
其次通过HashedCredentialsMatcher告诉shrio使用加密方式;

最后通过AuthorizingRealm,将数据库中获取的密码,告诉shrio框架,shrio处理完成后返回处理结果。

数据库创建表user,结构如下:
CREATE TABLE `user` (
  `id` bigint(20) NOT NULL AUTO_INCREMENT,
  `name` varchar(50) DEFAULT NULL,
  `psw` varchar(200) DEFAULT NULL,
  `user_right` varchar(300) DEFAULT NULL,
  `create_time` date DEFAULT NULL,
  `salt` varchar(100) DEFAULT NULL,
  PRIMARY KEY (`id`)
)
在dao完成根据登录名获取实体对象和增加用户两个方法,略过。service代码如下,保存代码时,密码使用sha256加密,盐随机获取20位随机数
@Service("UserService")
public class UserServiceImpl extends ServiceImpl<UserDao, UserEntity> implements UserService {

    @Override
    public UserEntity getUserByname(String loginName) {
        return baseMapper.queryByUserName(loginName);
    }

    @Override
    public boolean save(UserEntity user) {
        user.setCreateTime(new Date());
        String salt = RandomStringUtils.randomAlphanumeric(20);
        user.setPsw(new Sha256Hash(user.getPsw(), salt).toHex());//sha256加密
        user.setSalt(salt);
        try {
            baseMapper.insert(user);
            return true;
        } catch (Exception e) {
            return false;
        }
    }
}
controller代码如下
@RestController
public class UserController {
    @Autowired
    private UserService userService;

    @PostMapping("/login")
    public Map<String, Object> login(@RequestParam Map<String, Object> params) {
        String username=params.get("username").toString();
        String passWord=params.get("password").toString();
        String result = "已登录";
        Subject currentUser = SecurityUtils.getSubject();
        UsernamePasswordToken token = new UsernamePasswordToken(username, password);
        if (!currentUser.isAuthenticated()) {
            try {
                currentUser.login(token);// 会触发com.shiro.config.MyShiroRealm的doGetAuthenticationInfo方法
                result = "登录成功";
            } catch (UnknownAccountException e) {
                result = "用户名错误";
            } catch (IncorrectCredentialsException e) {
                e.printStackTrace();
                result = "密码错误";
            }
        }
        return R.ok(result);
    }

    @GetMapping("/loGout")
    public void logout() {
        Subject currentUser = SecurityUtils.getSubject();
        UserEntity user = (UserEntity)currentUser.getPrincipal();
        System.out.println(user.getName());
        currentUser.logout();
    }

    @RequestMapping("/user/add")
    public String add(@RequestBody UserEntity user) {
        userService.save(user);
        System.out.println("新增用户");
        return "hello";
    }
}
使用ShiroConfig 代替xml配置文件方式
@Configuration
public class ShiroConfig {
    @Bean
    public ShiroFilterFactoryBean shiroFilter(SecurityManager securityManager) {
        ShiroFilterFactoryBean shiroFilterFactoryBean = new ShiroFilterFactoryBean();
        //设置自定义的securityManager
        shiroFilterFactoryBean.setSecurityManager(securityManager);
        //设置默认登录的url,身份认证失败会访问该URL
        shiroFilterFactoryBean.setLoginUrl("/login");
        //设置成功,会访问该url
        shiroFilterFactoryBean.setSuccessUrl("/success");
        //设置未授权界面,权限认证失败会访问该url
        shiroFilterFactoryBean.setUnauthorizedUrl("/notRole");
        //进行拦截器配置
        Map<String, String> filterChainDefinitionMap = new LinkedHashMap<>();
        // <!-- authc:所有url都必须认证通过才可以访问; anon:所有url都都可以匿名访问-->
        filterChainDefinitionMap.put("/WEBjars/**", "anon");
        filterChainDefinitionMap.put("/login", "anon");
        filterChainDefinitionMap.put("/", "anon");
        filterChainDefinitionMap.put("/front/**", "anon");
        filterChainDefinitionMap.put("/user/add", "perms[add]");
        filterChainDefinitionMap.put("/admin/**", "authc");
        filterChainDefinitionMap.put("/user/**", "authc");
        //主要这行代码必须放在所有权限设置的最后,不然会导致所有 url 都被拦截 剩余的都需要认证
        filterChainDefinitionMap.put("/**", "authc");
        //配置logout过滤器
        filterChainDefinitionMap.put("/logout","logout");       shiroFilterFactoryBean.setFilterChainDefinitionMap(filterChainDefinitionMap);
        return shiroFilterFactoryBean;
    }
    @Bean
    public SecurityManager securityManager() {
        DefaultWebSecurityManager defaultSecurityManager = new DefaultWebSecurityManager();
        defaultSecurityManager.setRealm(customRealm());
        return defaultSecurityManager;
    }

    @Bean
    public CustomRealm customRealm() {
        CustomRealm customRealm = new CustomRealm();
        //SimpleCredentialsMatcher明文匹配,hashedCredentialsMatcher加盐匹配
        customRealm.setCredentialsMatcher(hashedCredentialsMatcher());
        return customRealm;
    }

    @Bean
    public HashedCredentialsMatcher hashedCredentialsMatcher() {
        HashedCredentialsMatcher hashedCredentialsMatcher = new HashedCredentialsMatcher();
        hashedCredentialsMatcher.setHashAlgorithmName("SHA-256");
        hashedCredentialsMatcher.setHashIterations(1);
        return hashedCredentialsMatcher;
    }

}
Realm中代码如下:
public class CustomRealm extends AuthorizingRealm {
    @Autowired
    private UserService userService;
    @Override
    protected AuthorizationInfo doGetAuthorizationInfo(PrincipalCollection principalCollection) {
       //授权部分代码略
        return null;
    }

    @Override
    protected AuthenticationInfo doGetAuthenticationInfo(AuthenticationToken authenticationToken) throws AuthenticationException {
        String loginName = (String) authenticationToken.getPrincipal();

        UserEntity user= userService.getUserByname(loginName);
        if (user == null) {  // 没找到帐号
            throw new UnknownAccountException();
        }

        // 交给AuthenticatingRealm使用CredentialsMatcher进行密码匹配
        SimpleAuthenticationInfo authenticationInfo =
                new SimpleAuthenticationInfo(user, user.getPsw(), ByteSource.Util.bytes(user.getSalt()),getName());

        return authenticationInfo;
    }
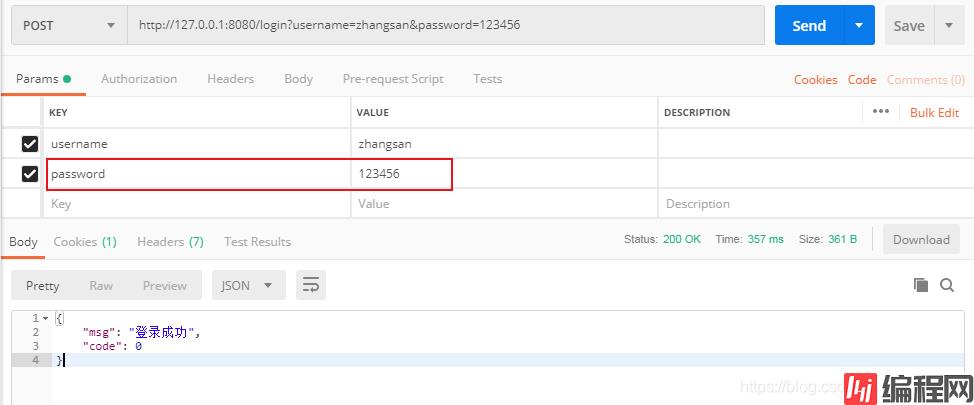
测试,使用张三登录


以上就是shrio中hashedCredentialsMatcher密码匹配示例详解的详细内容,更多关于shrio中hashedCredentialsMatcher密码匹配的资料请关注编程网其它相关文章!
--结束END--
本文标题: shrio中hashedCredentialsMatcher密码匹配示例详解
本文链接: https://lsjlt.com/news/137929.html(转载时请注明来源链接)
有问题或投稿请发送至: 邮箱/279061341@qq.com QQ/279061341
2024-03-01
2024-03-01
2024-03-01
2024-02-29
2024-02-29
2024-02-29
2024-02-29
2024-02-29
2024-02-29
2024-02-29
回答
回答
回答
回答
回答
回答
回答
回答
回答
回答
0