Python 官方文档:入门教程 => 点击学习
目录前言一、生成项目骨架(SpringBoot),运行一个简单的程序二、选择原生spring方式配置数据源前言 spring数据源的配置网络上有很多例子,这里我也来介绍一下单数据源配
spring数据源的配置网络上有很多例子,这里我也来介绍一下单数据源配置的例子,基于SpringBoot的方式和原生的Spring的方式。
访问:https://start.spring.io/ ,选择必要的依赖

下面我们先看下Application类的代码:
@SpringBootApplication
@Slf4j
public class SpringDatasourceApplication implements CommandLineRunner {

	@Autowired
	private DataSource dataSource;

	@Autowired
	private JdbcTemplate jdbcTemplate;

	public static void main(String[] args) {
		SpringApplication.run(SpringDatasourceApplication.class, args);
	}

	@Override
	public void run(String... args) throws Exception {
		showConnection();
		showData();
	}

	private void showConnection() throws sqlException {
		log.info("数据源:"+dataSource.toString());
		Connection conn = dataSource.getConnection();
		log.info("连接:"+conn.toString());
		conn.close();
	}

	private void showData() {
		jdbcTemplate.queryForList("SELECT * FROM user")
				.forEach(row -> log.info("记录:"+row.toString()));
	}
}application.properties文件的配置项,我们可以看到我们使用的h2数据库
management.endpoints.WEB.exposure.include=*
spring.output.ansi.enabled=ALWAYS

spring.datasource.url=jdbc:h2:mem:demodb
spring.datasource.username=sa
spring.datasource.passWord=
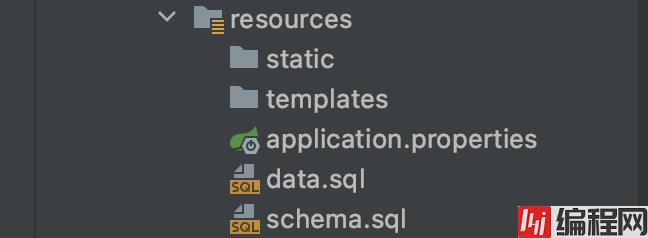
在资源文件目录,写入两个文件,一个是data.sql、一个是schema.sql

schema.sql内容是:
CREATE TABLE user (ID INT IDENTITY, name VARCHAR(64),age INT);data.sql内容是:
INSERT INTO user (ID,name,age) VALUES (1, '张三',18);
INSERT INTO user (ID, name,age) VALUES (2, '李四',19);
运行代码,结果如下:

其实我们并没有去对DataSource进行bean配置,只是指定了数据库的类型,加载了建表语句和初始化数据语句,可以看到连接池是Hikari,这也是springboot默认的连接池。
由于是使用的内置数据库,我们可以在代码中
这也是因为springboot给我们自动装配了我们所需要的信息,由于我们引入了actuator,我们可以通过Http://localhost:8080/actuator/beans 看到springboot帮我们装载了很多的bean,有些可能是我们根本用不到的。下面我们讲一下原生Spring方式怎么实现配置数据源。
pom文件配置内容:
<dependency>
            <groupId>org.springframework</groupId>
            <artifactId>spring-context</artifactId>
            <version>${spring.version}</version>
        </dependency>
        <dependency>
            <groupId>org.springframework</groupId>
            <artifactId>spring-jdbc</artifactId>
            <version>${spring.version}</version>
        </dependency>
        <dependency>
            <groupId>org.apache.commons</groupId>
            <artifactId>commons-dbcp2</artifactId>
            <version>2.8.0</version>
        </dependency>
        <dependency>
            <groupId>com.h2database</groupId>
            <artifactId>h2</artifactId>
            <version>1.4.200</version>
            <scope>runtime</scope>
        </dependency>
		```

		**创建applicationContext.xml文件,内容如下:**
```xml
<?xml version="1.0" encoding="UTF-8"?>
<beans xmlns="http://www.springframework.org/schema/beans"
       xmlns:xsi="http://www.w3.org/2001/XMLSchema-instance"
       xmlns:context="http://www.springframework.org/schema/context"
       xsi:schemaLocation="http://www.springframework.org/schema/beans
        http://www.springframework.org/schema/beans/spring-beans.xsd
        http://www.springframework.org/schema/context
        http://www.springframework.org/schema/context/spring-context.xsd">

    <context:component-scan base-package="com.xxx.xxxx" />
    <!--
    <bean id="dataSource" class="org.apache.commons.dbcp.BasicDataSource"
          destroy-method="close">
        <property name="driverClassName" value="org.h2.Driver"/>
        <property name="url" value="jdbc:h2:mem:testdb"/>
        <property name="username" value="SA"/>
        <property name="password" value=""/>
    </bean>
    -->
</beans>
** 自定义DataSource,这里使用注解来实现(使用dbcp连接池) **
@Configuration
@EnableTransactionManagement
public class DataSourceDemo {
    @Autowired
    private DataSource dataSource;

    public static void main(String[] args) throws SQLException {
        ApplicationContext applicationContext =
                new ClassPathXmlApplicationContext("applicationContext*.xml");
        showBeans(applicationContext);
        dataSourceDemo(applicationContext);
    }

    @Bean(destroyMethod = "close")
    public DataSource dataSource() throws Exception {
        Properties properties = new Properties();
        properties.setProperty("driverClassName", "org.h2.Driver");
        properties.setProperty("url", "jdbc:h2:mem:testdb");
        properties.setProperty("username", "sa");
        return BasicDataSourceFactory.createDataSource(properties);
    }

    @Bean
    public PlatfORMTransactionManager transactionManager() throws Exception {
        return new DataSourceTransactionManager(dataSource());
    }

    private static void showBeans(ApplicationContext applicationContext) {
        System.out.println(Arrays.toString(applicationContext.getBeanDefinitionNames()));
    }

    private static void dataSourceDemo(ApplicationContext applicationContext) throws SQLException {
        DataSourceDemo demo = applicationContext.getBean("dataSourceDemo", DataSourceDemo.class);
        demo.showDataSource();
    }

    public void showDataSource() throws SQLException {
        System.out.println(dataSource.toString());
        Connection conn = dataSource.getConnection();
        System.out.println(conn.toString());
        conn.close();
    }
}
运行main方法:

可以看到可以实现和springboot一样的效果
当然上面是按需来配置的,如果我们在代码中已经配置了一个DataSource,SpringBoot不会再帮我们配置一个DataSource
在实际情况下,我们可能需要在应用中配置多个数据源,下篇文章我将介绍多个数据源的配置方式。
到此这篇关于Spring单数据源的配置详解的文章就介绍到这了,更多相关Spring单数据源的配置内容请搜索编程网以前的文章或继续浏览下面的相关文章希望大家以后多多支持编程网!
--结束END--
本文标题: Spring单数据源的配置详解
本文链接: https://lsjlt.com/news/133621.html(转载时请注明来源链接)
有问题或投稿请发送至: 邮箱/279061341@qq.com QQ/279061341
2024-03-01
2024-03-01
2024-03-01
2024-02-29
2024-02-29
2024-02-29
2024-02-29
2024-02-29
2024-02-29
2024-02-29
回答
回答
回答
回答
回答
回答
回答
回答
回答
回答
0